![SDL - 2025 New Logo.png]](https://help.getsdl.com/hs-fs/hubfs/SDL%20-%202025%20New%20Logo.png?height=40&name=SDL%20-%202025%20New%20Logo.png)
Inspection requests for permits, fire alarms, and other certificate applications can all be submitted through the Requests - Schedule Inspections wizard in SDL Portal. This guide covers the most common of these: Construction Inspection Requests, which follow a three-step process.
Step 1: Identify the Permit
- Search for your open permit using the Permit Number box. Once your permit application is accepted and the plan review is complete, you'll receive a Permit Number either in person or via email — enter it here. Note: A Portal Request number (e.g., PR-1234235346) is not the same as a Permit Number and won't work in this field.
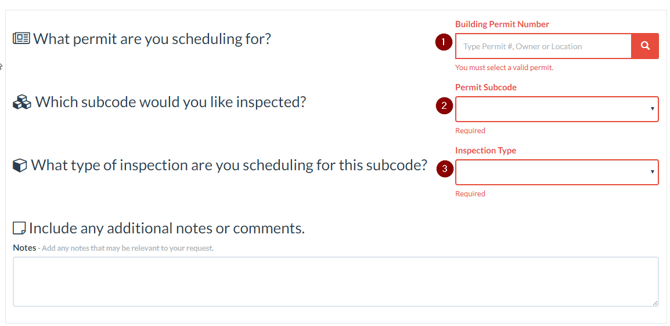
- As you type, Portal will suggest matching property records. You must click one of these suggestions rather than just typing the number — this keeps the record accurate. The field will turn from red to green once a valid match is selected. Grayed-out suggestions represent closed permits; select the open one you need.
- Choose the appropriate subcode from the list tied to your permit.
- Select an Inspection Type from the list. This list is set by your town, so if you're unsure which type applies, call the relevant department at town hall. If you select the wrong type, the town can correct it on their end, and you'll be notified by email.
Step 2: Choose Preferred Inspection Dates
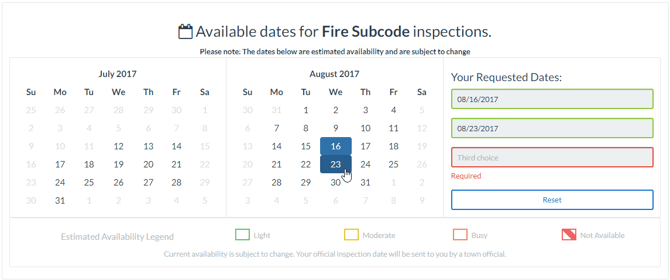
- Select three preferred dates using the calendar. Providing three gives you and the inspector flexibility to land on a workable date without needing to reschedule.
- Pay attention to the calendar's color coding: green-to-orange shading indicates how many inspections that subcode's inspector already has that day, while red-striped days mean the inspector is booked or unavailable.
Step 3: Submit Your Request
- Once all required fields are filled in (Permit Number, Subcode, Inspection Dates, and Notes if your town requires them), the Submit Request section becomes active.
- Review the summary of your request details.
- Click Send Request. This sends a Portal Request to your municipality, and you'll receive a confirmation email along with a PR (Portal Request) number. Note: The PR number is for tracking purposes only — it does not mean your inspection has been scheduled yet.
What Happens Next
- A town clerk will review your submission and schedule the inspection on the best of your three requested dates.
- You'll receive a second confirmation email once your inspection is officially accepted and scheduled. You can use these emails to correspond with your municipality if needed.
- The day before your inspection, you'll get a reminder email asking you to confirm you're ready, with one last chance to reschedule if needed.
- Review the inspection summary in that email, and click Confirm to lock in the date.