![SDL - 2025 New Logo.png]](https://help.getsdl.com/hs-fs/hubfs/SDL%20-%202025%20New%20Logo.png?height=40&name=SDL%20-%202025%20New%20Logo.png)
This guide covers the key differences between the GeoClient you’re used to and the SDL Hosting environment you’ll be using, including initial login and MFA setup, printing, and file management. It is highly recommended for all new users to read through this guide, as it addresses common questions and intricacies new users encounter when moving over.
If you have any questions or have a hard time navigating through the new system, feel free to email support@getsdl.com.
Table of Contents:Quick Reference: Key Terms
- GeoClient: The old desktop application you used to connect to your files and programs before this migration.
- SDL Desktop: The application you now use day-to-day for the same tasks GeoClient used to handle.
- Parallels (SDL Hosting / Parallels Client): The program that connects your computer to the SDL Hosting servers. You sign into this first, before launching SDL Desktop.
- tsclient: The network drive that represents your local computer’s files while you’re working inside SDL Hosting; used for uploading and downloading files.
Initial Login
SDL Desktop is opened through a separate program called Parallels, instead of being launched directly like GeoClient was. Because of this, you’ll have two sets of credentials: your SDL Hosting account, which you use to sign into Parallels first, and your GeoClient (SDL Desktop) account, which only becomes available after you’ve signed into Parallels. Your GeoClient account credentials will remain the same as they were before the migration.
Parallels should be installed before the migration by your IT team, but a member of the SDL Support team can always assist in locating/installing it. Instructions on how to install the program can also be found here: https://help.getsdl.com/how-to-install-the-parallels-client-for-sdl-desktop
Before continuing below, you will need the temporary SDL Hosting password and your SDL Hosting account username, which will be provided by IT. If you do not have these yet, you will not be able to complete the following steps.
The first time you log into Parallels, you will need to do 2 things:
- Enroll on our password reset website
- This step is to allow you to reset your own SDL Hosting password without needing assistance from an SDL Support technician or an administrator in your organization, as this password will need to be changed every 90 days.
- Set up Multi-factor Authentication
- Each morning, you will need to enter a 6-digit authentication code to sign in. The Authenticator app can be installed on your smartphone; a guide on the whole process is available here: https://help.getsdl.com/how-to-set-up-and-use-multi-factor-authentication-mfa-for-sdl-desktop
Note for both items above, most of the steps completed are for setup purposes, meaning your normal day-to-day sign-in process will be:
1. Double-click on the SDL Desktop Icon
2. Enter your 6-digit authentication code
3. Click OK on the SDL Desktop login screen
Enroll: Password Reset
These instructions are placed on a separate article. Click here to view.
Enroll: Multi-Factor Authentication
The instructions for setting up Multi-factor Authentication (MFA) are reviewed in this guide: https://help.getsdl.com/how-to-set-up-and-use-multi-factor-authentication-mfa-for-sdl-desktop
In summary, the steps are:
- Install the Google Authenticator App on your smartphone
- Scan the QR Code displayed on your screen
- Click Next to continue with setup
- Enter the 6-digit code shown on the Authenticator app into the OTP (One-Time Password) field shown on your screen.
Once complete, your screen should look similar to the image below. You can double-click the SDL Desktop icon shown to open the program as normal.

Loading the Program
When you log in on your first day with SDL Hosting, all you will need to do is click this ‘SDL Desktop’ icon:

You may also notice either an SDL Hosting or Parallels Client icon on your desktop, but this can be ignored, as all this holds is your connection information to our servers, such as your credentials and some printing settings.
Printing
If you experience issues with printing from SDL Desktop on your first day, you may need to check some printer settings to ensure the connection is using your computer's preferences. You can check this via the SDL Hosting/Parallels client previously mentioned.
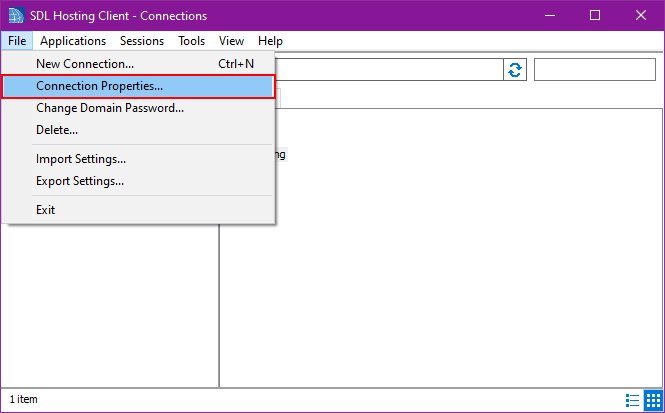
Once the SDL Hosting/Parallels client is open, select File, then Connection Properties:
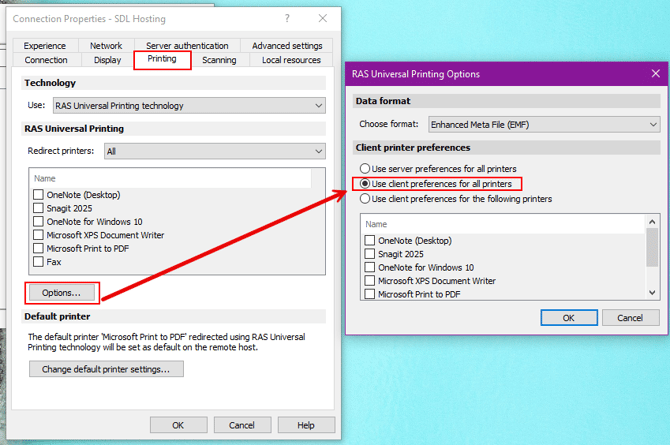
When in the next window, click on the Printing Tab, Options button, and ensure the Client Printer Preference area has the ‘Use client preferences for all printers’ radio button selected.
File Management
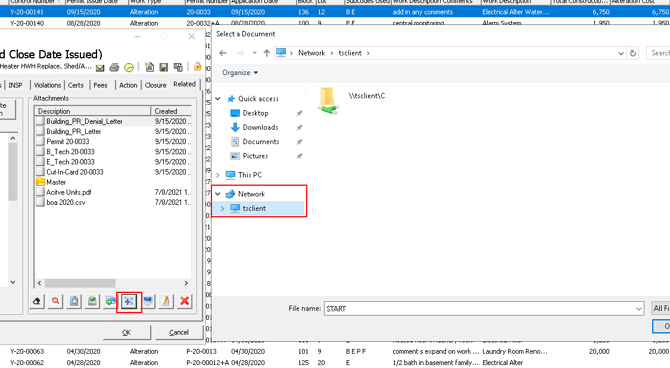
Since the program is no longer running on your local computer, our connection to the files on your computer will be in the shape of a network connection. It is called the ‘tsclient’.
A more straightforward way of uploading files is to Drag + Drop them into the Attachment areas of SDL. Simply open the file explorer on your machine, and drag + drop any file you’d like into these areas. This can also handle multiple files if needed.
The upload button in the attachment area will require some navigation. The tsclient network drive will allow you to navigate your files. If you have any mapped drives, they will also show up here. Note, the Quick Access buttons are not the ones for your machine; to unpin them, right-click the shortcut and select ‘Unpin from Quick Access’.
Once you’ve navigated to a folder, you can pin that folder to the quick access by right-clicking and selecting ‘Pin to Quick Access’.
If you are looking for your desktop, the common path for this is C:\Users\[Your User Folder]\Desktop