![SDL - 2025 New Logo.png]](https://help.getsdl.com/hs-fs/hubfs/SDL%20-%202025%20New%20Logo.png?height=40&name=SDL%20-%202025%20New%20Logo.png)
1. Log into the desired module in SDL Desktop
-png-1.png?width=670&height=503&name=1_800x600_z-undefined_mz-0-5_mi-1_ti-0_ar-1_cr-0_si-0_fr-0_tb-1_t-_ftc-_ftb-_mc-_mfc-_complete%20(4)-png-1.png)
2. Go to the Datagrid Tab
-png-1.png?width=670&height=503&name=2_800x600_z-undefined_mz-0-5_mi-1_ti-0_ar-1_cr-0_si-0_fr-0_tb-1_t-_ftc-_ftb-_mc-_mfc-_complete%20(4)-png-1.png)
3. Open up the Datagrid for the application you wish to create a prior approval request for.
-png-1.png?width=670&height=503&name=3_800x600_z-undefined_mz-0-5_mi-1_ti-0_ar-1_cr-0_si-0_fr-0_tb-1_t-_ftc-_ftb-_mc-_mfc-_complete%20(4)-png-1.png)
4. Open the Record that needs the prior approval.
-png-1.png?width=670&height=503&name=4_800x600_z-undefined_mz-0-5_mi-1_ti-0_ar-1_cr-0_si-0_fr-0_tb-1_t-_ftc-_ftb-_mc-_mfc-_complete%20(4)-png-1.png)
5. Go to the Approvals Section. The section may be labeled differently depending on which module you are in. Some are labeled Approvals or P Approvals. If you do not see an approvals tab, Prior Approvals may be on the related tab.
-png-1.png?width=670&height=503&name=5_800x600_z-undefined_mz-0-5_mi-1_ti-0_ar-1_cr-0_si-0_fr-0_tb-1_t-_ftc-_ftb-_mc-_mfc-_complete%20(4)-png-1.png)
6. Select the New button to create a new Prior Approval request. This screen may look differently in different applications. In our Construction example, you can specify whether your Prior Approval is for the permit or the certificate.
-png-1.png?width=670&height=503&name=6_800x600_z-undefined_mz-0-5_mi-1_ti-0_ar-1_cr-0_si-0_fr-0_tb-1_t-_ftc-_ftb-_mc-_mfc-_complete%20(4)-png-1.png)
7. To create a blank prior approval, make sure the option is set to Create Blank New Prior Approval and select OK
-png-1.png?width=670&height=503&name=7_800x600_z-undefined_mz-0-5_mi-1_ti-0_ar-1_cr-0_si-0_fr-0_tb-1_t-_ftc-_ftb-_mc-_mfc-_complete%20(4)-png-1.png)
8. To send your Prior Approval request to another SDL user, make sure GeoLogic User is selected.
-png-1.png?width=670&height=503&name=8_800x600_z-undefined_mz-0-5_mi-1_ti-0_ar-1_cr-0_si-0_fr-0_tb-1_t-_ftc-_ftb-_mc-_mfc-_complete%20(4)-png-1.png)
9. Select the Department who will need to approve your request from the dropdown.
-png-1.png?width=670&height=503&name=9_800x600_z-undefined_mz-0-5_mi-1_ti-0_ar-1_cr-0_si-0_fr-0_tb-1_t-_ftc-_ftb-_mc-_mfc-_complete%20(4)-png-1.png)
10. Select the User who will need to approve your request from the next drop down.
-png-1.png?width=670&height=503&name=10_800x600_z-undefined_mz-0-5_mi-1_ti-0_ar-1_cr-0_si-0_fr-0_tb-1_t-_ftc-_ftb-_mc-_mfc-_complete%20(4)-png-1.png)
11. If you click Add User Email the user's SDL account email address will populate and they will also receive an email with your prior approval request. All Prior Approval Requests will still display on the requested user's SDL Home Page.
-png-1.png?width=670&height=503&name=11_800x600_z-undefined_mz-0-5_mi-1_ti-0_ar-1_cr-0_si-0_fr-0_tb-1_t-_ftc-_ftb-_mc-_mfc-_complete%20(4)-png-1.png)
12. If you click Add Your Email, you will also receive an emailed copy of the Prior Approval Request.
-png-1.png?width=670&height=503&name=12_800x600_z-undefined_mz-0-5_mi-1_ti-0_ar-1_cr-0_si-0_fr-0_tb-1_t-_ftc-_ftb-_mc-_mfc-_complete%20(4)-png-1.png)
13. Click over to the Action tab.
-png-1.png?width=670&height=503&name=13_800x600_z-undefined_mz-0-5_mi-1_ti-0_ar-1_cr-0_si-0_fr-0_tb-1_t-_ftc-_ftb-_mc-_mfc-_complete%20(4)-png-1.png)
14. The Title of the Prior Approval will populate from your record. Select the Prior Approval type from the dropdown.
-png.png?width=670&height=503&name=14_800x600_z-undefined_mz-0-5_mi-1_ti-0_ar-1_cr-0_si-0_fr-0_tb-1_t-_ftc-_ftb-_mc-_mfc-_complete%20(4)-png.png)
15. If you would like to designate how many days you will need the response in, put that number in the box provided.
-png.png?width=670&height=503&name=15_800x600_z-undefined_mz-0-5_mi-1_ti-0_ar-1_cr-0_si-0_fr-0_tb-1_t-_ftc-_ftb-_mc-_mfc-_complete%20(3)-png.png)
16. Use the Comments box to provide the details of your prior approval request.
*Note: details from your application may populate in the comments box as well.
-png.png?width=670&height=503&name=16_800x600_z-undefined_mz-0-5_mi-1_ti-0_ar-1_cr-0_si-0_fr-0_tb-1_t-_ftc-_ftb-_mc-_mfc-_complete%20(2)-png.png)
17. Click Send Initial Email to prompt the email copy be sent to all addresses on the Send To tab.
-png.png?width=670&height=503&name=17_800x600_z-undefined_mz-0-5_mi-1_ti-0_ar-1_cr-0_si-0_fr-0_tb-1_t-_ftc-_ftb-_mc-_mfc-_complete%20(2)-png.png)
18. The Location Tab will show the location of the application.
-png.png?width=670&height=503&name=18_800x600_z-undefined_mz-0-5_mi-1_ti-0_ar-1_cr-0_si-0_fr-0_tb-1_t-_ftc-_ftb-_mc-_mfc-_complete%20(2)-png.png)
19. The Prior Approval Request Recipient will be able to use the Attachments tab to attach any needed documents.
-png-1.png?width=670&height=503&name=19_800x600_z-undefined_mz-0-5_mi-1_ti-0_ar-1_cr-0_si-0_fr-0_tb-1_t-_ftc-_ftb-_mc-_mfc-_complete%20(1)-png-1.png)
20. Click OK to save, close, and send your Prior Approval request.
-png-1.png?width=670&height=503&name=20_800x600_z-undefined_mz-0-5_mi-1_ti-0_ar-1_cr-0_si-0_fr-0_tb-1_t-_ftc-_ftb-_mc-_mfc-_complete%20(1)-png-1.png)
21. The prior approval request that you have created will now display in the Prior Approvals section.
-png-1.png?width=670&height=503&name=21_800x600_z-undefined_mz-0-5_mi-1_ti-0_ar-1_cr-0_si-0_fr-0_tb-1_t-_ftc-_ftb-_mc-_mfc-_complete%20(1)-png-1.png)
22. You will see that the Prior Approval Action status is currently In Progress, meaning the recipient has not yet completed the request.
-png-1.png?width=670&height=503&name=22_800x600_z-undefined_mz-0-5_mi-1_ti-0_ar-1_cr-0_si-0_fr-0_tb-1_t-_ftc-_ftb-_mc-_mfc-_complete%20(1)-png-1.png)
Prior Approval Templates
23. Next we will review creating a Prior Approval Template. Start by selecting New again.
-png-1.png?width=670&height=503&name=23_800x600_z-undefined_mz-0-5_mi-1_ti-0_ar-1_cr-0_si-0_fr-0_tb-1_t-_ftc-_ftb-_mc-_mfc-_complete%20(1)-png-1.png)
24. Click the Blue Folder to create a new Template for Prior Approvals. These can be used if you frequently send out the same kind of Prior Approval Request.
-png-1.png?width=670&height=503&name=24_800x600_z-undefined_mz-0-5_mi-1_ti-0_ar-1_cr-0_si-0_fr-0_tb-1_t-_ftc-_ftb-_mc-_mfc-_complete%20(1)-png-1.png)
25. Select the Department for the Prior Approval from the drop down.
-png-1.png?width=670&height=503&name=25_800x600_z-undefined_mz-0-5_mi-1_ti-0_ar-1_cr-0_si-0_fr-0_tb-1_t-_ftc-_ftb-_mc-_mfc-_complete%20(1)-png-1.png)
26. Select the SDL user to respond to the Prior Approval Request from the drop down.
-png-1.png?width=670&height=503&name=26_800x600_z-undefined_mz-0-5_mi-1_ti-0_ar-1_cr-0_si-0_fr-0_tb-1_t-_ftc-_ftb-_mc-_mfc-_complete%20(1)-png-1.png)
27. You can also set the email addresses, as we did in the Blank Prior Approval.
-png-1.png?width=670&height=503&name=27_800x600_z-undefined_mz-0-5_mi-1_ti-0_ar-1_cr-0_si-0_fr-0_tb-1_t-_ftc-_ftb-_mc-_mfc-_complete%20(1)-png-1.png)
28. Name your template.
-png-1.png?width=670&height=503&name=28_800x600_z-undefined_mz-0-5_mi-1_ti-0_ar-1_cr-0_si-0_fr-0_tb-1_t-_ftc-_ftb-_mc-_mfc-_complete%20(1)-png-1.png)
29. Click the Action tab.
-png-1.png?width=670&height=503&name=29_800x600_z-undefined_mz-0-5_mi-1_ti-0_ar-1_cr-0_si-0_fr-0_tb-1_t-_ftc-_ftb-_mc-_mfc-_complete%20(1)-png-1.png)
30. Set the Title of the Prior Approval that your recipient will receive.
-png-1.png?width=670&height=503&name=30_800x600_z-undefined_mz-0-5_mi-1_ti-0_ar-1_cr-0_si-0_fr-0_tb-1_t-_ftc-_ftb-_mc-_mfc-_complete%20(1)-png-1.png)
31. Select the Prior Approval Type from the drop down.
-png-1.png?width=670&height=503&name=31_800x600_z-undefined_mz-0-5_mi-1_ti-0_ar-1_cr-0_si-0_fr-0_tb-1_t-_ftc-_ftb-_mc-_mfc-_complete%20(1)-png-1.png)
32. If you want to set the days required for a response in the template, use the space provided.
-png.png?width=670&height=503&name=32_800x600_z-undefined_mz-0-5_mi-1_ti-0_ar-1_cr-0_si-0_fr-0_tb-1_t-_ftc-_ftb-_mc-_mfc-_complete%20(1)-png.png)
33. If you request will always be the same for this template, use the Comments section to fill in the details of your request.
*Note: you can add additional text later on if needed, when you create a new Prior Approval from this template.
-png.png?width=670&height=503&name=33_800x600_z-undefined_mz-0-5_mi-1_ti-0_ar-1_cr-0_si-0_fr-0_tb-1_t-_ftc-_ftb-_mc-_mfc-_complete%20(1)-png.png)
34. Select Send Initial Email if you would like to default that initial emails are sent for this prior approval template. Emails will be sent to the addresses included on your Sent To tab.
-png.png?width=670&height=503&name=34_800x600_z-undefined_mz-0-5_mi-1_ti-0_ar-1_cr-0_si-0_fr-0_tb-1_t-_ftc-_ftb-_mc-_mfc-_complete%20(1)-png.png)
35. Click OK to create your template.
-png.png?width=670&height=503&name=35_800x600_z-undefined_mz-0-5_mi-1_ti-0_ar-1_cr-0_si-0_fr-0_tb-1_t-_ftc-_ftb-_mc-_mfc-_complete%20(1)-png.png)
36. Your new Template will now be available to select when creating a new Prior Approval.
-png.png?width=670&height=503&name=36_800x600_z-undefined_mz-0-5_mi-1_ti-0_ar-1_cr-0_si-0_fr-0_tb-1_t-_ftc-_ftb-_mc-_mfc-_complete%20(1)-png.png)
37. To create a Prior Approval request from your template, select the Create New Prior Approval from selected Template button, highlight the template you would like to use, and click OK.
-png.png?width=670&height=503&name=37_800x600_z-undefined_mz-0-5_mi-1_ti-0_ar-1_cr-0_si-0_fr-0_tb-1_t-_ftc-_ftb-_mc-_mfc-_complete%20(1)-png.png)
38. When you create a prior approval from a template, your saved settings will already be included.
-png.png?width=670&height=503&name=38_800x600_z-undefined_mz-0-5_mi-1_ti-0_ar-1_cr-0_si-0_fr-0_tb-1_t-_ftc-_ftb-_mc-_mfc-_complete%20(1)-png.png)
39. When you create a prior approval from a template, you will automatically be brought to the Action tab. You can add additional details to the Comments Section if needed.
-png.png?width=670&height=503&name=39_800x600_z-undefined_mz-0-5_mi-1_ti-0_ar-1_cr-0_si-0_fr-0_tb-1_t-_ftc-_ftb-_mc-_mfc-_complete%20(1)-png.png)
40. Click OK to save, send, and close out the prior approval created from your template.
-png.png?width=670&height=503&name=40_800x600_z-undefined_mz-0-5_mi-1_ti-0_ar-1_cr-0_si-0_fr-0_tb-1_t-_ftc-_ftb-_mc-_mfc-_complete%20(1)-png.png)
41. You will see all of your Prior Approvals and their statuses in the section on your Prior Approval Tab.
-png.png?width=670&height=503&name=41_800x600_z-undefined_mz-0-5_mi-1_ti-0_ar-1_cr-0_si-0_fr-0_tb-1_t-_ftc-_ftb-_mc-_mfc-_complete%20(1)-png.png)
42. When you close your permit application record, you will receive the notification that your prior approvals have not been completed yet.
-png.png?width=670&height=503&name=42_800x600_z-undefined_mz-0-5_mi-1_ti-0_ar-1_cr-0_si-0_fr-0_tb-1_t-_ftc-_ftb-_mc-_mfc-_complete%20(1)-png.png)
43. After your recipient has completed the prior approval request, you will see the action status has changed to Approved
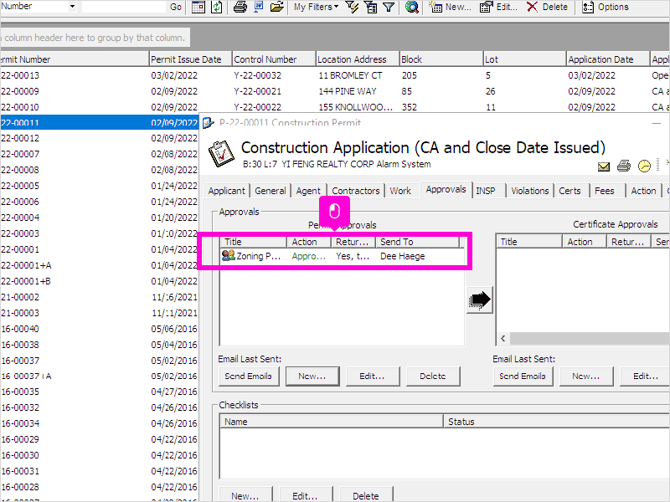
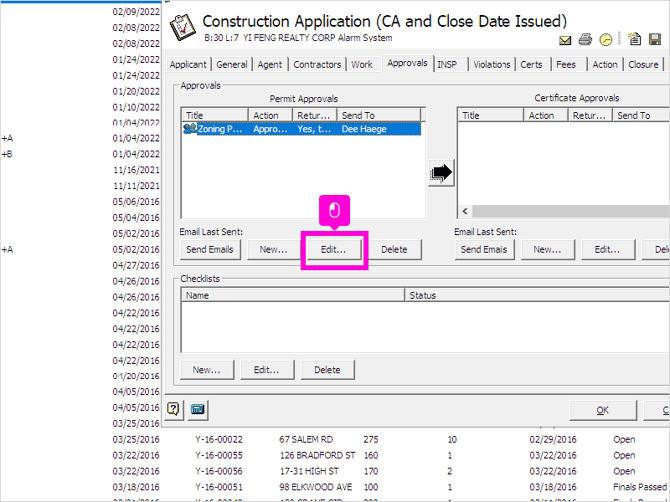
44. Highlight the prior approval and click Edit to view the response details.
45. You will be able to view the Status and Return Comments provided by the recipient of your prior approval request.
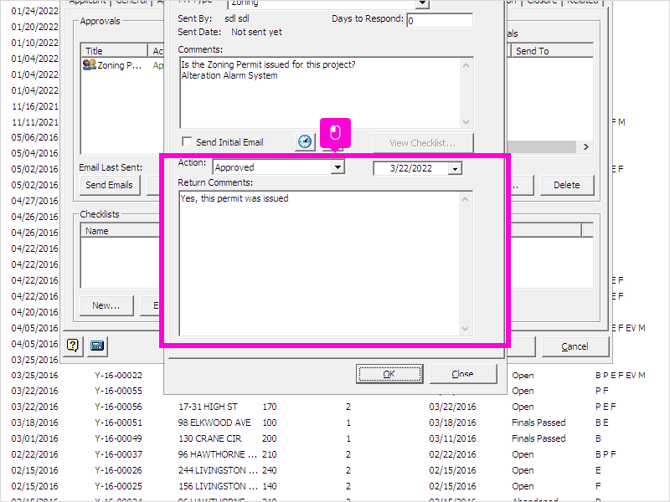
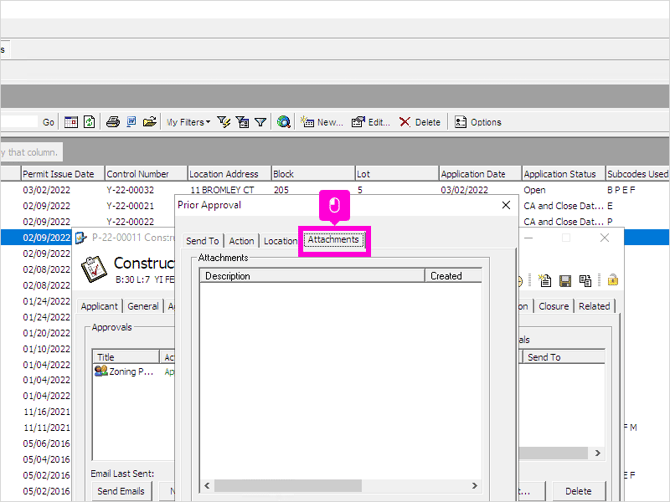
46. If the prior approval recipient has included any attachments, you will be able to find them on the Attachments tab.
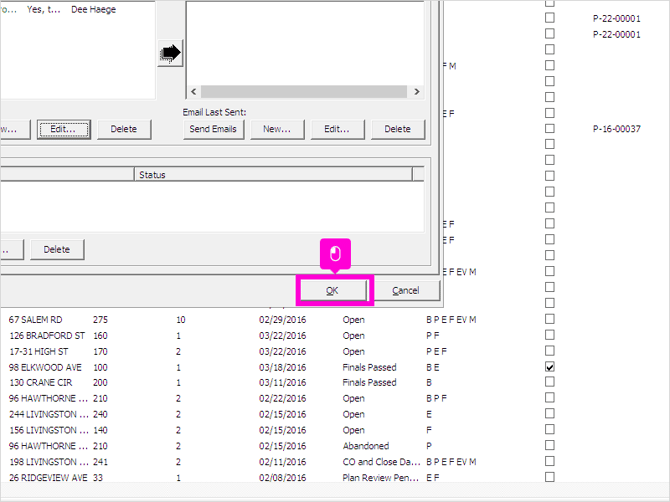
47. Click OK to close out the prior approval.
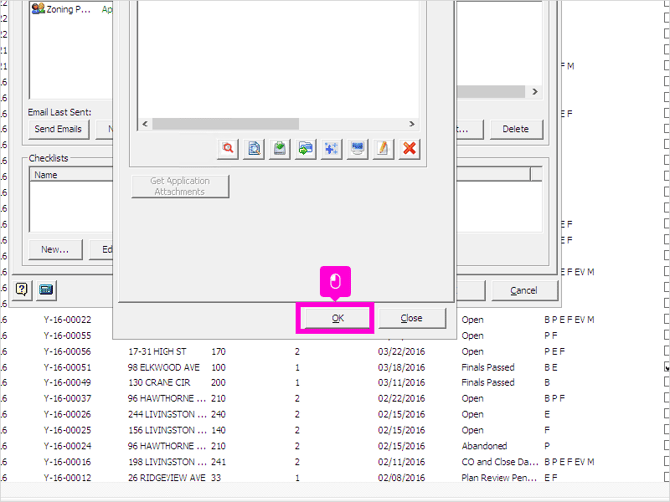
48. You can click OK to close out the permit record.