![SDL - 2025 New Logo.png]](https://help.getsdl.com/hs-fs/hubfs/SDL%20-%202025%20New%20Logo.png?height=40&name=SDL%20-%202025%20New%20Logo.png)
1. First, open SDL Desktop.
-png.png?width=670&height=503&name=1_800x600_z-undefined_mz-0-5_mi-1_ti-0_ar-1_cr-0_si-0_fr-0_tb-1_t-_ftc-_ftb-_mc-_mfc-_complete%20(4)-png.png)
2. Click Tools
-png.png?width=670&height=503&name=2_800x600_z-undefined_mz-0-5_mi-1_ti-0_ar-1_cr-0_si-0_fr-0_tb-1_t-_ftc-_ftb-_mc-_mfc-_complete%20(4)-png.png)
3. Click Options
-png.png?width=670&height=503&name=3_800x600_z-undefined_mz-0-5_mi-1_ti-0_ar-1_cr-0_si-0_fr-0_tb-1_t-_ftc-_ftb-_mc-_mfc-_complete%20(4)-png.png)
4. Click the Checklists tab
-png.png?width=670&height=503&name=4_800x600_z-undefined_mz-0-5_mi-1_ti-0_ar-1_cr-0_si-0_fr-0_tb-1_t-_ftc-_ftb-_mc-_mfc-_complete%20(4)-png.png)
5. The Available Checklists window will show you the checklists created for every module.
-png.png?width=670&height=503&name=5_800x600_z-undefined_mz-0-5_mi-1_ti-0_ar-1_cr-0_si-0_fr-0_tb-1_t-_ftc-_ftb-_mc-_mfc-_complete%20(4)-png.png)
6. Hit Add to create a new checklist.
-png.png?width=670&height=503&name=6_800x600_z-undefined_mz-0-5_mi-1_ti-0_ar-1_cr-0_si-0_fr-0_tb-1_t-_ftc-_ftb-_mc-_mfc-_complete%20(4)-png.png)
7. Use the Title field to add a title for the checklist (remember these will be available from any module).
-png.png?width=670&height=503&name=7_800x600_z-undefined_mz-0-5_mi-1_ti-0_ar-1_cr-0_si-0_fr-0_tb-1_t-_ftc-_ftb-_mc-_mfc-_complete%20(4)-png.png)
8. Use the Subtitle field to add a subtitle.
-png.png?width=670&height=503&name=8_800x600_z-undefined_mz-0-5_mi-1_ti-0_ar-1_cr-0_si-0_fr-0_tb-1_t-_ftc-_ftb-_mc-_mfc-_complete%20(4)-png.png)
9. The Checkbox Header is used to add labels to the two columns of the checklist
-png.png?width=670&height=503&name=9_800x600_z-undefined_mz-0-5_mi-1_ti-0_ar-1_cr-0_si-0_fr-0_tb-1_t-_ftc-_ftb-_mc-_mfc-_complete%20(4)-png.png)
10. Separate the two column labels with a /
-png.png?width=670&height=503&name=10_800x600_z-undefined_mz-0-5_mi-1_ti-0_ar-1_cr-0_si-0_fr-0_tb-1_t-_ftc-_ftb-_mc-_mfc-_complete%20(4)-png.png)
11. Highlight the first item in the checklist
-png.png?width=670&height=503&name=11_800x600_z-undefined_mz-0-5_mi-1_ti-0_ar-1_cr-0_si-0_fr-0_tb-1_t-_ftc-_ftb-_mc-_mfc-_complete%20(4)-png.png)
12. Hit Edit to change the name of the checklist title.
-png.png?width=670&height=503&name=12_800x600_z-undefined_mz-0-5_mi-1_ti-0_ar-1_cr-0_si-0_fr-0_tb-1_t-_ftc-_ftb-_mc-_mfc-_complete%20(4)-png.png)
13. Hit OK to save
-png.png?width=670&height=503&name=13_800x600_z-undefined_mz-0-5_mi-1_ti-0_ar-1_cr-0_si-0_fr-0_tb-1_t-_ftc-_ftb-_mc-_mfc-_complete%20(4)-png.png)
14. Next, hit Add to create a sub-title under your checklist title. Subtitles can be used to organize your checklist into categories, room types, etc.
-png.png?width=670&height=503&name=14_800x600_z-undefined_mz-0-5_mi-1_ti-0_ar-1_cr-0_si-0_fr-0_tb-1_t-_ftc-_ftb-_mc-_mfc-_complete%20(3)-png.png)
15. Rename the sub-title and hit OK to save
-png.png?width=670&height=503&name=15_800x600_z-undefined_mz-0-5_mi-1_ti-0_ar-1_cr-0_si-0_fr-0_tb-1_t-_ftc-_ftb-_mc-_mfc-_complete%20(2)-png.png)
16. Hit Add to create checklist items under the sub-title
-png-1.png?width=670&height=503&name=16_800x600_z-undefined_mz-0-5_mi-1_ti-0_ar-1_cr-0_si-0_fr-0_tb-1_t-_ftc-_ftb-_mc-_mfc-_complete%20(1)-png-1.png)
17. Name the checklist item and hit OK to save
-png-1.png?width=670&height=503&name=17_800x600_z-undefined_mz-0-5_mi-1_ti-0_ar-1_cr-0_si-0_fr-0_tb-1_t-_ftc-_ftb-_mc-_mfc-_complete%20(1)-png-1.png)
18. As you add more items, highlight the title or sub-title that you would like your new items added under. (For example, if you would like to add a checklist item under the sub-title "Living Room" highlight Living Room first).
-png-1.png?width=670&height=503&name=18_800x600_z-undefined_mz-0-5_mi-1_ti-0_ar-1_cr-0_si-0_fr-0_tb-1_t-_ftc-_ftb-_mc-_mfc-_complete%20(1)-png-1.png)
19. Hit Add
-png.png?width=670&height=503&name=19_800x600_z-undefined_mz-0-5_mi-1_ti-0_ar-1_cr-0_si-0_fr-0_tb-1_t-_ftc-_ftb-_mc-_mfc-_complete%20(2)-png.png)
20. Do this for each item you would like added underneath the sub-title.
-png.png?width=670&height=503&name=20_800x600_z-undefined_mz-0-5_mi-1_ti-0_ar-1_cr-0_si-0_fr-0_tb-1_t-_ftc-_ftb-_mc-_mfc-_complete%20(2)-png.png)
20b. Click OK.
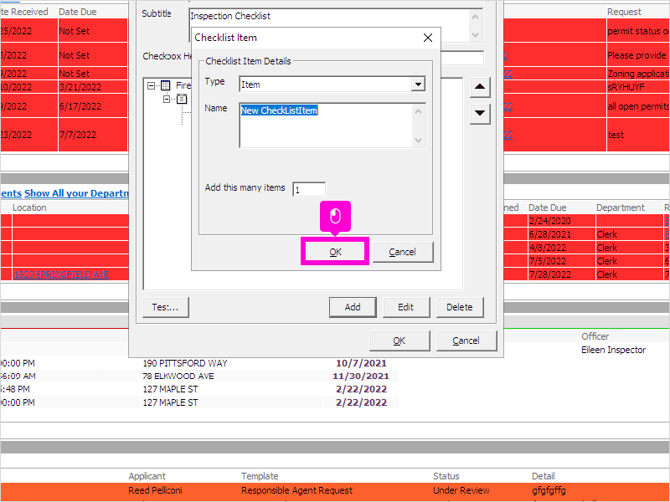
21. To add a new sub-title, highlight the title
-png.png?width=670&height=503&name=21_800x600_z-undefined_mz-0-5_mi-1_ti-0_ar-1_cr-0_si-0_fr-0_tb-1_t-_ftc-_ftb-_mc-_mfc-_complete%20(2)-png.png)
22. Hit Add
-png.png?width=670&height=503&name=22_800x600_z-undefined_mz-0-5_mi-1_ti-0_ar-1_cr-0_si-0_fr-0_tb-1_t-_ftc-_ftb-_mc-_mfc-_complete%20(2)-png.png)
23. Rename your new Sub-title
-png.png?width=670&height=503&name=23_800x600_z-undefined_mz-0-5_mi-1_ti-0_ar-1_cr-0_si-0_fr-0_tb-1_t-_ftc-_ftb-_mc-_mfc-_complete%20(2)-png.png)
24. Continue adding as many sub-titles you would like, highlighting the main title before hitting Add each time.
-png.png?width=670&height=503&name=24_800x600_z-undefined_mz-0-5_mi-1_ti-0_ar-1_cr-0_si-0_fr-0_tb-1_t-_ftc-_ftb-_mc-_mfc-_complete%20(2)-png.png)
25. To continue adding items in each sub-title's section, highlight the sub-title you would like the items to appear under, before hitting Add.
-png.png?width=670&height=503&name=25_800x600_z-undefined_mz-0-5_mi-1_ti-0_ar-1_cr-0_si-0_fr-0_tb-1_t-_ftc-_ftb-_mc-_mfc-_complete%20(2)-png.png)
26. You can create as many items as you need to each sub-title section.
-png.png?width=670&height=503&name=26_800x600_z-undefined_mz-0-5_mi-1_ti-0_ar-1_cr-0_si-0_fr-0_tb-1_t-_ftc-_ftb-_mc-_mfc-_complete%20(2)-png.png)
27. After you have added all of your checklist sub-titles and checklist items, you can hit Test to preview your checklist.
-png.png?width=670&height=503&name=27_800x600_z-undefined_mz-0-5_mi-1_ti-0_ar-1_cr-0_si-0_fr-0_tb-1_t-_ftc-_ftb-_mc-_mfc-_complete%20(2)-png.png)
28. This is how your checklist will appear in SDL Desktop.
-png.png?width=670&height=503&name=28_800x600_z-undefined_mz-0-5_mi-1_ti-0_ar-1_cr-0_si-0_fr-0_tb-1_t-_ftc-_ftb-_mc-_mfc-_complete%20(1)-png.png)
29. You can close out of the inspection preview.
-png.png?width=670&height=503&name=29_800x600_z-undefined_mz-0-5_mi-1_ti-0_ar-1_cr-0_si-0_fr-0_tb-1_t-_ftc-_ftb-_mc-_mfc-_complete%20(1)-png.png)
30. Click OK when you are done with your checklist to save and close.
-png.png?width=670&height=503&name=30_800x600_z-undefined_mz-0-5_mi-1_ti-0_ar-1_cr-0_si-0_fr-0_tb-1_t-_ftc-_ftb-_mc-_mfc-_complete%20(1)-png.png)
31. You will now see your new checklist added to the list of Available Checklists
-png.png?width=670&height=503&name=31_800x600_z-undefined_mz-0-5_mi-1_ti-0_ar-1_cr-0_si-0_fr-0_tb-1_t-_ftc-_ftb-_mc-_mfc-_complete%20(1)-png.png)
32. You will need to log out and log back in, in order to be able to add your checklist to an inspection.