![SDL - 2025 New Logo.png]](https://help.getsdl.com/hs-fs/hubfs/SDL%20-%202025%20New%20Logo.png?height=40&name=SDL%20-%202025%20New%20Logo.png)
1. Go to sdlportal.com. You can get there from the link on your SDL Desktop homepage or from any internet browser. Log in with your SDL Desktop username and password. Check the box indicating you're a municipal employee and search for your town.
-png.png?width=670&height=503&name=1_800x600_z-undefined_mz-0-5_mi-1_ti-0_ar-1_cr-0_si-0_fr-0_tb-1_t-_ftc-_ftb-_mc-_mfc-_complete%20(7)-png.png)
2. You will be automatically brought to your municipality's homepage.
Click the account menu button in the upper right hand corner.
-png.png?width=670&height=503&name=2_800x600_z-undefined_mz-0-5_mi-1_ti-0_ar-1_cr-0_si-0_fr-0_tb-1_t-_ftc-_ftb-_mc-_mfc-_complete%20(7)-png.png)
3. Click Town Admin
-png.png?width=670&height=503&name=3_800x600_z-undefined_mz-0-5_mi-1_ti-0_ar-1_cr-0_si-0_fr-0_tb-1_t-_ftc-_ftb-_mc-_mfc-_complete%20(7)-png.png)
4. Click Web Requests
-png.png?width=670&height=503&name=4_800x600_z-undefined_mz-0-5_mi-1_ti-0_ar-1_cr-0_si-0_fr-0_tb-1_t-_ftc-_ftb-_mc-_mfc-_complete%20(7)-png.png)
5. Click Pet License Registration. The number next to Pet Licensing Registration indicates how many pet types you have syncing from your SDL Desktop.
-png.png?width=670&height=503&name=5_800x600_z-undefined_mz-0-5_mi-1_ti-0_ar-1_cr-0_si-0_fr-0_tb-1_t-_ftc-_ftb-_mc-_mfc-_complete%20(7)-png.png)
6. You will be brought to the Request Settings tab. These settings will apply for all of your Pet Types.
-png.png?width=670&height=503&name=6_800x600_z-undefined_mz-0-5_mi-1_ti-0_ar-1_cr-0_si-0_fr-0_tb-1_t-_ftc-_ftb-_mc-_mfc-_complete%20(7)-png.png)
7. The Allow SDL Geologic Users Access check will turn this request on internally, for town users to test and work with.
-png.png?width=670&height=503&name=7_800x600_z-undefined_mz-0-5_mi-1_ti-0_ar-1_cr-0_si-0_fr-0_tb-1_t-_ftc-_ftb-_mc-_mfc-_complete%20(7)-png.png)
8. Public Account Access settings are turned on when you're ready to go live for the public. Allow Account Access turns the request on for users with an SDL Portal account. Require Account Verification would also require phone number verification.
-png.png?width=670&height=503&name=8_800x600_z-undefined_mz-0-5_mi-1_ti-0_ar-1_cr-0_si-0_fr-0_tb-1_t-_ftc-_ftb-_mc-_mfc-_complete%20(7)-png.png)
9. If you wish to receive BCC emails of each submission, you can enter those email addresses in here. Multiple email addresses are separated with a comma.
-png.png?width=670&height=503&name=9_800x600_z-undefined_mz-0-5_mi-1_ti-0_ar-1_cr-0_si-0_fr-0_tb-1_t-_ftc-_ftb-_mc-_mfc-_complete%20(7)-png.png)
10. Click Display on Home Page to create a link to start the Pet Licensing Request on the SDL Portal home page.
Click Display on Requests Page to create a link to start the Pet Licensing Request on the SDL Portal Requests tab in the header menu.
-png.png?width=670&height=503&name=10_800x600_z-undefined_mz-0-5_mi-1_ti-0_ar-1_cr-0_si-0_fr-0_tb-1_t-_ftc-_ftb-_mc-_mfc-_complete%20(7)-png.png)
11. Pet License Registration is the default title of this request. By typing over this in the Request Custom Label box, you can rename the request.
-png.png?width=670&height=503&name=11_800x600_z-undefined_mz-0-5_mi-1_ti-0_ar-1_cr-0_si-0_fr-0_tb-1_t-_ftc-_ftb-_mc-_mfc-_complete%20(7)-png.png)
12. You can also edit our default text for the Request Button Text, that is selected to start the application from the Requests page.
-png.png?width=670&height=503&name=12_800x600_z-undefined_mz-0-5_mi-1_ti-0_ar-1_cr-0_si-0_fr-0_tb-1_t-_ftc-_ftb-_mc-_mfc-_complete%20(7)-png.png)
13. You can edit our default Description text. This description will also show up on the Requests page, before the applicant starts the request.
-png.png?width=670&height=503&name=13_800x600_z-undefined_mz-0-5_mi-1_ti-0_ar-1_cr-0_si-0_fr-0_tb-1_t-_ftc-_ftb-_mc-_mfc-_complete%20(7)-png.png)
14. Next you'll find Custom Submit Description. This will display at the end of the web request, after the applicant has completed all required fields, but before they hit submit. You can write over our default here as well.
-png.png?width=670&height=503&name=14_800x600_z-undefined_mz-0-5_mi-1_ti-0_ar-1_cr-0_si-0_fr-0_tb-1_t-_ftc-_ftb-_mc-_mfc-_complete%20(7)-png.png)
15. If your town is set up with MuniciPAY, you also have the option to require applicants make an online payment when they submit their request. If you would like to enable this setting please contact SDL Support or your Customer Success Account Rep.
-png.png?width=670&height=503&name=15_800x600_z-undefined_mz-0-5_mi-1_ti-0_ar-1_cr-0_si-0_fr-0_tb-1_t-_ftc-_ftb-_mc-_mfc-_complete%20(6)-png.png)
16. Select Display alternative vaccination provider option in Pet License request if you would like to allow applicants to opt out of including veterinarian information, in the case of obtaining vaccinations from another source or town vaccine event.
-png.png?width=670&height=503&name=16_800x600_z-undefined_mz-0-5_mi-1_ti-0_ar-1_cr-0_si-0_fr-0_tb-1_t-_ftc-_ftb-_mc-_mfc-_complete%20(5)-png.png)
17. You can also edit the description for this setting, if enabled, with the field for Custom Alternate Provider Text
-png.png?width=670&height=503&name=17_800x600_z-undefined_mz-0-5_mi-1_ti-0_ar-1_cr-0_si-0_fr-0_tb-1_t-_ftc-_ftb-_mc-_mfc-_complete%20(5)-png.png)
18. Select Allow pet search to display for user. This will enable applicants submitting renewal requests to search for their pet using last license number, or pet name and address. This will tie this renewal request to an existing pet.
-png.png?width=670&height=503&name=18_800x600_z-undefined_mz-0-5_mi-1_ti-0_ar-1_cr-0_si-0_fr-0_tb-1_t-_ftc-_ftb-_mc-_mfc-_complete%20(5)-png.png)
19. Scroll back to the top of the page and hit Save Settings.
-png.png?width=670&height=503&name=19_800x600_z-undefined_mz-0-5_mi-1_ti-0_ar-1_cr-0_si-0_fr-0_tb-1_t-_ftc-_ftb-_mc-_mfc-_complete%20(4)-png.png)
20. Next, click Manage Templates.
-png.png?width=670&height=503&name=20_800x600_z-undefined_mz-0-5_mi-1_ti-0_ar-1_cr-0_si-0_fr-0_tb-1_t-_ftc-_ftb-_mc-_mfc-_complete%20(4)-png.png)
21. The Manage Templates tab will display all the pet types you have syncing from the SDL Desktop, and will display their template status: Active, Inactive, or SDL Only.
-png.png?width=670&height=503&name=21_800x600_z-undefined_mz-0-5_mi-1_ti-0_ar-1_cr-0_si-0_fr-0_tb-1_t-_ftc-_ftb-_mc-_mfc-_complete%20(4)-png.png)
22. Click the Pet Type name to open additional settings for the template.
-png.png?width=670&height=503&name=22_800x600_z-undefined_mz-0-5_mi-1_ti-0_ar-1_cr-0_si-0_fr-0_tb-1_t-_ftc-_ftb-_mc-_mfc-_complete%20(4)-png.png)
23. Click SDL Access to turn the template on for internal/testing access by town users.
-png.png?width=670&height=503&name=23_800x600_z-undefined_mz-0-5_mi-1_ti-0_ar-1_cr-0_si-0_fr-0_tb-1_t-_ftc-_ftb-_mc-_mfc-_complete%20(4)-png.png)
24. Click Public Access when you are ready to turn the template on for the public. (Note if the Request is turned on for the public in the Request Settings tab, at least 1 template must be turned on for the public as well).
-png.png?width=670&height=503&name=24_800x600_z-undefined_mz-0-5_mi-1_ti-0_ar-1_cr-0_si-0_fr-0_tb-1_t-_ftc-_ftb-_mc-_mfc-_complete%20(4)-png.png)
25. If you'd like an email notification for this template's submissions only, you can enter your email address in the BCC Emails field.
If you have already entered your email in the BCC field on the Request Settings tab, you don't need to enter it here.
-png.png?width=670&height=503&name=25_800x600_z-undefined_mz-0-5_mi-1_ti-0_ar-1_cr-0_si-0_fr-0_tb-1_t-_ftc-_ftb-_mc-_mfc-_complete%20(4)-png.png)
26. You can enter a custom Description in the field provided. The description will display at the top of the application, when the applicant selects the pet type.
-png.png?width=670&height=503&name=26_800x600_z-undefined_mz-0-5_mi-1_ti-0_ar-1_cr-0_si-0_fr-0_tb-1_t-_ftc-_ftb-_mc-_mfc-_complete%20(3)-png.png)
27. Formatting options for the text include Bold, Italic, Underline, Bulleted Lists, Numbered Lists, external hyperlinking and text/background colors.
-png.png?width=670&height=503&name=27_800x600_z-undefined_mz-0-5_mi-1_ti-0_ar-1_cr-0_si-0_fr-0_tb-1_t-_ftc-_ftb-_mc-_mfc-_complete%20(3)-png.png)
28. There is also a box for custom instruction. The instructions have the same formatting options, and will also appear at the top of the application. Please note these instructions are for new licenses, not renewals.
-png.png?width=670&height=503&name=28_800x600_z-undefined_mz-0-5_mi-1_ti-0_ar-1_cr-0_si-0_fr-0_tb-1_t-_ftc-_ftb-_mc-_mfc-_complete%20(3)-png.png)
29. Under the section provided for new license instructions, is a text box for Pet Licensing Renewal Instructions. This field also provides the same formatting options and will appear at the top of the renewal application.
-png.png?width=670&height=503&name=29_800x600_z-undefined_mz-0-5_mi-1_ti-0_ar-1_cr-0_si-0_fr-0_tb-1_t-_ftc-_ftb-_mc-_mfc-_complete%20(3)-png.png)
30. The Attachment Settings section provides applicants with the ability to request general uploads from the applicant. You can check Allow Attachments to turn the field on, and Require Attachments to require a document be uploaded.
-png.png?width=670&height=503&name=30_800x600_z-undefined_mz-0-5_mi-1_ti-0_ar-1_cr-0_si-0_fr-0_tb-1_t-_ftc-_ftb-_mc-_mfc-_complete%20(3)-png.png)
31. There's also a section to provide Attachment Instructions, which contains the same formatting options. Note: there will be fields at the end of this form that allow you to name individual documents for upload, such as a Rabies Certification.
-png.png?width=670&height=503&name=31_800x600_z-undefined_mz-0-5_mi-1_ti-0_ar-1_cr-0_si-0_fr-0_tb-1_t-_ftc-_ftb-_mc-_mfc-_complete%20(3)-png.png)
32. Clicking Allow service animal options will give the applicant the option to indicate if their pet is a service animal. Note: this will remove their licensing fee.
-png.png?width=670&height=503&name=32_800x600_z-undefined_mz-0-5_mi-1_ti-0_ar-1_cr-0_si-0_fr-0_tb-1_t-_ftc-_ftb-_mc-_mfc-_complete%20(3)-png.png)
33. The default label for this field is service animal, but you can use the Service Animal Label if you wish to re-name it.
-png.png?width=670&height=503&name=33_800x600_z-undefined_mz-0-5_mi-1_ti-0_ar-1_cr-0_si-0_fr-0_tb-1_t-_ftc-_ftb-_mc-_mfc-_complete%20(3)-png.png)
34. The Service Animal Text is the text that will display next to the checkbox the applicant will use to indicate a service animal.
-png.png?width=670&height=503&name=34_800x600_z-undefined_mz-0-5_mi-1_ti-0_ar-1_cr-0_si-0_fr-0_tb-1_t-_ftc-_ftb-_mc-_mfc-_complete%20(3)-png.png)
35. The Pet Service Animal Messaging is for any additional custom messaging you would like to include with that field.
-png.png?width=670&height=503&name=35_800x600_z-undefined_mz-0-5_mi-1_ti-0_ar-1_cr-0_si-0_fr-0_tb-1_t-_ftc-_ftb-_mc-_mfc-_complete%20(4)-png.png)
36. Check Include file uploads, rabies exp and vet or location change options for renewal pets in order to allow applicants to upload documents, such as rabies vaccination records, for their pet license renewals.
-png.png?width=670&height=503&name=36_800x600_z-undefined_mz-0-5_mi-1_ti-0_ar-1_cr-0_si-0_fr-0_tb-1_t-_ftc-_ftb-_mc-_mfc-_complete%20(3)-png.png)
37. Three additional fields that will be provided on the application are Pet Color, Pet Hair, and Pet Size. These will always be displayed, but you can choose to require those fields be completed by checking the respective boxes.
-png.png?width=670&height=503&name=37_800x600_z-undefined_mz-0-5_mi-1_ti-0_ar-1_cr-0_si-0_fr-0_tb-1_t-_ftc-_ftb-_mc-_mfc-_complete%20(3)-png.png)
38. The Document and Form Settings section is where you can request specific documents be uploaded and/or downloaded.
-png.png?width=670&height=503&name=38_800x600_z-undefined_mz-0-5_mi-1_ti-0_ar-1_cr-0_si-0_fr-0_tb-1_t-_ftc-_ftb-_mc-_mfc-_complete%20(3)-png.png)
39. Use the Document Name field to name the document you would like uploaded/downloaded.
-png.png?width=670&height=503&name=39_800x600_z-undefined_mz-0-5_mi-1_ti-0_ar-1_cr-0_si-0_fr-0_tb-1_t-_ftc-_ftb-_mc-_mfc-_complete%20(3)-png.png)
40. Use the Description field to add a description of the document.
-png.png?width=670&height=503&name=40_800x600_z-undefined_mz-0-5_mi-1_ti-0_ar-1_cr-0_si-0_fr-0_tb-1_t-_ftc-_ftb-_mc-_mfc-_complete%20(3)-png.png)
41. Use the Instructions field to add any document instructions.
-png.png?width=670&height=503&name=41_800x600_z-undefined_mz-0-5_mi-1_ti-0_ar-1_cr-0_si-0_fr-0_tb-1_t-_ftc-_ftb-_mc-_mfc-_complete%20(3)-png.png)
42. If this is a document you want to require they download, paste the PDF URL in this field.
-png.png?width=670&height=503&name=42_800x600_z-undefined_mz-0-5_mi-1_ti-0_ar-1_cr-0_si-0_fr-0_tb-1_t-_ftc-_ftb-_mc-_mfc-_complete%20(3)-png.png)
43. Checking Allow Upload will allow a user to upload a document, but not make it required to submit. This is recommended for Neuter/Spay Certificates or Proof of Service Animal.
-png.png?width=670&height=503&name=43_800x600_z-undefined_mz-0-5_mi-1_ti-0_ar-1_cr-0_si-0_fr-0_tb-1_t-_ftc-_ftb-_mc-_mfc-_complete%20(2)-png.png)
44. Checking Require will require this document be submitted in order to complete the application. This is recommended for Rabies Vaccination Certificates. If the document is required, both the Allow and Require boxes must be checked.
-png.png?width=670&height=503&name=44_800x600_z-undefined_mz-0-5_mi-1_ti-0_ar-1_cr-0_si-0_fr-0_tb-1_t-_ftc-_ftb-_mc-_mfc-_complete%20(2)-png.png)
45. If you leave both boxes unchecked, and have provided a URL, your applicant can download the document but not upload one. You can also provide a download and check the upload boxes, indicating the document should be completed and reuploaded.
-png.png?width=670&height=503&name=45_800x600_z-undefined_mz-0-5_mi-1_ti-0_ar-1_cr-0_si-0_fr-0_tb-1_t-_ftc-_ftb-_mc-_mfc-_complete%20(2)-png.png)
46. When you have completed all of the fields, remember to hit the Add button to save the line.
-png.png?width=670&height=503&name=46_800x600_z-undefined_mz-0-5_mi-1_ti-0_ar-1_cr-0_si-0_fr-0_tb-1_t-_ftc-_ftb-_mc-_mfc-_complete%20(1)-png.png)
47. You can click Remove to delete any unwanted document upload/downloads.
-png.png?width=670&height=503&name=47_800x600_z-undefined_mz-0-5_mi-1_ti-0_ar-1_cr-0_si-0_fr-0_tb-1_t-_ftc-_ftb-_mc-_mfc-_complete%20(1)-png.png)
48. Click Save Template
-png.png?width=670&height=503&name=48_800x600_z-undefined_mz-0-5_mi-1_ti-0_ar-1_cr-0_si-0_fr-0_tb-1_t-_ftc-_ftb-_mc-_mfc-_complete%20(1)-png.png)
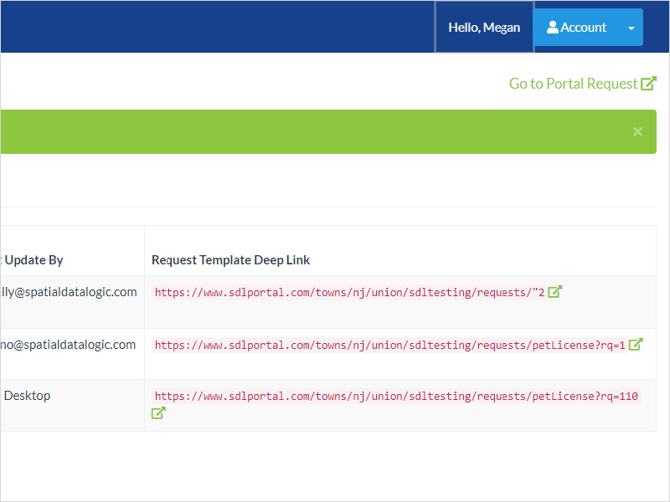
49. You've now completed setting up your Pet Licensing Portal Request. You can click the Go to Portal Request button to see the public-facing view of the request.