50 STEPS
-png-3.png?width=688&height=516&name=1_800x600_z-undefined_mz-0-5_mi-1_ti-0_ar-1_cr-0_si-0_fr-0_tb-1_t-_ftc-_ftb-_mc-_mfc-_complete%20(6)-png-3.png)
2. Once you are logged into the SDL Portal, click the menu in the upper right hand corner.
-png-2.png?width=688&height=516&name=2_800x600_z-undefined_mz-0-5_mi-1_ti-0_ar-1_cr-0_si-0_fr-0_tb-1_t-_ftc-_ftb-_mc-_mfc-_complete%20(6)-png-2.png)
3. Click Town Admin
-png-2.png?width=688&height=516&name=3_800x600_z-undefined_mz-0-5_mi-1_ti-0_ar-1_cr-0_si-0_fr-0_tb-1_t-_ftc-_ftb-_mc-_mfc-_complete%20(6)-png-2.png)
4. Click Settings and Access
-png-2.png?width=688&height=516&name=4_800x600_z-undefined_mz-0-5_mi-1_ti-0_ar-1_cr-0_si-0_fr-0_tb-1_t-_ftc-_ftb-_mc-_mfc-_complete%20(6)-png-2.png)
5. Click Data Display
-png-2.png?width=688&height=516&name=5_800x600_z-undefined_mz-0-5_mi-1_ti-0_ar-1_cr-0_si-0_fr-0_tb-1_t-_ftc-_ftb-_mc-_mfc-_complete%20(6)-png-2.png)
6. Click Home Page
-png-2.png?width=688&height=516&name=6_800x600_z-undefined_mz-0-5_mi-1_ti-0_ar-1_cr-0_si-0_fr-0_tb-1_t-_ftc-_ftb-_mc-_mfc-_complete%20(6)-png-2.png)
7. Click Allow SDL User Access to create shortcut links to chosen requests on the Portal Home Page, for your internal municipal users.
Click Allow Public Access to display this shortcut link for public users as well.
-png-2.png?width=688&height=516&name=7_800x600_z-undefined_mz-0-5_mi-1_ti-0_ar-1_cr-0_si-0_fr-0_tb-1_t-_ftc-_ftb-_mc-_mfc-_complete%20(6)-png-2.png)
8. Click Save Settings before leaving the page.
-png-2.png?width=688&height=516&name=8_800x600_z-undefined_mz-0-5_mi-1_ti-0_ar-1_cr-0_si-0_fr-0_tb-1_t-_ftc-_ftb-_mc-_mfc-_complete%20(6)-png-2.png)
9. Click Web Requests
-png-2.png?width=688&height=516&name=9_800x600_z-undefined_mz-0-5_mi-1_ti-0_ar-1_cr-0_si-0_fr-0_tb-1_t-_ftc-_ftb-_mc-_mfc-_complete%20(6)-png-2.png)
10. This will bring you to all of the SDL Portal's available web requests. Please note that each department must be live on the SDL Desktop in order to turn on any of the corresponding web requests.
-png-2.png?width=688&height=516&name=10_800x600_z-undefined_mz-0-5_mi-1_ti-0_ar-1_cr-0_si-0_fr-0_tb-1_t-_ftc-_ftb-_mc-_mfc-_complete%20(6)-png-2.png)
11. Please note the key at the top of the page. All complaints are marked with a symbol to denote their public or internal status.
-png-2.png?width=688&height=516&name=11_800x600_z-undefined_mz-0-5_mi-1_ti-0_ar-1_cr-0_si-0_fr-0_tb-1_t-_ftc-_ftb-_mc-_mfc-_complete%20(6)-png-2.png)
12. Click on any of the available web requests to access the settings.
We will be reviewing Zoning Applications.
-png-2.png?width=688&height=516&name=12_800x600_z-undefined_mz-0-5_mi-1_ti-0_ar-1_cr-0_si-0_fr-0_tb-1_t-_ftc-_ftb-_mc-_mfc-_complete%20(6)-png-2.png)
13. Click Allow SDL Geologic Users Access to turn this request on for municipal employees with SDL accounts.
-png-2.png?width=688&height=516&name=13_800x600_z-undefined_mz-0-5_mi-1_ti-0_ar-1_cr-0_si-0_fr-0_tb-1_t-_ftc-_ftb-_mc-_mfc-_complete%20(6)-png-2.png)
14. Click Allow Account Access - active portal account is required when you are ready to turn this request on for public users.
-png-2.png?width=688&height=516&name=14_800x600_z-undefined_mz-0-5_mi-1_ti-0_ar-1_cr-0_si-0_fr-0_tb-1_t-_ftc-_ftb-_mc-_mfc-_complete%20(5)-png-2.png)
15. Clicking Require Account Verification will require that public users have a verified account in order to complete this request. A verified account requires a phone number in addition to the email verification that a standard account required.
-png-2.png?width=688&height=516&name=15_800x600_z-undefined_mz-0-5_mi-1_ti-0_ar-1_cr-0_si-0_fr-0_tb-1_t-_ftc-_ftb-_mc-_mfc-_complete%20(3)-png-2.png)
16. You can also Allow Unregistered Access: public user will not need to be logged into to submit a request. With this, you will also have the option to Require a CAPTCHA security check. You cannot allow anonymous access if you will be accepting payments
-png-2.png?width=688&height=516&name=16_800x600_z-undefined_mz-0-5_mi-1_ti-0_ar-1_cr-0_si-0_fr-0_tb-1_t-_ftc-_ftb-_mc-_mfc-_complete%20(2)-png-2.png)
17. Enter any emails that would like a BCC email with every submitted Zoning Application. You can separate multiple email addresses with a comma.
-png-2.png?width=688&height=516&name=17_800x600_z-undefined_mz-0-5_mi-1_ti-0_ar-1_cr-0_si-0_fr-0_tb-1_t-_ftc-_ftb-_mc-_mfc-_complete%20(2)-png-2.png)
18. Click Display on Home Page if you would like a shortcut link to this request on your Portal Home Page.
-png-2.png?width=688&height=516&name=18_800x600_z-undefined_mz-0-5_mi-1_ti-0_ar-1_cr-0_si-0_fr-0_tb-1_t-_ftc-_ftb-_mc-_mfc-_complete%20(2)-png-2.png)
19. Click Display on Requests Page to put this request on the Requests Menu page.
-png-3.png?width=688&height=516&name=19_800x600_z-undefined_mz-0-5_mi-1_ti-0_ar-1_cr-0_si-0_fr-0_tb-1_t-_ftc-_ftb-_mc-_mfc-_complete%20(3)-png-3.png)
20. Here you have the option to change the label associated with this form. If you do not type anything it will display our default.
-png-2.png?width=688&height=516&name=20_800x600_z-undefined_mz-0-5_mi-1_ti-0_ar-1_cr-0_si-0_fr-0_tb-1_t-_ftc-_ftb-_mc-_mfc-_complete%20(3)-png-2.png)
21. Here you have the option to change the text that displays on the button citizens will click to start their application. Again, the light gray default text will be displayed if you do not choose to change it.
-png-2.png?width=688&height=516&name=21_800x600_z-undefined_mz-0-5_mi-1_ti-0_ar-1_cr-0_si-0_fr-0_tb-1_t-_ftc-_ftb-_mc-_mfc-_complete%20(3)-png-2.png)
22. The description text field will allow you to write a custom description for the request, to be displayed on the Requests page under the Request Label.
-png-2.png?width=688&height=516&name=22_800x600_z-undefined_mz-0-5_mi-1_ti-0_ar-1_cr-0_si-0_fr-0_tb-1_t-_ftc-_ftb-_mc-_mfc-_complete%20(3)-png-2.png)
23. The Custom Submit Description will allow you to customize the message displayed at the bottom of the request, when applicants submit their completed requests.
-png-2.png?width=688&height=516&name=23_800x600_z-undefined_mz-0-5_mi-1_ti-0_ar-1_cr-0_si-0_fr-0_tb-1_t-_ftc-_ftb-_mc-_mfc-_complete%20(3)-png-2.png)
24. The Zoning Application allows you to request payment at the time of the Applicant's submission. You will need to be setup with MuniciPAY. Contact SDL Support once you have started with MuniciPAY, and they will turn on payments in this request.
-png-2.png?width=688&height=516&name=24_800x600_z-undefined_mz-0-5_mi-1_ti-0_ar-1_cr-0_si-0_fr-0_tb-1_t-_ftc-_ftb-_mc-_mfc-_complete%20(3)-png-2.png)
25. Once the general request settings have been determined, click on Manage Templates. -png-2.png?width=688&height=516&name=25_800x600_z-undefined_mz-0-5_mi-1_ti-0_ar-1_cr-0_si-0_fr-0_tb-1_t-_ftc-_ftb-_mc-_mfc-_complete%20(3)-png-2.png)
26. These Templates will be pulled from the unique Application Types you have created in SDL Desktop and have set to web access. If you don't have any Templates, contact SDL Support to make sure you have Application types created, and that syncing is on. -png-2.png?width=688&height=516&name=26_800x600_z-undefined_mz-0-5_mi-1_ti-0_ar-1_cr-0_si-0_fr-0_tb-1_t-_ftc-_ftb-_mc-_mfc-_complete%20(3)-png-2.png)
27. Click one of the templates to edit it. -png-2.png?width=688&height=516&name=27_800x600_z-undefined_mz-0-5_mi-1_ti-0_ar-1_cr-0_si-0_fr-0_tb-1_t-_ftc-_ftb-_mc-_mfc-_complete%20(3)-png-2.png)
28. Click SDL Access to turn this template on for internal, municipal user access.-png-2.png?width=688&height=516&name=28_800x600_z-undefined_mz-0-5_mi-1_ti-0_ar-1_cr-0_si-0_fr-0_tb-1_t-_ftc-_ftb-_mc-_mfc-_complete%20(2)-png-2.png)
-png-2.png?width=688&height=516&name=29_800x600_z-undefined_mz-0-5_mi-1_ti-0_ar-1_cr-0_si-0_fr-0_tb-1_t-_ftc-_ftb-_mc-_mfc-_complete%20(2)-png-2.png)
30. Enter email addresses of individuals who will want an email for each submission of this application type. If you have already entered emails on the main Requests Setting page, these users will receive emails for all application types submitted.
-png-2.png?width=688&height=516&name=30_800x600_z-undefined_mz-0-5_mi-1_ti-0_ar-1_cr-0_si-0_fr-0_tb-1_t-_ftc-_ftb-_mc-_mfc-_complete%20(2)-png-2.png)
31. Use this field to write a custom description that will display at the beginning of the request.
-png-2.png?width=688&height=516&name=31_800x600_z-undefined_mz-0-5_mi-1_ti-0_ar-1_cr-0_si-0_fr-0_tb-1_t-_ftc-_ftb-_mc-_mfc-_complete%20(2)-png-2.png)
32. Use this field to write any custom instructions for your applicant. This will also display at the beginning of the request. Note that all custom text fields have formatting options including bold, bullets, hyperlinks, etc. -png-2.png?width=688&height=516&name=32_800x600_z-undefined_mz-0-5_mi-1_ti-0_ar-1_cr-0_si-0_fr-0_tb-1_t-_ftc-_ftb-_mc-_mfc-_complete%20(1)-png-2.png)
33. Click Allow Attachments if you would like to allow applicants to submit any additional documents with their request. 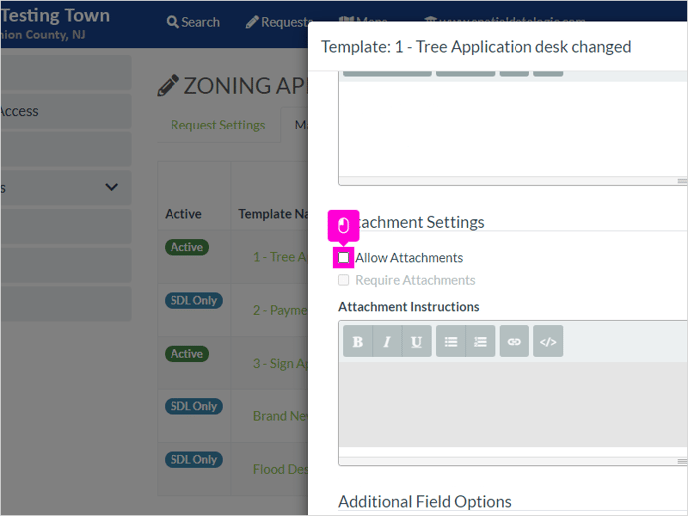
34. Click Require Attachments if you would like to make additional attachment uploads required. 
35. There is also a text box for custom attachment instructions. Here you can describe which documents will be needed. 
36. Additional fields for Zoning Applications include Tree Change. Here you have the option to turn this field on, or require it be completed. 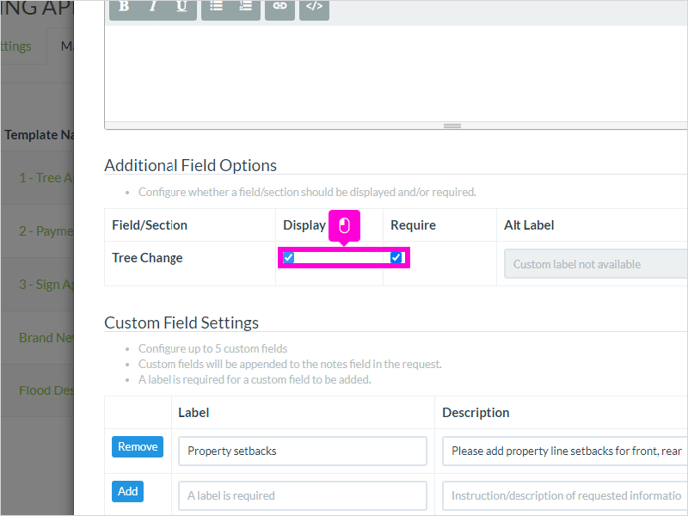

38. The upload/download form section is where you will provide a link to any additional forms you would like applicants to download, complete, and upload back to the request.
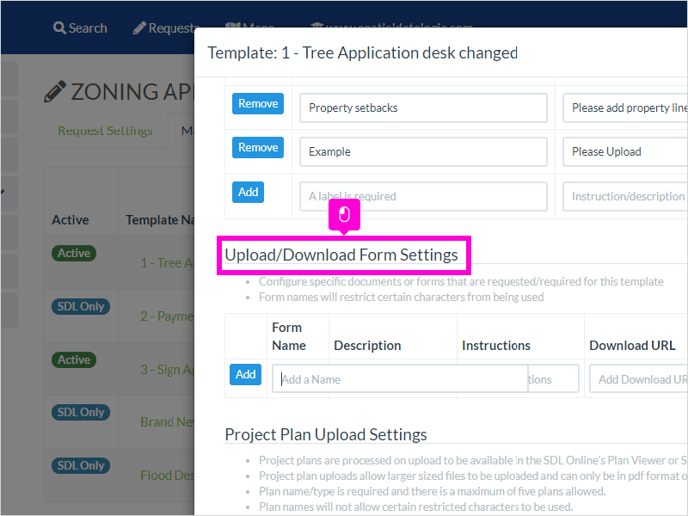
39. Here you can give the form a Name, Description, Instructions, provide the link to the digital document, and check whether you want to allow or require them upload a document. Click Add when you are done completing the fields.

40. Similarly, the Project Plan Upload Settings gives a designated area to require plan uploads. Fill in the Name of the Plan Type, a description, any instructions, and check whether you want to require the upload. Click Add once fields are completed.
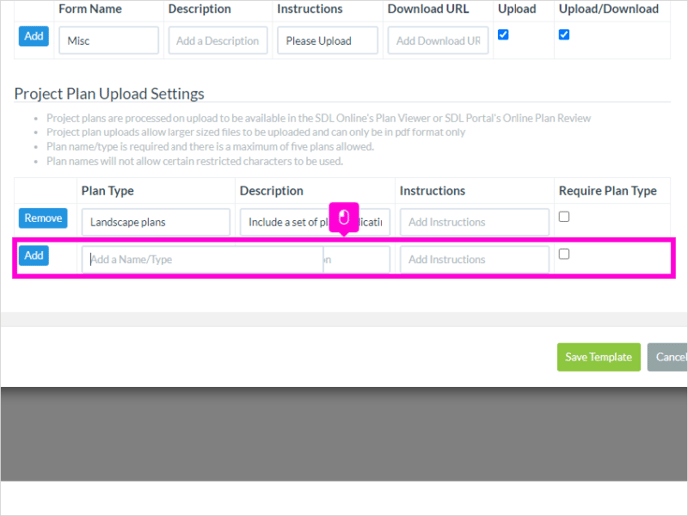
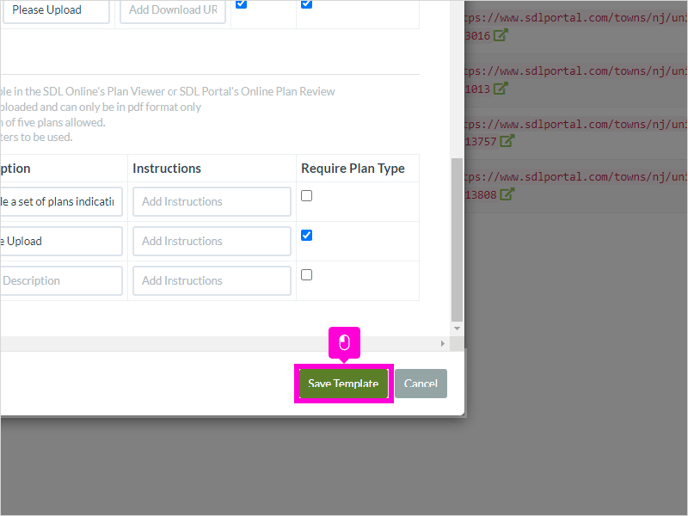
41. Be sure to click Save Template when you are done with the settings.
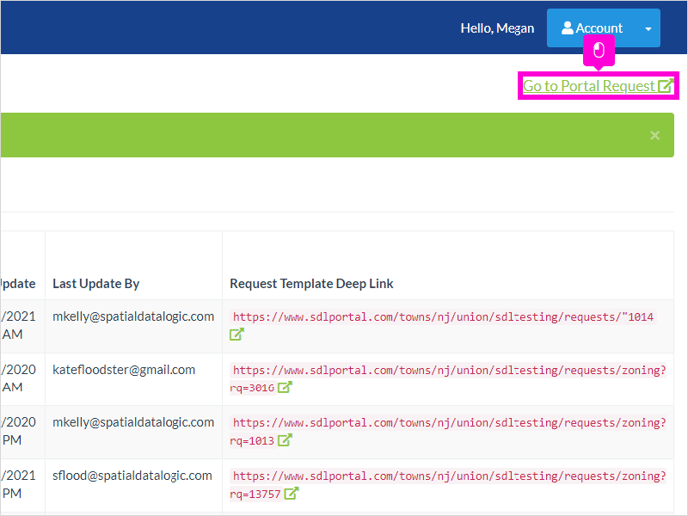
42. Once you close out of the template, you will be able to review it by clicking Go to Portal Request.
43. Click 3 - Sign Application
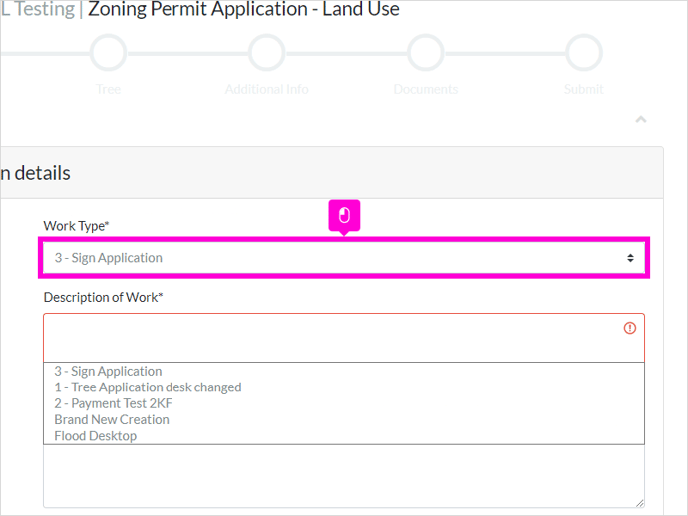
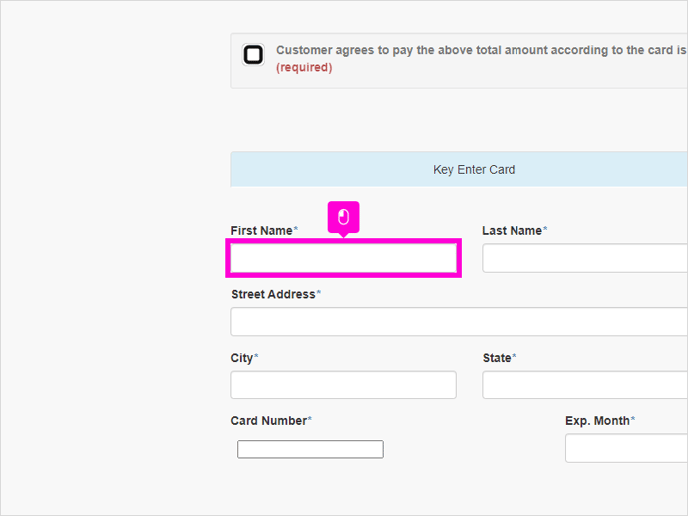
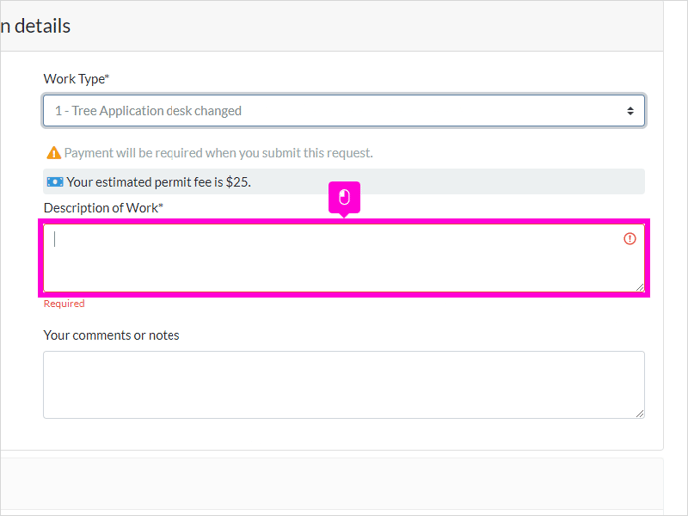
44. Applicants will select the Work Type, complete the Description of Work, and have a section for any additional notes.
45. They will next search the address, or click a property on the map.

46. Applicant will fill out Property Owner Information and Tree Change details.

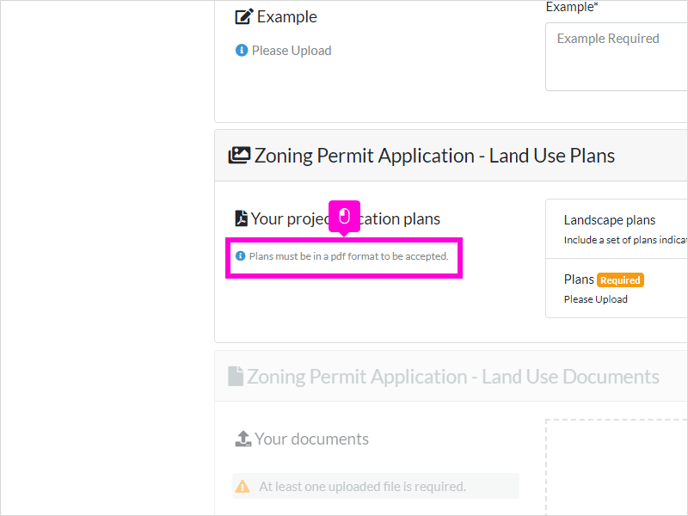
47. Custom fields and required uploads will be next. All custom instructions will appear to the left of the field, next to the blue information icon.
48. These Custom Instructions display the "Custom Submit Description" field you completed on the Zoning Application Request Settings page at the beginning.
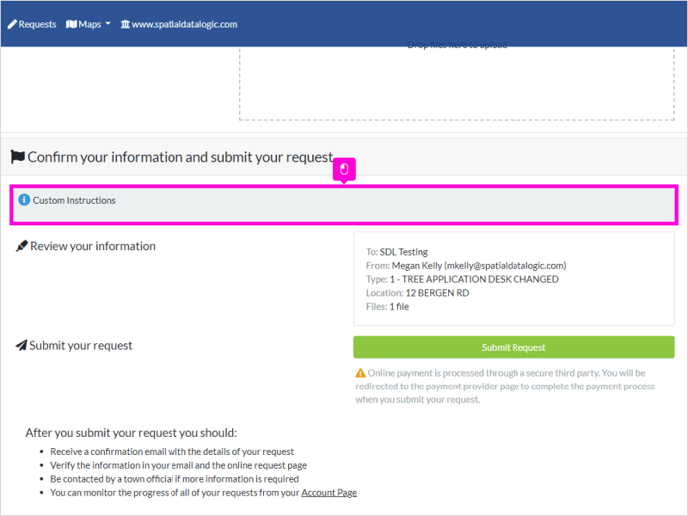
49. Applicants will only be permitted to submit the application after all required fields have been completed. If you have enabled payments at time of submission, they will be redirected to the MuniciPAY payment page after hitting Submit Request.

50. On the MuniciPAY payment page they will be able to fill in their contact and payment information. Fee item descriptions will also be listed.