![SDL - 2025 New Logo.png]](https://help.getsdl.com/hs-fs/hubfs/SDL%20-%202025%20New%20Logo.png?height=40&name=SDL%20-%202025%20New%20Logo.png)
1. First visit the SDL Portal at sdlportal.com and login using your SDL Desktop username and password. Be sure to check the box titled "Log in as a municipal user" and search for your municipality. You'll be brought to your Portal home page.
-png.png?width=670&height=503&name=1_800x600_z-undefined_mz-0-5_mi-1_ti-0_ar-1_cr-0_si-0_fr-0_tb-1_t-_ftc-_ftb-_mc-_mfc-_complete%20(8)-png.png)
2. From the home page, click the account button in the upper right hand corner.
-png.png?width=670&height=503&name=2_800x600_z-undefined_mz-0-5_mi-1_ti-0_ar-1_cr-0_si-0_fr-0_tb-1_t-_ftc-_ftb-_mc-_mfc-_complete%20(8)-png.png)
3. Click Town Admin. Please note that you must be set up as an SDL Portal Admin in order to access this menu item. If you are not set up as an SDL Portal admin, please reach out to your SDL Admin for the correct permissions.
-png.png?width=670&height=503&name=3_800x600_z-undefined_mz-0-5_mi-1_ti-0_ar-1_cr-0_si-0_fr-0_tb-1_t-_ftc-_ftb-_mc-_mfc-_complete%20(8)-png.png)
4. Click Settings and Access
-png.png?width=670&height=503&name=4_800x600_z-undefined_mz-0-5_mi-1_ti-0_ar-1_cr-0_si-0_fr-0_tb-1_t-_ftc-_ftb-_mc-_mfc-_complete%20(8)-png.png)
5. Click Data Display
-png.png?width=670&height=503&name=5_800x600_z-undefined_mz-0-5_mi-1_ti-0_ar-1_cr-0_si-0_fr-0_tb-1_t-_ftc-_ftb-_mc-_mfc-_complete%20(8)-png.png)
6. Click Permit/Inspections
-png.png?width=670&height=503&name=6_800x600_z-undefined_mz-0-5_mi-1_ti-0_ar-1_cr-0_si-0_fr-0_tb-1_t-_ftc-_ftb-_mc-_mfc-_complete%20(8)-png.png)
7. This will bring you to the public access settings for your Construction Permits and Inspections.
Click Allow Public Access to turn Building Permits on for public view.
-png.png?width=670&height=503&name=7_800x600_z-undefined_mz-0-5_mi-1_ti-0_ar-1_cr-0_si-0_fr-0_tb-1_t-_ftc-_ftb-_mc-_mfc-_complete%20(8)-png.png)
8. You will see two additional options for Issued Permits Only and Summary Data Only.
Issued Permits Only will only allow public users to view records of issued permits.
Summary Data Only will redact details from the permit record.
-png.png?width=670&height=503&name=8_800x600_z-undefined_mz-0-5_mi-1_ti-0_ar-1_cr-0_si-0_fr-0_tb-1_t-_ftc-_ftb-_mc-_mfc-_complete%20(8)-png.png)
9. You can also choose to only display permits issued after a certain date by filling in the date from the calendar in this field.
-png.png?width=670&height=503&name=9_800x600_z-undefined_mz-0-5_mi-1_ti-0_ar-1_cr-0_si-0_fr-0_tb-1_t-_ftc-_ftb-_mc-_mfc-_complete%20(8)-png.png)
10. You will see additional settings giving you the option to display sections on the building permit record to display Permit Status History, Permit Plan Review, Permit Prior Approvals and the Permit Fees Section.
-png.png?width=670&height=503&name=10_800x600_z-undefined_mz-0-5_mi-1_ti-0_ar-1_cr-0_si-0_fr-0_tb-1_t-_ftc-_ftb-_mc-_mfc-_complete%20(8)-png.png)
11. You can also choose to Allow Public Access to the Building Inspection records, and Summary Data Only to redact some details. Users must have their email address on the Permit record in order to be able to view the full inspection record.
-png.png?width=670&height=503&name=11_800x600_z-undefined_mz-0-5_mi-1_ti-0_ar-1_cr-0_si-0_fr-0_tb-1_t-_ftc-_ftb-_mc-_mfc-_complete%20(8)-png.png)
12. In the Town admin menu, switch to the Property Info Display tab.
-png.png?width=670&height=503&name=12_800x600_z-undefined_mz-0-5_mi-1_ti-0_ar-1_cr-0_si-0_fr-0_tb-1_t-_ftc-_ftb-_mc-_mfc-_complete%20(8)-png.png)
13. These sections determine which records will be shown on a property record. For Construction, these sections include Permit Applications, Inspections, Violations and Ongoing Applications.
-png.png?width=670&height=503&name=13_800x600_z-undefined_mz-0-5_mi-1_ti-0_ar-1_cr-0_si-0_fr-0_tb-1_t-_ftc-_ftb-_mc-_mfc-_complete%20(8)-png.png)
14. Leaving both boxes unchecked will give SDL Town users access to those property sections. Checking Public Full will give public users access to the sections. Checking Disabled will restrict access from both public users and SDL Town users.
-png.png?width=670&height=503&name=14_800x600_z-undefined_mz-0-5_mi-1_ti-0_ar-1_cr-0_si-0_fr-0_tb-1_t-_ftc-_ftb-_mc-_mfc-_complete%20(8)-png.png)
15. Switch to the Notifications section in the Town Admin menu.
-png.png?width=670&height=503&name=15_800x600_z-undefined_mz-0-5_mi-1_ti-0_ar-1_cr-0_si-0_fr-0_tb-1_t-_ftc-_ftb-_mc-_mfc-_complete%20(7)-png.png)
16. Checking Send Notifications for Permit updates will automatically send emails to users with email address on a permit record, every time a permit status changes.
-png.png?width=670&height=503&name=16_800x600_z-undefined_mz-0-5_mi-1_ti-0_ar-1_cr-0_si-0_fr-0_tb-1_t-_ftc-_ftb-_mc-_mfc-_complete%20(6)-png.png)
17. You can add custom text to the automatic permit emails in the provided text box. Note that this text will be included regardless of the status of the permit, so we recommend keeping the information general.
-png.png?width=670&height=503&name=17_800x600_z-undefined_mz-0-5_mi-1_ti-0_ar-1_cr-0_si-0_fr-0_tb-1_t-_ftc-_ftb-_mc-_mfc-_complete%20(6)-png.png)
18. To customize the Construction Permit Requests, select Web Requests
-png.png?width=670&height=503&name=18_800x600_z-undefined_mz-0-5_mi-1_ti-0_ar-1_cr-0_si-0_fr-0_tb-1_t-_ftc-_ftb-_mc-_mfc-_complete%20(6)-png.png)
19. You will be able to see the status of your Portal requests using the icons described in the above key.
-png.png?width=670&height=503&name=19_800x600_z-undefined_mz-0-5_mi-1_ti-0_ar-1_cr-0_si-0_fr-0_tb-1_t-_ftc-_ftb-_mc-_mfc-_complete%20(5)-png.png)
20. Click Building Permit to customize your Building Permit settings and templates.
-png.png?width=670&height=503&name=20_800x600_z-undefined_mz-0-5_mi-1_ti-0_ar-1_cr-0_si-0_fr-0_tb-1_t-_ftc-_ftb-_mc-_mfc-_complete%20(5)-png.png)
21. We will start with the options on the Request Settings tab. These options will apply to every type of Construction Permit template you create.
-png.png?width=670&height=503&name=21_800x600_z-undefined_mz-0-5_mi-1_ti-0_ar-1_cr-0_si-0_fr-0_tb-1_t-_ftc-_ftb-_mc-_mfc-_complete%20(5)-png.png)
22. Allow SDL Geologic Users Access will turn the request on internally for SDL Town users. We recommend turning this setting on for internal testing before bringing the Portal Request live.
-png.png?width=670&height=503&name=22_800x600_z-undefined_mz-0-5_mi-1_ti-0_ar-1_cr-0_si-0_fr-0_tb-1_t-_ftc-_ftb-_mc-_mfc-_complete%20(5)-png.png)
23. When you are ready to turn the Building Permit Request on for the public, you can check Allow Account Access. Checking Require Account Verification will require users to verify their SDL Portal account with a phone number, in addition to their email.
-png.png?width=670&height=503&name=23_800x600_z-undefined_mz-0-5_mi-1_ti-0_ar-1_cr-0_si-0_fr-0_tb-1_t-_ftc-_ftb-_mc-_mfc-_complete%20(5)-png.png)
24. If you would like to allow submissions without requiring an SDL Portal account, you can select Allow Unregistered Access. In this case, we would recommend turning on the additional security CAPTCHA setting as well.
-png.png?width=670&height=503&name=24_800x600_z-undefined_mz-0-5_mi-1_ti-0_ar-1_cr-0_si-0_fr-0_tb-1_t-_ftc-_ftb-_mc-_mfc-_complete%20(5)-png.png)
25. If you would like to receive a BCC of every permit request submission, you can enter your email address in the box provided. Multiple emails can be separated with a comma. You will also see all submissions on the home page of your SDL Desktop.
-png.png?width=670&height=503&name=25_800x600_z-undefined_mz-0-5_mi-1_ti-0_ar-1_cr-0_si-0_fr-0_tb-1_t-_ftc-_ftb-_mc-_mfc-_complete%20(5)-png.png)
26. Click Display on Home Page to allow users to start the Building Permit Request from your SDL Portal home page. Click Display on Requests Page to make the Building Permit Request available on your main SDL Portal Requests page.
-png.png?width=670&height=503&name=26_800x600_z-undefined_mz-0-5_mi-1_ti-0_ar-1_cr-0_si-0_fr-0_tb-1_t-_ftc-_ftb-_mc-_mfc-_complete%20(4)-png.png)
27. You can use the Request Custom Label to rename the Building Permit Request. To do so, simply type over our default title in light gray.
-png.png?width=670&height=503&name=27_800x600_z-undefined_mz-0-5_mi-1_ti-0_ar-1_cr-0_si-0_fr-0_tb-1_t-_ftc-_ftb-_mc-_mfc-_complete%20(4)-png.png)
28. The Request Custom Button Text refers to the text of the button used on the Request page to start the application. You can also overwrite our default in the field provided.
-png.png?width=670&height=503&name=28_800x600_z-undefined_mz-0-5_mi-1_ti-0_ar-1_cr-0_si-0_fr-0_tb-1_t-_ftc-_ftb-_mc-_mfc-_complete%20(4)-png.png)
29. The Description appears under the title of the Building Permit Request on the main Requests page. You can overwrite our default description in the field provided.
-png.png?width=670&height=503&name=29_800x600_z-undefined_mz-0-5_mi-1_ti-0_ar-1_cr-0_si-0_fr-0_tb-1_t-_ftc-_ftb-_mc-_mfc-_complete%20(4)-png.png)
30. The field for Custom Submit Description will display at the end of the Building Permit Request, before the applicant submits the finished application. You can also write over our default text in the field provided.
-png.png?width=670&height=503&name=30_800x600_z-undefined_mz-0-5_mi-1_ti-0_ar-1_cr-0_si-0_fr-0_tb-1_t-_ftc-_ftb-_mc-_mfc-_complete%20(4)-png.png)
31. Remember to Save Settings
-png.png?width=670&height=503&name=31_800x600_z-undefined_mz-0-5_mi-1_ti-0_ar-1_cr-0_si-0_fr-0_tb-1_t-_ftc-_ftb-_mc-_mfc-_complete%20(4)-png.png)
32. Scroll up and click Manage Templates to work on setting up templates for your individual Construction Permit types, or templates.
-png.png?width=670&height=503&name=32_800x600_z-undefined_mz-0-5_mi-1_ti-0_ar-1_cr-0_si-0_fr-0_tb-1_t-_ftc-_ftb-_mc-_mfc-_complete%20(4)-png.png)
33. All templates will have an indication of their activity status. Templates are either Inactive (turned off) SDL Only (only available for Town SDL Users) or Active (available for the public).
-png.png?width=670&height=503&name=33_800x600_z-undefined_mz-0-5_mi-1_ti-0_ar-1_cr-0_si-0_fr-0_tb-1_t-_ftc-_ftb-_mc-_mfc-_complete%20(4)-png.png)
34. To open an existing template, click the Template Name.
-png.png?width=670&height=503&name=34_800x600_z-undefined_mz-0-5_mi-1_ti-0_ar-1_cr-0_si-0_fr-0_tb-1_t-_ftc-_ftb-_mc-_mfc-_complete%20(4)-png.png)
35. To create a new template, click Create Template
-png.png?width=670&height=503&name=35_800x600_z-undefined_mz-0-5_mi-1_ti-0_ar-1_cr-0_si-0_fr-0_tb-1_t-_ftc-_ftb-_mc-_mfc-_complete%20(5)-png.png)
36. First enter a Template Name. This should describe the type of work being performed for the Permit Application.
-png.png?width=670&height=503&name=36_800x600_z-undefined_mz-0-5_mi-1_ti-0_ar-1_cr-0_si-0_fr-0_tb-1_t-_ftc-_ftb-_mc-_mfc-_complete%20(4)-png.png)
37. Click SDL Access to turn the template on for SDL Town users.
-png.png?width=670&height=503&name=37_800x600_z-undefined_mz-0-5_mi-1_ti-0_ar-1_cr-0_si-0_fr-0_tb-1_t-_ftc-_ftb-_mc-_mfc-_complete%20(4)-png.png)
38. Click Public Access when you are ready to turn the template on for public access. Note, the main Request must also be activated for the public in order for individual templates to be accessible.
-png.png?width=670&height=503&name=38_800x600_z-undefined_mz-0-5_mi-1_ti-0_ar-1_cr-0_si-0_fr-0_tb-1_t-_ftc-_ftb-_mc-_mfc-_complete%20(4)-png.png)
39. Use Default Icon will set the template icon to the first letter of the template name.
-png.png?width=670&height=503&name=39_800x600_z-undefined_mz-0-5_mi-1_ti-0_ar-1_cr-0_si-0_fr-0_tb-1_t-_ftc-_ftb-_mc-_mfc-_complete%20(4)-png.png)
40. You can also Select an Icon from the dropdown list provided.
-png.png?width=670&height=503&name=40_800x600_z-undefined_mz-0-5_mi-1_ti-0_ar-1_cr-0_si-0_fr-0_tb-1_t-_ftc-_ftb-_mc-_mfc-_complete%20(4)-png.png)
41. Just like in the main request settings, you are able to add emails to receive BCCs of all template applications submitted. Note, if your email is on the main request setting you will already receive an email for every template application submitted.
-png.png?width=670&height=503&name=41_800x600_z-undefined_mz-0-5_mi-1_ti-0_ar-1_cr-0_si-0_fr-0_tb-1_t-_ftc-_ftb-_mc-_mfc-_complete%20(4)-png.png)
42. We have provided fields to add custom Descriptions and Instructions for each individual template. These descriptions and instructions will appear at the beginning of the request.
-png.png?width=670&height=503&name=42_800x600_z-undefined_mz-0-5_mi-1_ti-0_ar-1_cr-0_si-0_fr-0_tb-1_t-_ftc-_ftb-_mc-_mfc-_complete%20(4)-png.png)
43. Customization options for the text fields include Bold, Italic, Underlined, Bulleted lists, Numbered lists, external hyperlinks, and custom text/highlight colors.
-png.png?width=670&height=503&name=43_800x600_z-undefined_mz-0-5_mi-1_ti-0_ar-1_cr-0_si-0_fr-0_tb-1_t-_ftc-_ftb-_mc-_mfc-_complete%20(3)-png.png)
44. The Attachment Settings section provides you with the option to allow uploads from applicants. This is recommended for general, miscellaneous, or optional uploads. More specific upload requests can be set up further down the settings page.
-png.png?width=670&height=503&name=44_800x600_z-undefined_mz-0-5_mi-1_ti-0_ar-1_cr-0_si-0_fr-0_tb-1_t-_ftc-_ftb-_mc-_mfc-_complete%20(3)-png.png)
45. You can choose to Allow or Require something be uploaded for this section, and include attachment instructions with formatting options similar to those in the previous sections.
-png.png?width=670&height=503&name=45_800x600_z-undefined_mz-0-5_mi-1_ti-0_ar-1_cr-0_si-0_fr-0_tb-1_t-_ftc-_ftb-_mc-_mfc-_complete%20(3)-png.png)
46. Next you want to select all of the subcodes that will be used for this type of Building Permit Application.
-png.png?width=670&height=503&name=46_800x600_z-undefined_mz-0-5_mi-1_ti-0_ar-1_cr-0_si-0_fr-0_tb-1_t-_ftc-_ftb-_mc-_mfc-_complete%20(2)-png.png)
47. You can also create Construction Permit applications for a Non UCC permit
-png.png?width=670&height=503&name=47_800x600_z-undefined_mz-0-5_mi-1_ti-0_ar-1_cr-0_si-0_fr-0_tb-1_t-_ftc-_ftb-_mc-_mfc-_complete%20(2)-png.png)
48. Click the Include "In Lieu Of" certification form check box to provide applicants with the opportunity to download the In Lieu Of Oath form, fill it out, and reupload it to the application.
-png.png?width=670&height=503&name=48_800x600_z-undefined_mz-0-5_mi-1_ti-0_ar-1_cr-0_si-0_fr-0_tb-1_t-_ftc-_ftb-_mc-_mfc-_complete%20(2)-png.png)
49. If you require any specific documents be submitted to support this type of Building Permit Application, we recommend adding them in the sections provided next.
-png.png?width=670&height=503&name=49_800x600_z-undefined_mz-0-5_mi-1_ti-0_ar-1_cr-0_si-0_fr-0_tb-1_t-_ftc-_ftb-_mc-_mfc-_complete%20(1)-png.png)
50. Type in the Name of the Document you need, any Description and Instructions. You can also paste in a PDF URL if you have a paper form they need to download, complete, and reupload.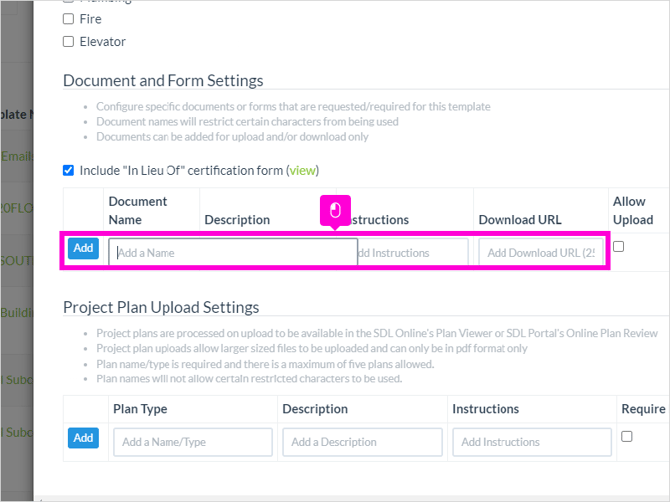
51. Check Allow Upload to let the Applicant upload the Document. Click Require if you want them to be required to upload in order to submit the application.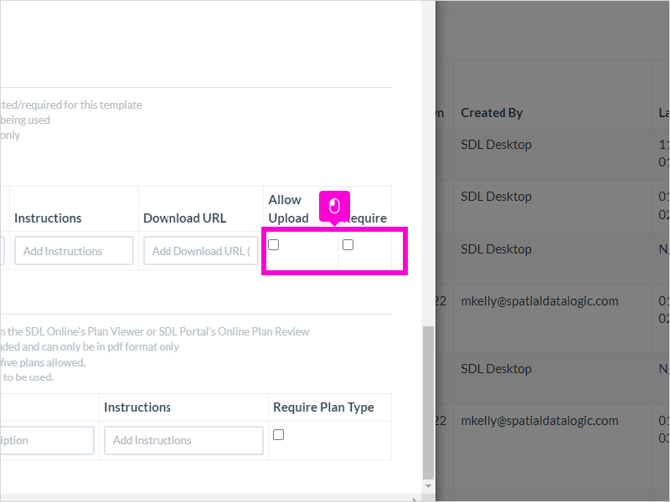
52. When you've filled out those fields, always remember to hit Add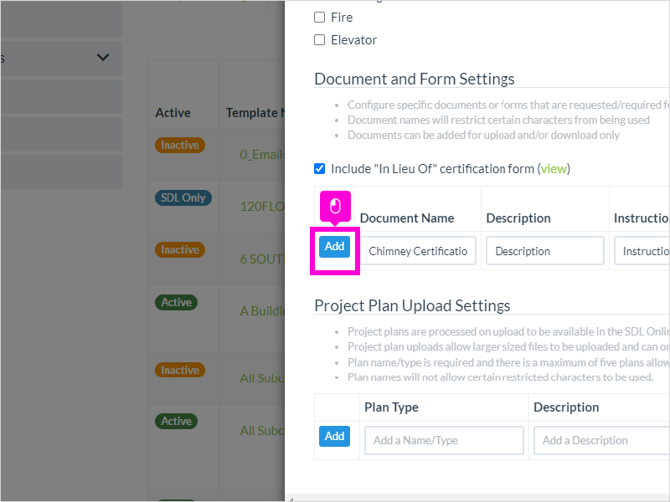
53. You can add multiple lines, for different documents you would like uploaded.-png.png?width=670&height=503&name=53_800x600_z-undefined_mz-0-5_mi-1_ti-0_ar-1_cr-0_si-0_fr-0_tb-1_t-_ftc-_ftb-_mc-_mfc-_complete%20(1)-png.png)
54. Next is a similar section designed for uploading Project Plans.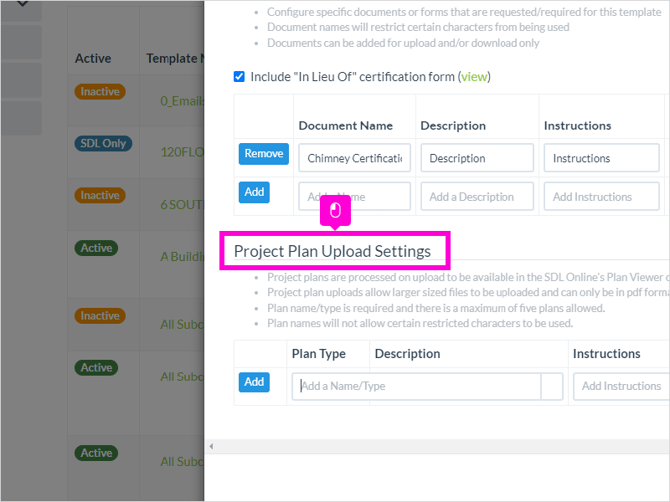
55. You can fill out the Plan Type needed, along with a Description, Instructions, and a check if these plans are required.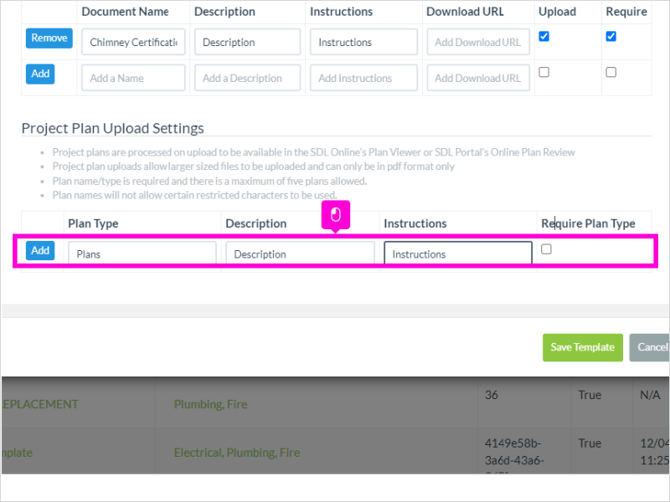
56. Remember to hit Add when you are done with the fields.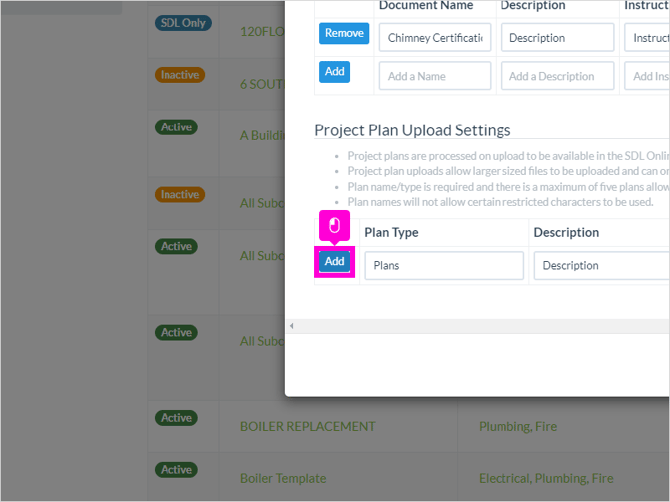
57. When you're done with all of the settings, click Save Template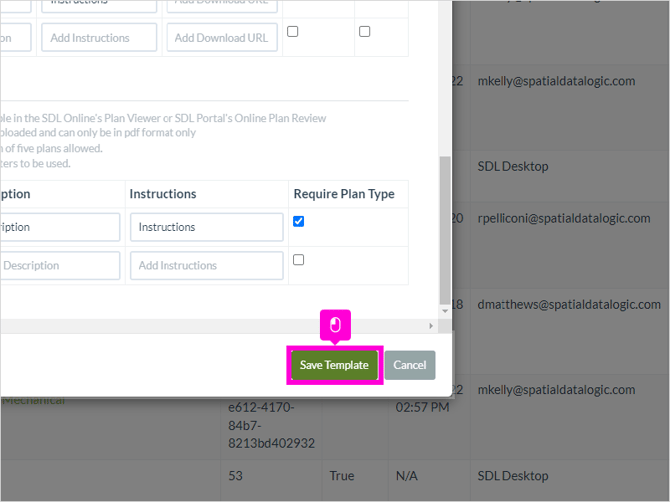
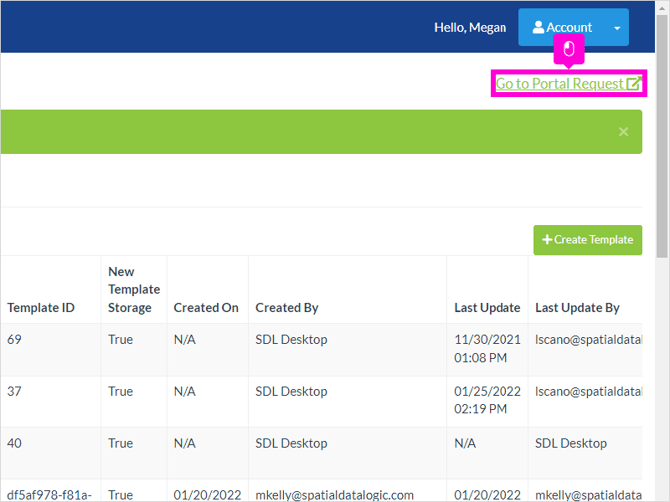
58. If you would like to review the public view of your settings, click the button labeled Go to Portal Request