![SDL - 2025 New Logo.png]](https://help.getsdl.com/hs-fs/hubfs/SDL%20-%202025%20New%20Logo.png?height=40&name=SDL%20-%202025%20New%20Logo.png)
What a Subcode Official/Construction Official needs to know about Online Plan Review
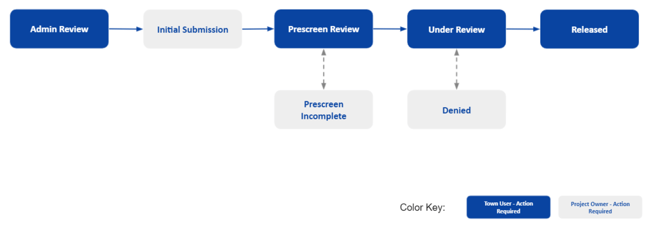
The typical Online Plan Review steps are outlined below. The Subcode Official comes into the Online Plan Review Process after the admin review, initial submission and prescreen processes are complete. The plan review status will display as “Under Review”.
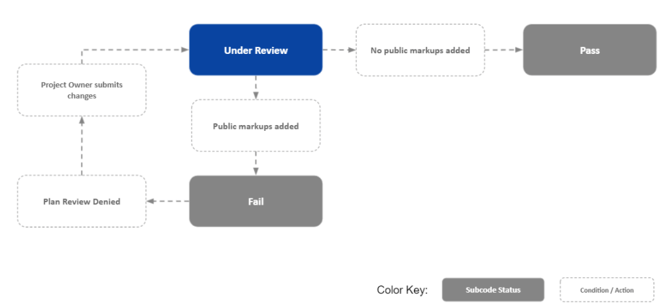
The typical subcode review process is below. The review and resubmittal process will continue to repeat until there are no public markups and the subcode has “passed” the plan review.
Accessing Online Plan Review
You can access SDL’s Online Plan Review System from SDL Online, SDL Portal or your notification email. Please note, at this point, the online plan review system is available in demo.sdlportal.com. Once we push your town live, you will follow the same steps but from sdlportal.com.
Note: You will only have access to a plan review if you are an active user on the plan review. If you are having issues accessing or marking up a plan review, it’s likely that you are not on the plan review or do not have the appropriate permissions set up in SDL Desktop.
Accessing from SDL Portal
- Go to demo.sdlportal.com
- Select plan review from the drop-down menu
- Search for the permit or control number
- Click the “Find” button and select the property
- Click on the plan review result
.gif?width=670&height=359&name=OPR%20Gif%20(2).gif)
Accessing from SDL Online
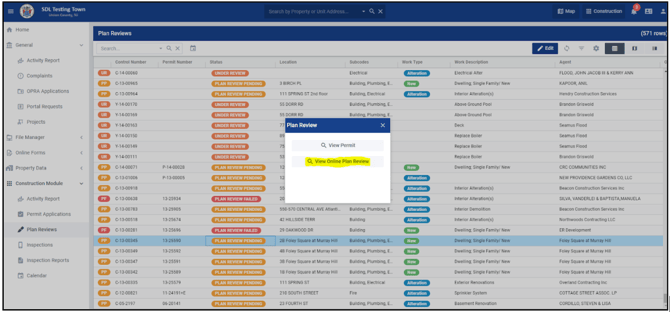
In the construction module of SDL Online, you will find “Plan Reviews” listed on the left-hand side. Here you will find a list of all of the permits and where they stand from a plan review standpoint. Clicking on the permit will give you the option to view the permit or access the plan review.
Accessing from notification email
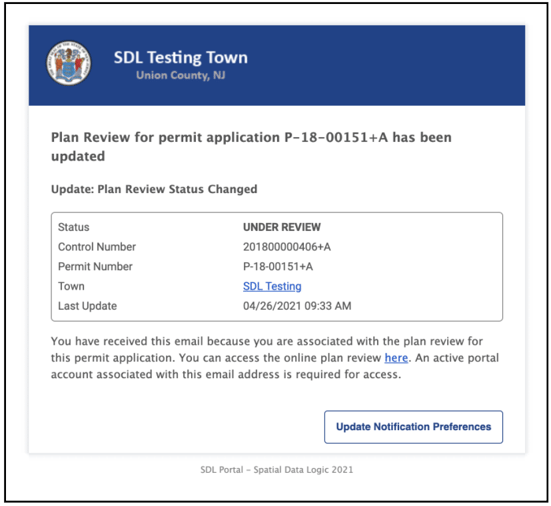
Users on the plan review will receive notifications throughout the process when the status has changed or an action is required. In the example below, you can see the plan review is now “Under Review” and the subcode can go into the plan review by clicking the “You can access the online plan review here” link.
Navigating The Homescreen
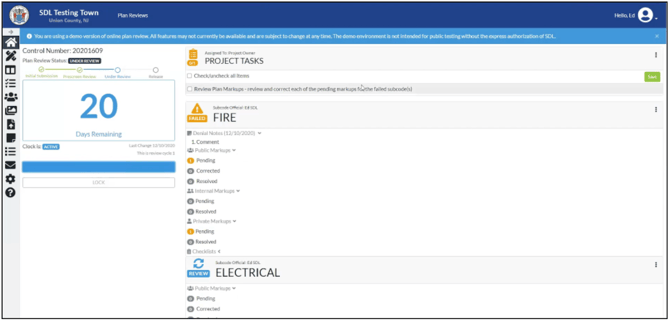
On the home screen, you will see the number of days left on the review clock, the associated subcodes and where each review stands. Example: In the screenshot below, we can see:
- There are still 20 days remaining
- There are two subcodes associated with the plans (Fire & Electrical)
- Fire has completed their review and failed the plans with 1 public markup and Electrical has still yet to complete their review.
Starting Your Review
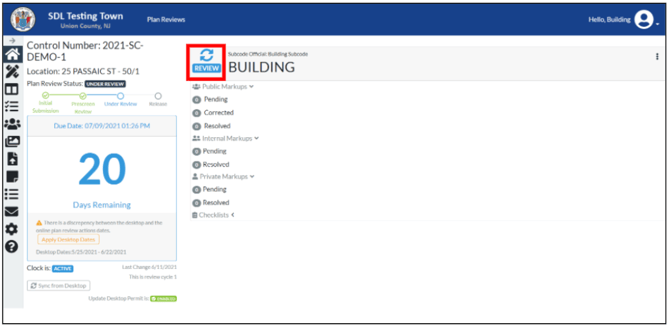
To access the plan viewer and your specific subcode, the easiest way is to click the blue “Review” button next to your subcode.
Plan Viewer
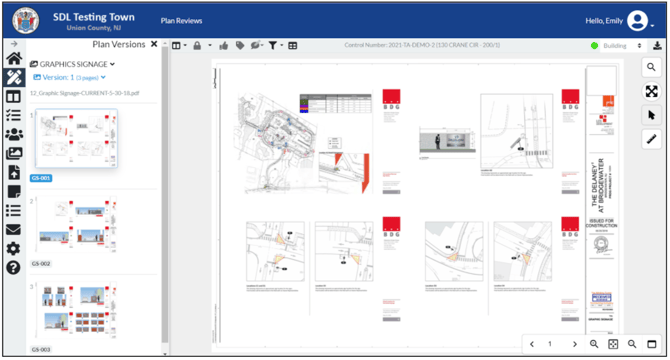
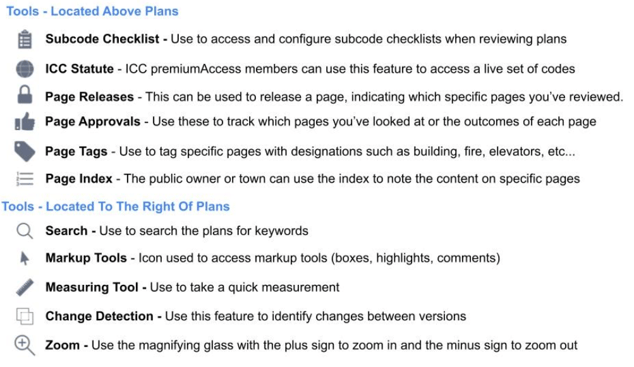
Once you have clicked the button, you will be brought into the plan viewer. Here you will have access to a number of tools that you can use to navigate the plans and complete your reviews.
Plan Review Icon Guide:
Adding Markups
When completing your review, you can use the markup tools to box, highlight and add comments to the plans.
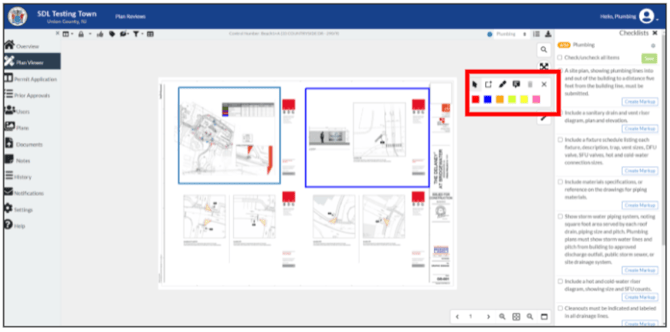
When adding comments, you have the option to make the comments public, private or internal. All markups begin as private and can be switched using the ellipsis to “Make Public” or “Make Internal” (pictured below). Note: Only public comments will impact your ability to “Pass” a plan review.
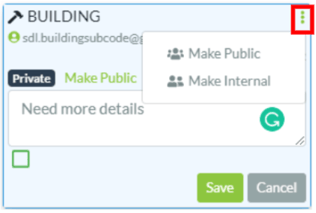
Be sure to hit the “Save” button when you are done.
Using Subcode Checklists
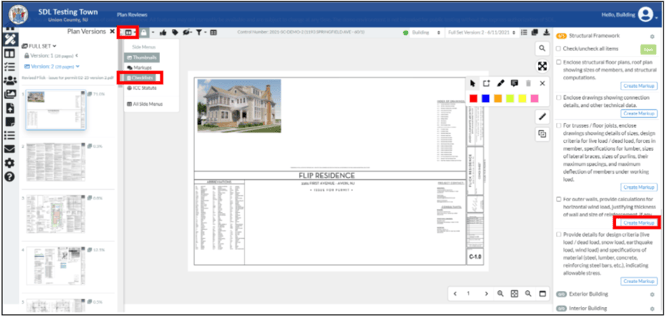
Throughout the review process, you can reference your subcode checklist and use the checklist items to create markups. To view your subcode checklist alongside the plans, click the checklist icon. If you want to convert one of your checklist items into a markup, simply click the “Create Markup” button under that item.
Failing Your Subcode Review
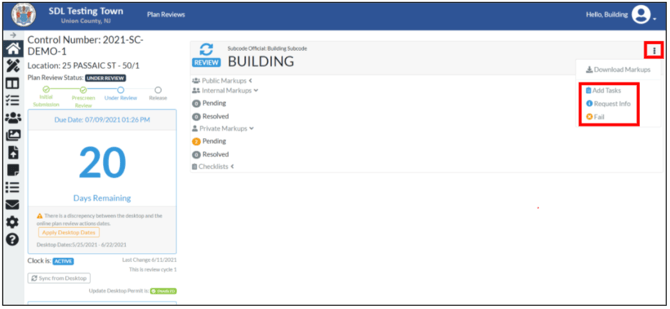
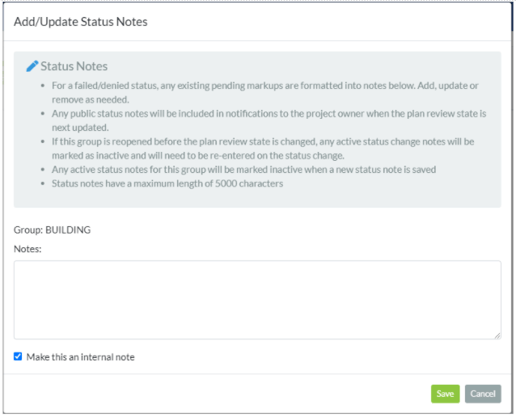
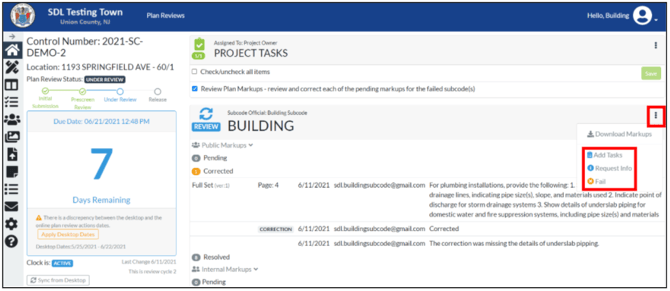
If you added any “Public” markups, your only option will be to fail the plan review. To do this, go to the home screen and click the ellipsis next to your subcode to add tasks and fail the plan review. After hitting “Fail”, you will have the option to add additional public/private notes if needed.
Denying The Plans
Once all subcodes have reviewed their plans, your plan review admin will deny the plans which will notify the project owner that the plans have been denied and let them know what is needed to resolve the issues. No further action will be required until the project owner has made corrections and submitted their changes for review.
How To Do A Subcode Review Of A Resubmittal
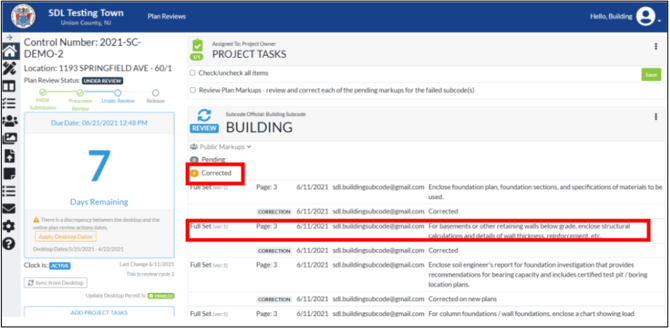
Once the markups have been addressed by the owner, the subcode official will have 7 days to rereview the plans. In the example below we can see that there are 9 corrected markups that need to be reviewed.
You can click “Corrected” to see the list of specific corrections and the page where that correction occurred. If you click on review, you will be brought back into the plan viewer, but if you click on a specific correction, you will be brought to that specific item.
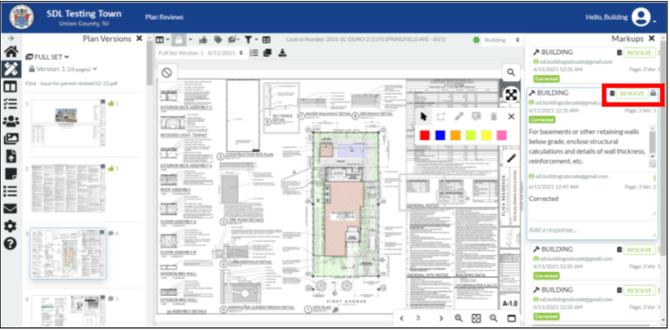
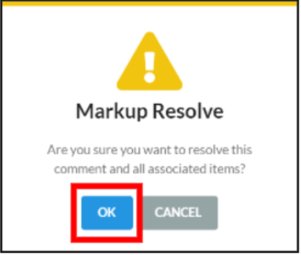
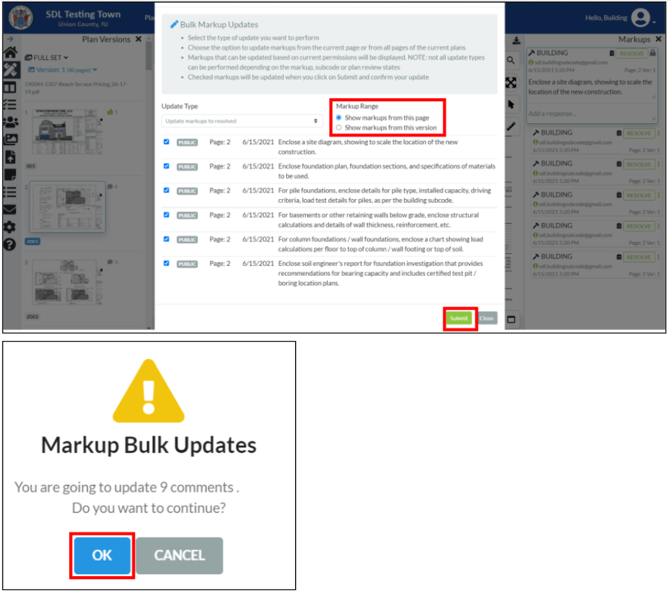
If all of the issues have been resolved, you can mark each one individually using the "RESOLVE" button or use the bulk markup tool to resolve all of the markups on a single page. Note: Once you have resolved a markup, you will have the option to re-open the markup if needed.
Using Bulk Markup Tools (Optional)
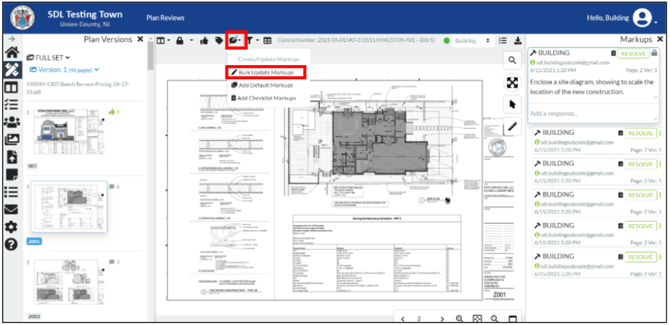
As mentioned above, if you want to resolve multiple corrections at once, you have the option to use our Bulk Markup tools by clicking on the icon at the top and selecting “Bulk Update Markups” from the drop down. Once in the bulk markup window, you can adjust the Markup Range to “Show markups from this page” to bulk markup the items on a specific page or you can click “Show markups from this version” to bulk markup items across the full set of plans. Simply check off the corrections that you want to resolve and then click submit.
If There Are Issues With The Resubmittal
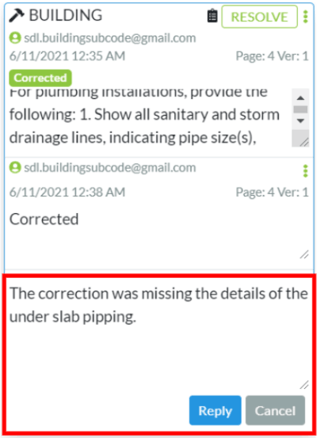
If there are still lingering issues, you can add a response to their correction to let the project owner know what is needed. Then, navigate to the home screen and repeat the same failure steps as above (i.e. add tasks for the project owner and then click fail).
Accepting the Plans
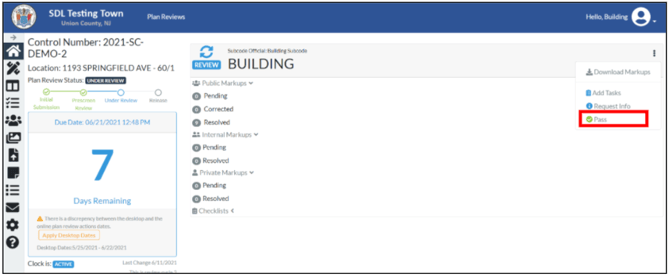
If everything looks good and you have resolved any corrections from the project owner, you can go back to the homescreen. This time, you will mark your tasks as complete and then select “Pass”. Once you’ve hit “Pass”, you will also have the option to add public or internal notes.
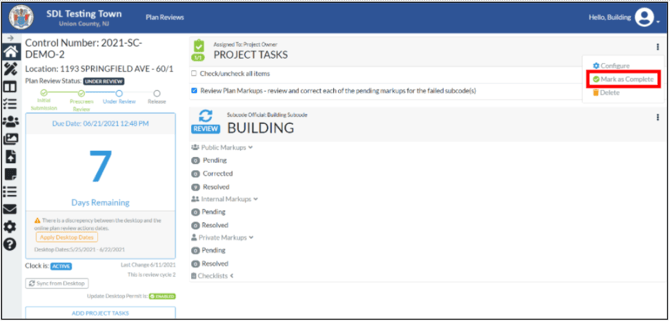
Note: If there are any outstanding corrections or public markups you will not see the Pass option.
.png?width=494&height=400&name=Subcode%2020%20(1).png)
Releasing And Stamping Plans
Once all of the subcodes have passed their reviews, your plan review admin can go in to release the plans and apply the stamp (See TA/CO/Secretary Guide). This concludes the subcode overview.