![SDL - 2025 New Logo.png]](https://help.getsdl.com/hs-fs/hubfs/SDL%20-%202025%20New%20Logo.png?height=40&name=SDL%20-%202025%20New%20Logo.png)
What a TA, Secretary or Construction Official needs to know about Online Plan Review
This guide is designed to help guide any members of your Construction Department who will act as the “plan review admin” by handling the setup, kick-off, and final steps to release/stamp a plan review.
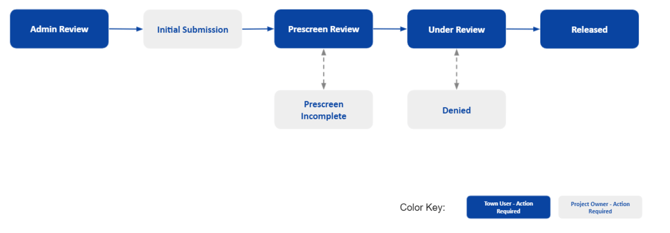
The typical Online Plan Review steps are outlined in the diagram below. The first step is “Admin Review” which is your chance to configure the plan review prior to opening the process to the public. Once the process has moved into “Initial Submission”, the project owner (public user) will be able to upload plans, specs, statements of work and complete any other tasks you’ve assigned. Once that has been done, the process will move into the prescreen review where you can make sure everything looks good before the subcodes begin their review. If anything else is needed, they can kick it back to the project owner. Once everything is in order, the process moves into “Under Review” where the subcodes review their plans and either pass or fail the plans. If any of the subcode reviews fail, the plans are denied and kicked back to the project owner for corrections. If the plans pass all subcode reviews, they can be released and stamped thus concluding the process.
Accessing Online Plan Review
You can access SDL’s Online Plan Review System from SDL Online, SDL Portal or your notification email. Please note, at this point, the online plan review system is available in demo.sdlportal.com. Once we push your town live, you will follow the same steps but from sdlportal.com.
Note: You will only have access to a plan review if you are an active user on the plan review. If you are having issues accessing or marking up a plan review, it’s likely that you are not on the plan review or do not have the appropriate permissions set up in SDL Desktop.
Accessing from SDL Portal
- Go to demo.sdlportal.com
- Select plan review from the drop-down menu
- Search for the permit or control number
- Click the “Find” button and select the property
- Click on the plan review result
-gif.gif?width=670&height=359&name=OPR%20Gif%20(2)-gif.gif)
Accessing from SDL Online
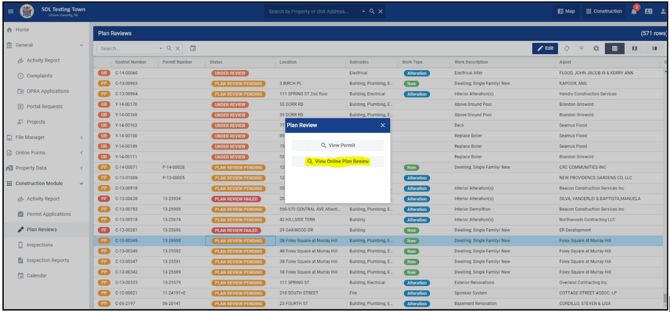
In the construction module of SDL Online, you will find “Plan Reviews” listed on the left-hand side. Here you will find a list of all of the permits and where they stand from a plan review standpoint. Clicking on the permit will give you the option to view the permit or access the plan review.
Accessing from notification email
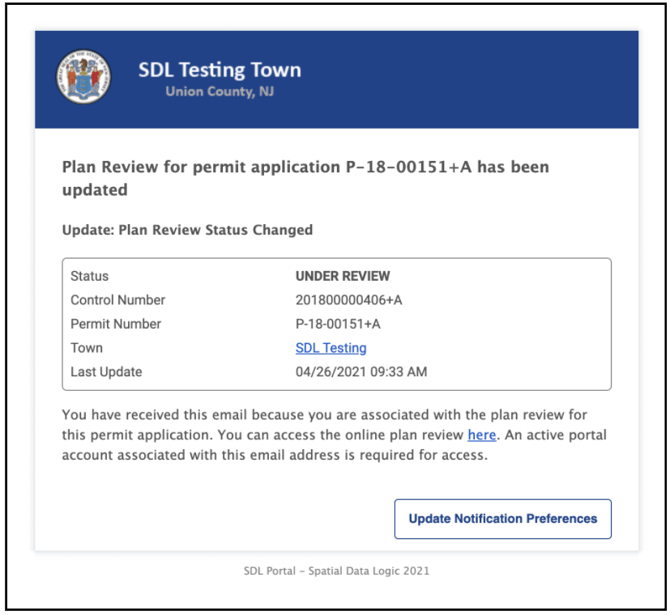
Users on the plan review will receive notifications throughout the process when the status has changed or an action is required. In the example below, you can see the plan review is now “Under Review” and the subcode can go into the plan review by clicking the “You can access the online plan review here” link.
Navigating The Home Screen
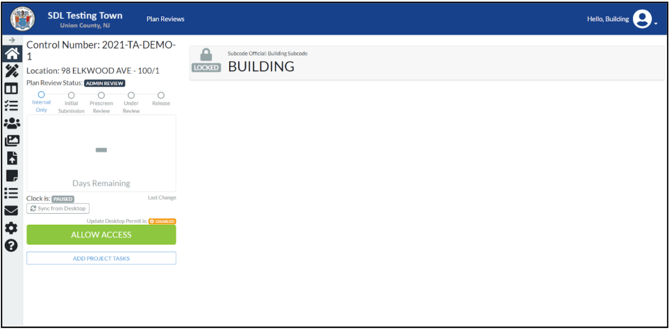
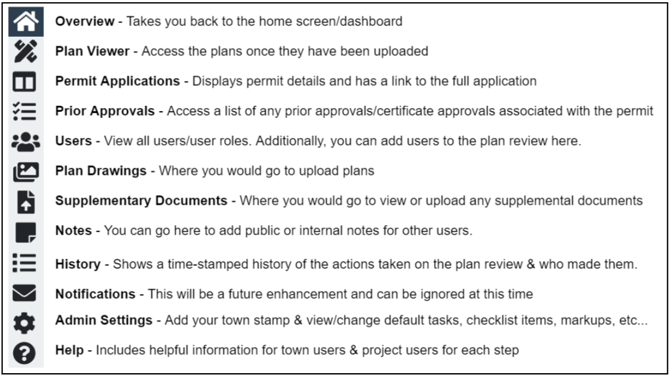
Once you are in the plan review, you will be greeted by the home screen that displays the plan review status and the subcodes associated with the plan review (see image below). On the left-hand side, you will see a list of icons that you will be using to complete your initial admin review. We have included a guide below to help you understand each of the sidebar icons and why you would use them.
Home screen:
Sidebar icons:
Completing Your Admin Review
The admin review is an internal process and allows you to make sure the plan review is configured properly before you make the plan review available for the public. During this time you can create a task list for the project owner and you can also opt to add other users, add notes and upload documents/plans.
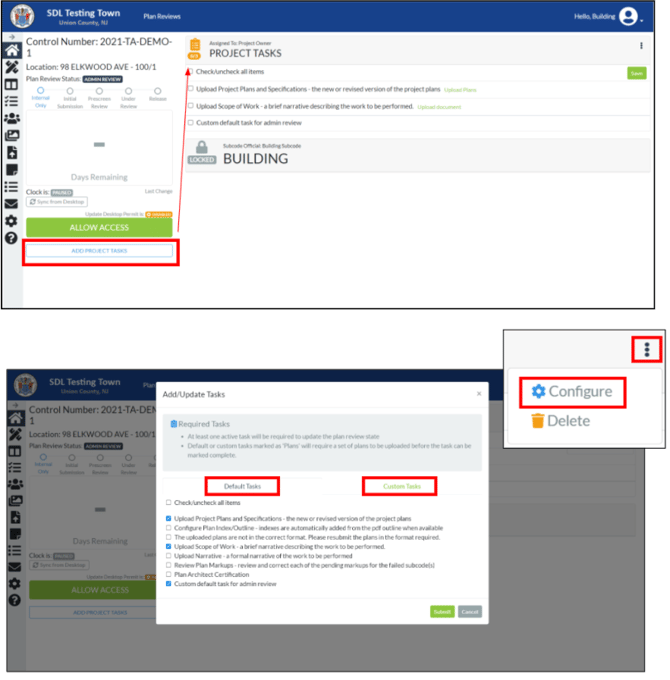
- Adding Tasks: Before “Allowing Access” to the public, you will first need to add some tasks for them to complete. Click the “Add Project Tasks” button which will add the default project tasks to the top such as upload project plans, specs and scope of work. If you need to add/delete tasks from the default list you can click the ellipsis located to the right of the project tasks header (see screenshots below). This will allow you to modify the default tasks or add custom tasks.
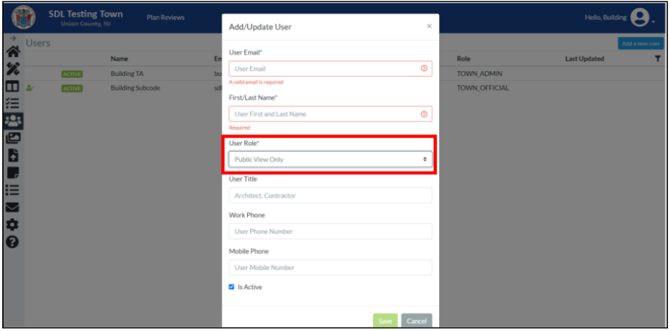
- Adding Users: While in demo, any subcode associated with the permit in desktop will be automatically added to the plan review. Once you are in the live version, there is also a setting in the admin settings that would allow you to automatically add the permit agent as the project owner. If you need to add any other users to the plan review, you would do so by clicking the User icon on the left-hand menu. As you add users, it’s important to take note of the user role.
- Adding Documents/Plans/Notes: If you need to upload any plans/documents or add any notes at this point, you can do so by clicking on the associated icons on the left-hand menu.
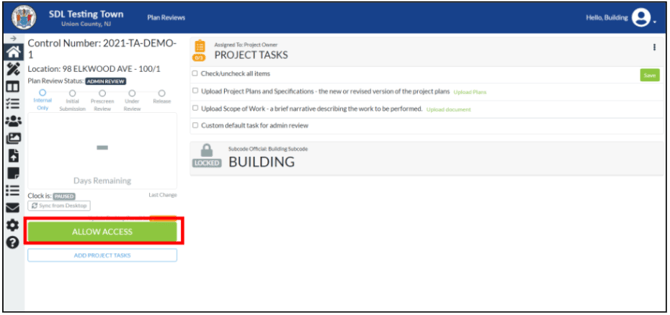
Once you have completed your admin review and added tasks for the project owner, you can click the “Allow Access” button. This will open up the plan review for the public and notify them via email. At this point, the plan review status will update to “Initial Submission” and no further action will be required until the project owner responds.
Initial Submission
This is a public process that typically refers to uploading their plans/specs and completing any other tasks you requested.
Helpful Tip: If you are practicing Online Plan Review internally, you always have the option to skip the public process by deleting out any project tasks using the ellipsis and clicking the “Update Status” button which will move you ahead to the next step.
Note: If you skip the initial submission, the system will assume everything is good from a prescreen review standpoint and go straight to the subcode review process so you should also do any pre-screen review steps.
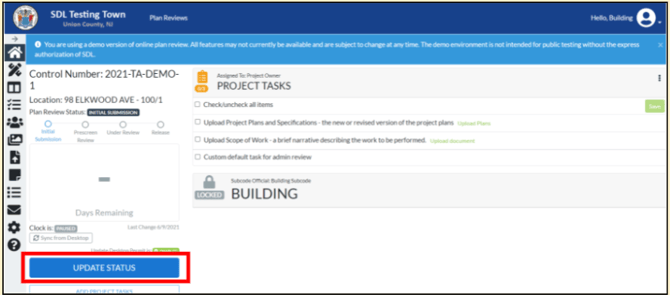
Completing Your Prescreen Review
Once you have all of the items you need from the project owner, the status will update to “Prescreen Review” and you can now go in to review the submissions to ensure any uploaded documents open properly, are legible and have been completed to your satisfaction. On the home page, you will also see a review clock has now appeared showing you how many days are remaining for your prescreen review.
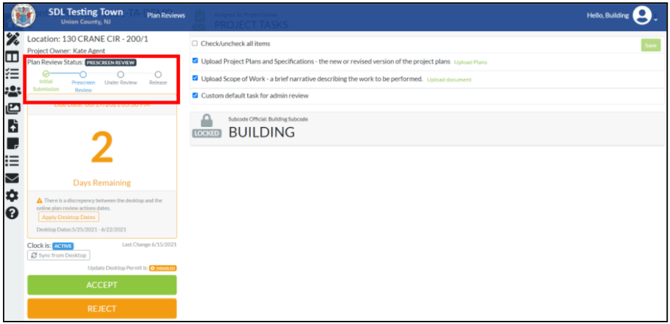
- Reviewing The Documents/Plans: You can begin by using the icons on the left-hand menu to view what documents (
 ), plans (
 ) and notes (
 ) have been added. Next, you can go into the plan viewer (
 ) to make sure the plans look OK.
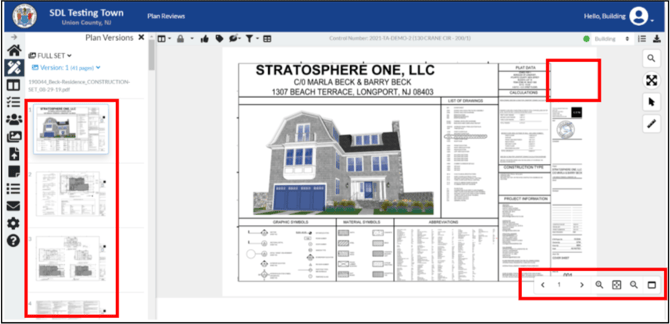
At this point, it is also important to check to make sure that the plans have a blank space in the upper right-hand corner for the digital stamp to go (see plans below)
You can click through the thumbnails to see each page or use the tools at the bottom right to toggle between pages and zoom in/out.
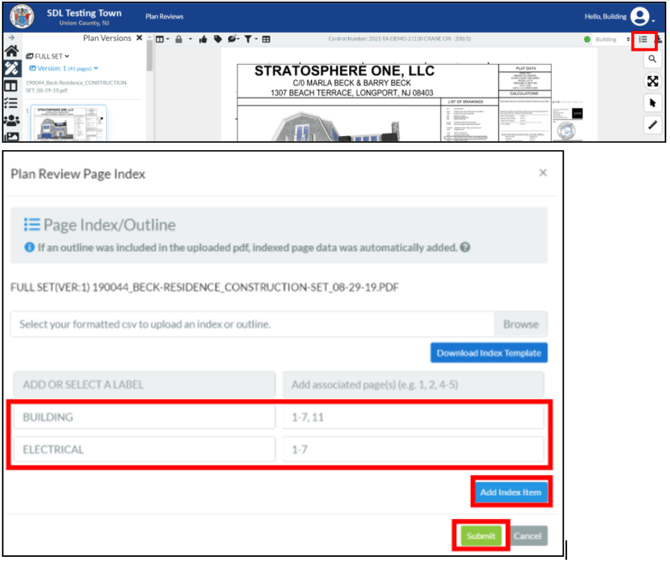
In the plan viewer, you also have some optional steps you can take such as creating an index for the plans or adding page tags, which indicate the content on specific pages.
- Indexing Pages (Optional): A plan index can be added or updated manually. If you would like to add an index, you can do so by clicking on the icon below and then adding the indexes using the “Add Index Item” button, entering the label and entering the page numbers. Once done, “Submit”.
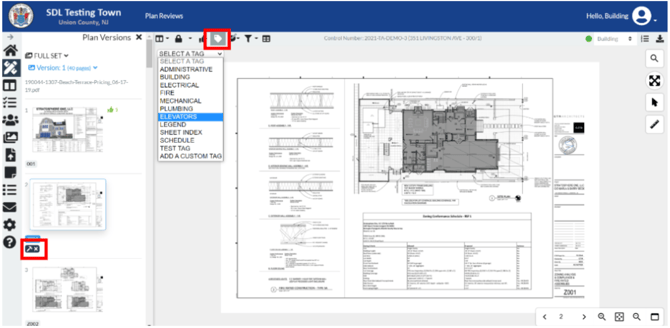
- Adding Page Tags (Optional): You can use the page-tag button to tag certain pages to indicate specific content (i.e. electrical, fire, elevators). The tag will appear below the applicable page thumbnail in the plan viewer.
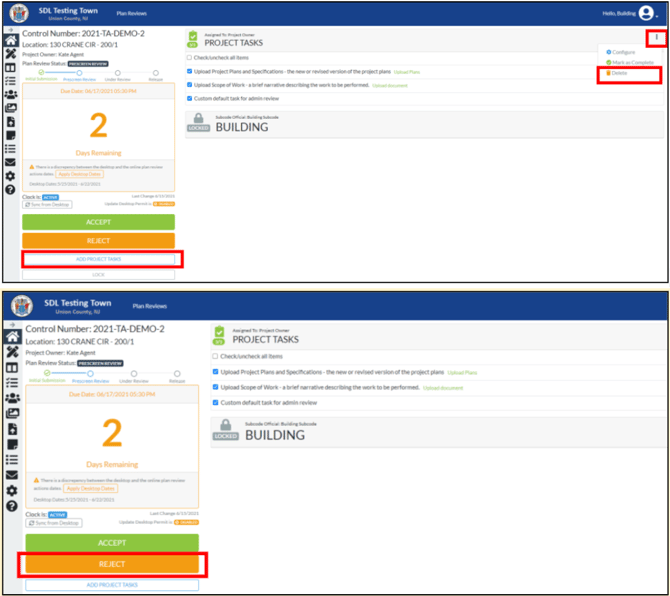
Rejecting The Submission: If you need to reject the submission, you can click the subcode menu next to the project tasks and “Delete” the current list of project tasks. Then, click the “Add Project Tasks” button to add new tasks based on what still needs to be done. Remember, you can use the ellipsis to configure the tasks if you want to delete defaults or add custom tasks.
Then, click the “Reject” button”. Once again, the project owner will be notified and nothing will need to be done until the project owner addresses your tasks. Once they’ve replied, you can repeat these Prescreen Review steps.
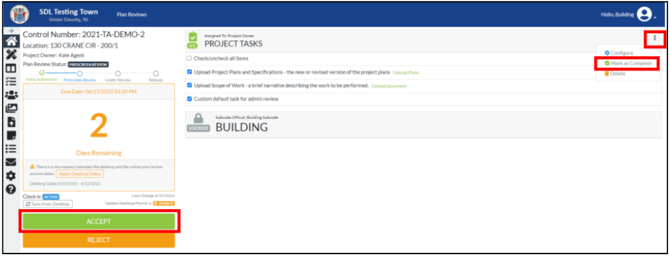
Accepting The Submission: If everything looks good, you can click the subcode menu next to project tasks and select “Mark as Complete”. Then, click the “Accept” button. The plan review status will update to “Under Review”.
Under Review
At this point, you can sit tight while the associated subcode officials complete their reviews. If you would like to understand the subcode review tools/process, we suggest you check out our separate subcode official guide.
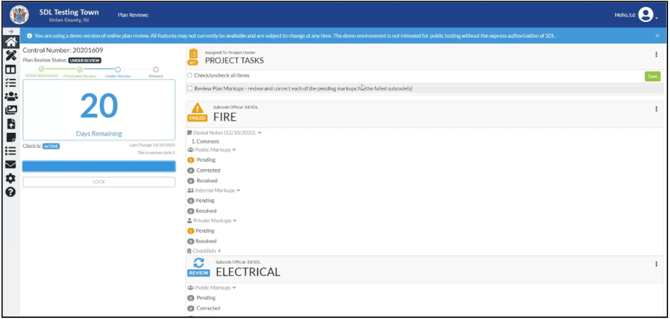
While you will be able to monitor the status of the plan review through SDL Desktop, you also have the option to go into the plan review to see the status. On the home screen, you will be able to see the number of days remaining on the review clock, the associated subcodes and where each review stands. For example, looking at the screenshot below we can see:
- There are still 20 days remaining
- There are two subcodes associated with the plans (Fire & Electrical)
- Fire has completed their review and failed the plans with 1 public markup and Electrical has still yet to complete their review.
Denying Plans
If any of the subcode officials failed their review, you will need to go into the plan review and deny the plans which notifies the project owner. To do this, you would start by clicking “Add Project Tasks”. Similar to the other times you’ve added tasks, this makes your default tasks appear and if you need to make any adjustments you can click on the ellipsis to configure the tasks. (Note: The subcode official may have already added tasks in which case you can use their task list or create a new one).
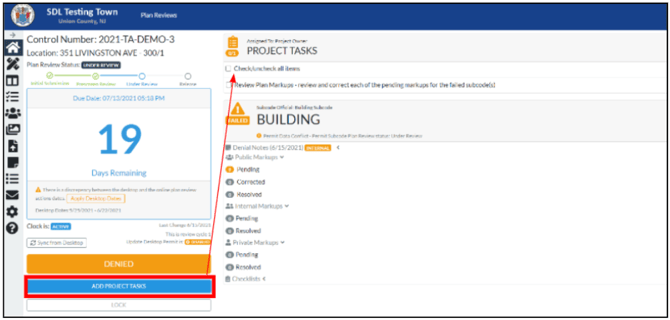
Then, click the “Denied” button.
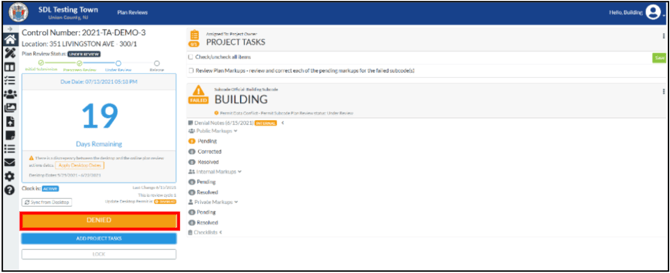
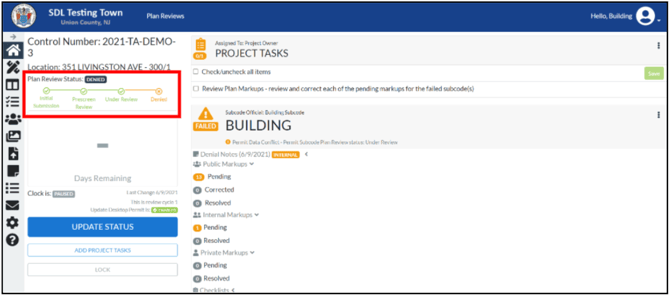
Once denied, you will see the plan review status update to “Denied’ in the top left corner of the home screen. You will not need to take any additional action until the project owner has submitted their response and the subcode official has reviewed their corrections and Passed/Failed the revised plans. If any subcodes fail the plans, you will repeat these steps.
Releasing The Plans & Applying The Stamp
Once any issues have been rectified and all subcodes have passed their reviews, you will be able to release the plans and apply the stamp. To do this, click the “Release” button.
Note: If you want to collect payment prior to releasing the plans, you should do so at this point prior to hitting the button.
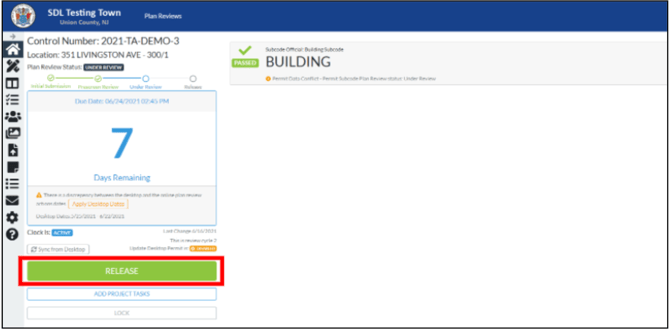
Then click, “Apply Stamp” which applies your town's digital stamp to the plans.
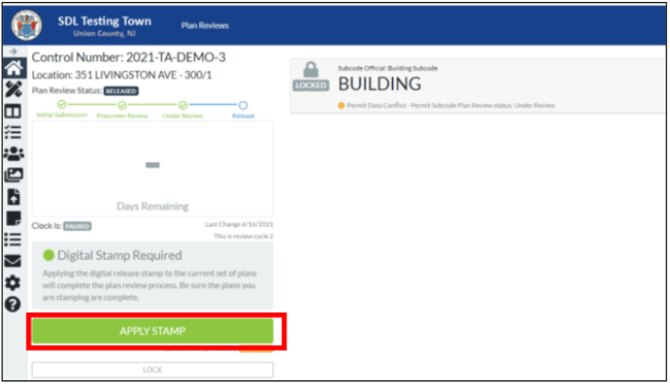
You can see that the plan review will update to reflect that plans are released and stamped.
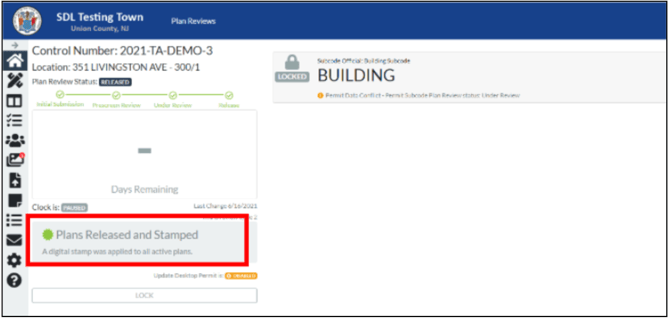
This concludes our TA/Secretary/CO process.
Need To Adjust The Default Settings?
These are located under Settings in the left-hand menu. (i.e. the gear symbol).