![SDL - 2025 New Logo.png]](https://help.getsdl.com/hs-fs/hubfs/SDL%20-%202025%20New%20Logo.png?height=40&name=SDL%20-%202025%20New%20Logo.png)
-
This guide will demonstrate how to create an inspection and issue a certificate in the Fire Prevention module. The first step is to click on the Active Units data grid under the Fire Prevention category.
.png?width=439&height=390&name=1_450x400_z-undefined_mz-undefined_mi-1_ti-0_ar-0_cr-0_si-0_fr-0_tb-1_t-_ftc-_ftb-_mc-_mfc-_complete%20(5).png)
-
Use the search features at the top of the data grid to find the unit you want to add the inspection to. If a unit doesn't exist you will need to create one, check the Fire Prevention - Units guide for more information.
.png?width=424&height=377&name=2_450x400_z-undefined_mz-undefined_mi-1_ti-0_ar-0_cr-0_si-0_fr-0_tb-1_t-_ftc-_ftb-_mc-_mfc-_complete%20(5).png)
-
Double click the Unit record in the data grid to open it in the Unit Editor.
.png?width=447&height=397&name=3_450x400_z-undefined_mz-undefined_mi-1_ti-0_ar-0_cr-0_si-0_fr-0_tb-1_t-_ftc-_ftb-_mc-_mfc-_complete%20(5).png)
-
The Unit Editor allows you to make changes to the unit, issue permits, invoices, inspections, and more. Click on the Inspections tab.
.png?width=432&height=384&name=4_450x400_z-undefined_mz-undefined_mi-1_ti-0_ar-0_cr-0_si-0_fr-0_tb-1_t-_ftc-_ftb-_mc-_mfc-_complete%20(5).png)
- Click the Add button to create a new inspection.
.png?width=437&height=388&name=5_450x400_z-undefined_mz-undefined_mi-1_ti-0_ar-0_cr-0_si-0_fr-0_tb-1_t-_ftc-_ftb-_mc-_mfc-_complete%20(5).png)
-
The inspection date will default to the current date. The Unit Inspections sidebar on the left lists all inspections for this unit, with the inspection currently being edited indicated there.
.png?width=458&height=407&name=6_450x400_z-undefined_mz-undefined_mi-1_ti-0_ar-0_cr-0_si-0_fr-0_tb-1_t-_ftc-_ftb-_mc-_mfc-_complete%20(4).png)
-
Click the Inspection tab to enter the inspection details. Begin by adding the Inspector, Inspection Type and Inspection Level.
.png?width=465&height=413&name=7_450x400_z-undefined_mz-undefined_mi-1_ti-0_ar-0_cr-0_si-0_fr-0_tb-1_t-_ftc-_ftb-_mc-_mfc-_complete%20(4).png)
-
Review the Scheduling section to ensure the date and time are correct. The Recurring Inspection section can be used to create prompts for future inspections once this inspection has been completed.
.png?width=469&height=417&name=8_450x400_z-undefined_mz-undefined_mi-1_ti-0_ar-0_cr-0_si-0_fr-0_tb-1_t-_ftc-_ftb-_mc-_mfc-_complete%20(4).png)
- If the inspection has already been completed, set the Result field accordingly (for example, Passed or Failed).
.png?width=458&height=407&name=9_450x400_z-undefined_mz-undefined_mi-1_ti-0_ar-0_cr-0_si-0_fr-0_tb-1_t-_ftc-_ftb-_mc-_mfc-_complete%20(4).png)
-
Confirm all of the information on the Inspection tab is correct before continuing.
.png?width=450&height=400&name=10_450x400_z-undefined_mz-undefined_mi-1_ti-0_ar-0_cr-0_si-0_fr-0_tb-1_t-_ftc-_ftb-_mc-_mfc-_complete%20(4).png)
-
To issue a certificate, go to the Related tab and click Issue Certificate under the Reports menu.
.png?width=476&height=423&name=11_450x400_z-undefined_mz-undefined_mi-1_ti-0_ar-0_cr-0_si-0_fr-0_tb-1_t-_ftc-_ftb-_mc-_mfc-_complete%20(4).png)
-
Click Show Report.
.png?width=474&height=421&name=12_450x400_z-undefined_mz-undefined_mi-1_ti-0_ar-0_cr-0_si-0_fr-0_tb-1_t-_ftc-_ftb-_mc-_mfc-_complete%20(3).png)
-
Set the certificate expiration date, then click the OK button.
.png?width=464&height=412&name=13_450x400_z-undefined_mz-undefined_mi-1_ti-0_ar-0_cr-0_si-0_fr-0_tb-1_t-_ftc-_ftb-_mc-_mfc-_complete%20(2).png)
- The certificate is now created and can be printed or saved using the buttons at the top of the form. Once finished, click the X to close the certificate.
.png?width=670&height=595&name=14_450x400_z-undefined_mz-undefined_mi-1_ti-0_ar-0_cr-0_si-0_fr-0_tb-1_t-_ftc-_ftb-_mc-_mfc-_complete%20(1).png)
-
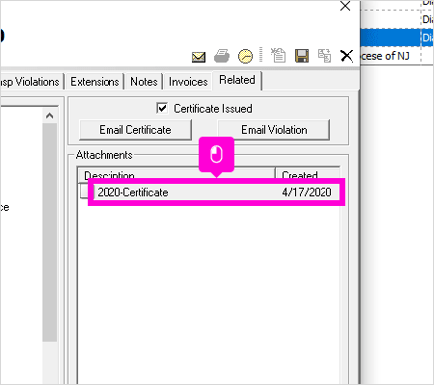
All reports, including this certificate, are saved as attachments to the Unit by default.
-
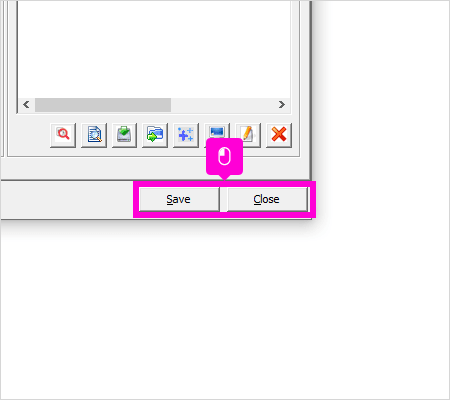
The process is now complete. Click Save and Close to exit the unit.