![SDL - 2025 New Logo.png]](https://help.getsdl.com/hs-fs/hubfs/SDL%20-%202025%20New%20Logo.png?height=40&name=SDL%20-%202025%20New%20Logo.png)
Creating and Applying Filters
- Select the ‘Code Enforcement’ module.
- Select the ‘Property Registry’ data grid.
- Click on ‘My Filters’ in the data grid toolbar.
- Select ‘Manage Filters’, then the ‘New’ button. We need to create a filter to show the property registries that will need to be renewed.
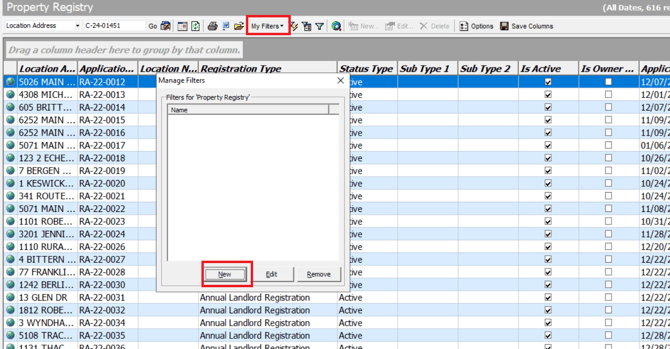
- After clicking the ‘New’ button, we will create the data grid filter. First, give it a name, preferably something that describes what the filter does and also one that will be helpful to use for next year’s renewals.
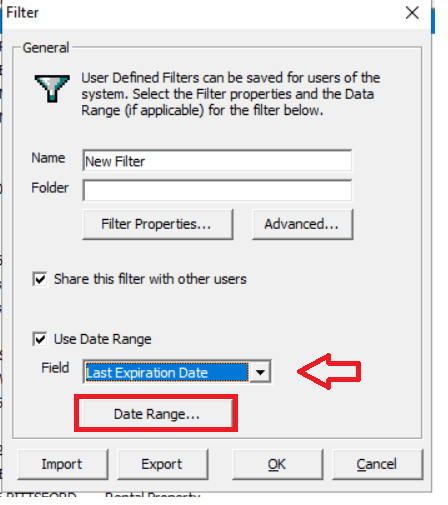
- Check the box for ‘Use Date Range’ and be sure to select the ‘Last Expiration Date’. This will show the last expiration date of the most recently issued license. We want this date because it will tell us which Property Registries have expired. Please note, DO NOT go by ‘Last Issued Date’ because this goes by the date that the license was issued!
- Click the ‘Date Range’ button.
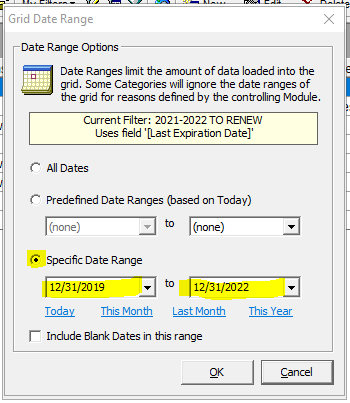
- Select the 3rd radio button option for ‘Specific Date Range’. This will be the expiration date of the licenses that you want to show on the data grid. If you only want to see the 2023 Property Registries that are not renewed, then set the range to 12/31/2023 TO 12/31/2023 because we are looking at only one expiration date. The first date can be backdated to previous years if you want to go further back, like in the screenshot below, this will show 2019, 2020, 2021 and 2022 Property Registries that were not renewed.
- Do NOT check the box at the bottom for ‘Include Blank Dates in this range’, because this will include the licenses with blank expiration dates. Click ‘OK’ when done to save the ‘Date Range’ for this filter.
- Back on the main filter window, click on the ‘Filter Properties’ button and it will bring up this ‘Filter By’ window. Use the top drop-down and select the field/column you want the filter to show. For example, Is Active = True means that only active mercantile applications will show on the data grid.
TIPS:
- If you need to reduce the number of returned results, you can add additional filters. For example, if I add ‘Registration Type’ to show only records with ‘Vacant Property’, the data grid will show only those results. If your filter is not returning any or fewer than expected results, remove or re-add filter properties with different keywords until you get the number of results you need.
- Check the spelling when entering keywords in the filter properties.
- When the filter is done, click ‘OK’ at the bottom to save it.
- Click on ‘My Filters’ and select the filter you just created to apply it. Look at the top right to see the results.
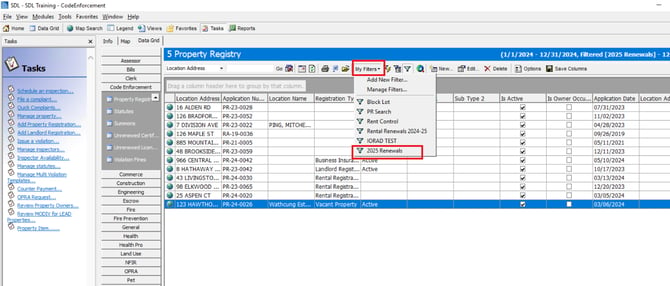
We are now done with creating and applying the data grid filters.
Selecting Property Registry Records
- After filters are applied on the ‘Property Registry’ data grid, right-click on any record in the data grid and a menu will appear. Click on ‘Select All’.
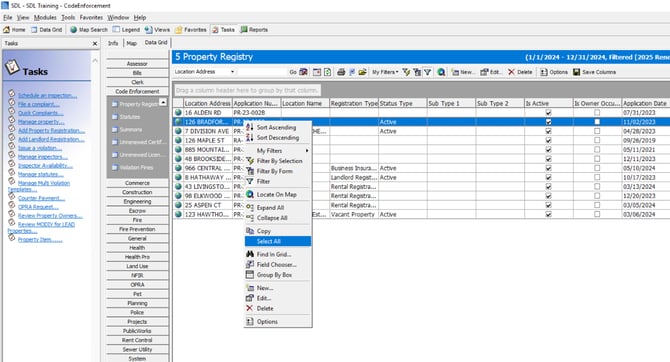
- All records currently showing on the data grid will be selected (highlighted dark blue).
If you want to deselect records, you can hold on to the ‘CTRL’ key on the keyboard and at the same time left-click on the ones you do not want selected.
- After the records are selected, click on the ‘Edit’ button.
-png-1.png?width=670&height=377&name=31045263502861%20(1)-png-1.png)
- Select the option ‘Create Invoice’ and set a ‘Due Date’, then click the ‘Run’ button. (If you want customers to pay by credit card, you will need to check the “Include CC Statement”.)
- When the progress bar under the ‘Run” button is completed, a popup will show how many mercantile licenses were created.
We are now done with the Property Registry Invoice creation part. Next we will print them.
Printing Registry Renewals
- Go to the ‘Property Registry’ data grid and select the same filter that you created. Select All > Edit > Select Print Invoices.
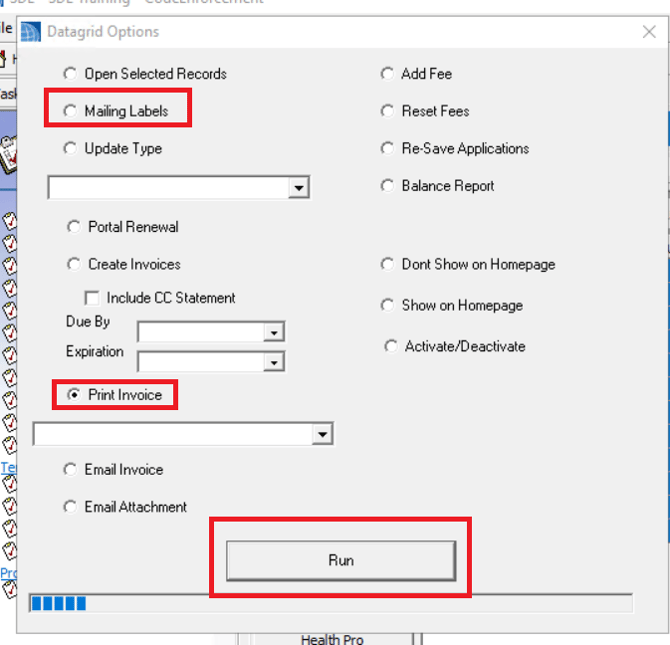
- After the records are selected, click on the ‘Edit’ button and a menu will appear.
- Select ‘Print Invoice’ and click the ‘Run’ button at the bottom and the blue progress bar will show when it is done.
Recap Summary
- Go to the ‘Property Registry’ Data grid and create a filter.
- Apply the filter and select the records that you want to create licenses for. Click the ‘Edit’ button and select ‘Create Invoice’ and remember to set a ‘Due Date’!
- After the licenses are created, go to the “Property Registry License” data grid and create the filter.
- Apply the filter and select the records that you want to print and click the ‘Edit’ button.
- In the popup menu, click on ‘Print Invoices’ and click ‘Run’.