![SDL - 2025 New Logo.png]](https://help.getsdl.com/hs-fs/hubfs/SDL%20-%202025%20New%20Logo.png?height=40&name=SDL%20-%202025%20New%20Logo.png)
1. To begin the renewal process, make sure you are in the clerk module.
Click on Modules
-png-2.png?width=670&height=503&name=1_800x600_z-undefined_mz-0-5_mi-1_ti-0_ar-1_cr-0_si-0_fr-0_tb-1_t-_ftc-_ftb-_mc-_mfc-_complete%20(1)-png-2.png)
2. And then select Clerk
-png-2.png?width=670&height=503&name=2_800x600_z-undefined_mz-0-5_mi-1_ti-0_ar-1_cr-0_si-0_fr-0_tb-1_t-_ftc-_ftb-_mc-_mfc-_complete%20(1)-png-2.png)
3. In the clerk module, click on the data grid.
-png-2.png?width=670&height=503&name=3_800x600_z-undefined_mz-0-5_mi-1_ti-0_ar-1_cr-0_si-0_fr-0_tb-1_t-_ftc-_ftb-_mc-_mfc-_complete%20(1)-png-2.png)
4. Once you are in the clerk module, make sure you are also in the clerk module section
-png-2.png?width=670&height=503&name=4_800x600_z-undefined_mz-0-5_mi-1_ti-0_ar-1_cr-0_si-0_fr-0_tb-1_t-_ftc-_ftb-_mc-_mfc-_complete%20(1)-png-2.png)
5. You can then choose the Mercantile Applications Data grid
-png-2.png?width=670&height=503&name=5_800x600_z-undefined_mz-0-5_mi-1_ti-0_ar-1_cr-0_si-0_fr-0_tb-1_t-_ftc-_ftb-_mc-_mfc-_complete%20(1)-png-2.png)
6. The most important step in renewing licenses is to ensure that you have identified all the applications that need to be renewed.
This is done with Filters.
-png-2.png?width=670&height=503&name=6_800x600_z-undefined_mz-0-5_mi-1_ti-0_ar-1_cr-0_si-0_fr-0_tb-1_t-_ftc-_ftb-_mc-_mfc-_complete%20(1)-png-2.png)
7. By creating a filter you are limiting the records that will be viewed in the data grid. The records that do not match the filter criteria are still in the system just hidden from view.
-png-2.png?width=670&height=503&name=7_800x600_z-undefined_mz-0-5_mi-1_ti-0_ar-1_cr-0_si-0_fr-0_tb-1_t-_ftc-_ftb-_mc-_mfc-_complete%20(1)-png-2.png)
8. Click on the My Filters tab. Choose a filter from the drop down.
-png-2.png?width=670&height=503&name=8_800x600_z-undefined_mz-0-5_mi-1_ti-0_ar-1_cr-0_si-0_fr-0_tb-1_t-_ftc-_ftb-_mc-_mfc-_complete%20(1)-png-2.png)
9. If you do not have a filter setup, Click Add a new filter
-png-2.png?width=670&height=503&name=9_800x600_z-undefined_mz-0-5_mi-1_ti-0_ar-1_cr-0_si-0_fr-0_tb-1_t-_ftc-_ftb-_mc-_mfc-_complete%20(1)-png-2.png)
10. Type in the filter name.
-png-2.png?width=670&height=503&name=10_800x600_z-undefined_mz-0-5_mi-1_ti-0_ar-1_cr-0_si-0_fr-0_tb-1_t-_ftc-_ftb-_mc-_mfc-_complete%20(1)-png-2.png)
11. Check the box to share this filter with your colleagues.
-png-2.png?width=670&height=503&name=11_800x600_z-undefined_mz-0-5_mi-1_ti-0_ar-1_cr-0_si-0_fr-0_tb-1_t-_ftc-_ftb-_mc-_mfc-_complete%20(1)-png-2.png)
12. Click on Filter Properties to set the filter parameters.
-png-2.png?width=670&height=503&name=12_800x600_z-undefined_mz-0-5_mi-1_ti-0_ar-1_cr-0_si-0_fr-0_tb-1_t-_ftc-_ftb-_mc-_mfc-_complete%20(1)-png-2.png)
13. To find the current applications start the search criteria by choosing, 'is Active' from the drop down. Use the = sign and the type in the word 'true' . This setting will find all the Mercantile Applications that are currently listed as active.
-png-2.png?width=670&height=503&name=13_800x600_z-undefined_mz-0-5_mi-1_ti-0_ar-1_cr-0_si-0_fr-0_tb-1_t-_ftc-_ftb-_mc-_mfc-_complete%20(1)-png-2.png)
14. With the next criteria you can select from many options. We chose Last issue date.
-png-2.png?width=670&height=503&name=14_800x600_z-undefined_mz-0-5_mi-1_ti-0_ar-1_cr-0_si-0_fr-0_tb-1_t-_ftc-_ftb-_mc-_mfc-_complete%20(1)-png-2.png)
15. Choose a comparison operator.
-png-2.png?width=670&height=503&name=15_800x600_z-undefined_mz-0-5_mi-1_ti-0_ar-1_cr-0_si-0_fr-0_tb-1_t-_ftc-_ftb-_mc-_mfc-_complete%20(1)-png-2.png)
16. Since we wanted to list anything that was issued up to or before December 2021, We selected the less then or equal to symbol.
-png-2.png?width=670&height=503&name=16_800x600_z-undefined_mz-0-5_mi-1_ti-0_ar-1_cr-0_si-0_fr-0_tb-1_t-_ftc-_ftb-_mc-_mfc-_complete%20(1)-png-2.png)
17. Then type in the date. You can use the date that reflects the last day you issue licenses.
-png-2.png?width=670&height=503&name=17_800x600_z-undefined_mz-0-5_mi-1_ti-0_ar-1_cr-0_si-0_fr-0_tb-1_t-_ftc-_ftb-_mc-_mfc-_complete%20(1)-png-2.png)
18. Click OK save the filter.
-png-2.png?width=670&height=503&name=18_800x600_z-undefined_mz-0-5_mi-1_ti-0_ar-1_cr-0_si-0_fr-0_tb-1_t-_ftc-_ftb-_mc-_mfc-_complete%20(1)-png-2.png)
19. Click OK again to complete the filter setup.
-png-2.png?width=670&height=503&name=19_800x600_z-undefined_mz-0-5_mi-1_ti-0_ar-1_cr-0_si-0_fr-0_tb-1_t-_ftc-_ftb-_mc-_mfc-_complete%20(1)-png-2.png)
20. Now return to the My Filters button
-png-2.png?width=670&height=503&name=20_800x600_z-undefined_mz-0-5_mi-1_ti-0_ar-1_cr-0_si-0_fr-0_tb-1_t-_ftc-_ftb-_mc-_mfc-_complete%20(1)-png-2.png)
21. You should see the new filter you created in the drop down list.
Click on your filter to display the results in the data grid.
-png-2.png?width=670&height=503&name=21_800x600_z-undefined_mz-0-5_mi-1_ti-0_ar-1_cr-0_si-0_fr-0_tb-1_t-_ftc-_ftb-_mc-_mfc-_complete%20(1)-png-2.png)
22. The data grid view can then be sorted by column headings. With your mouse, click and drag Business Class, then drop it into the menu bar above.
-png-2.png?width=670&height=503&name=22_800x600_z-undefined_mz-0-5_mi-1_ti-0_ar-1_cr-0_si-0_fr-0_tb-1_t-_ftc-_ftb-_mc-_mfc-_complete%20(1)-png-2.png)
22b. Drop
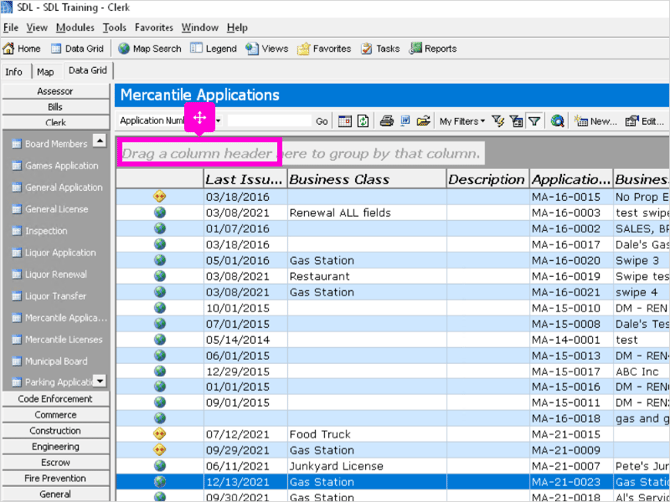
23. This will sort all the renewals by Business Class. Click the + button to expand the section.
-png-2.png?width=670&height=503&name=23_800x600_z-undefined_mz-0-5_mi-1_ti-0_ar-1_cr-0_si-0_fr-0_tb-1_t-_ftc-_ftb-_mc-_mfc-_complete%20(1)-png-2.png)
24. You will be able to view the individual applications under each business class.
-png-2.png?width=670&height=503&name=24_800x600_z-undefined_mz-0-5_mi-1_ti-0_ar-1_cr-0_si-0_fr-0_tb-1_t-_ftc-_ftb-_mc-_mfc-_complete%20(1)-png-2.png)
25. Click the minus sign to collapse the selection.
-png-2.png?width=670&height=503&name=25_800x600_z-undefined_mz-0-5_mi-1_ti-0_ar-1_cr-0_si-0_fr-0_tb-1_t-_ftc-_ftb-_mc-_mfc-_complete%20(1)-png-2.png)
26. The data grid can be sorted this way for any of the headings. Simply drag the column heading to the menu bar and drop it.
-png-2.png?width=670&height=503&name=26_800x600_z-undefined_mz-0-5_mi-1_ti-0_ar-1_cr-0_si-0_fr-0_tb-1_t-_ftc-_ftb-_mc-_mfc-_complete%20(1)-png-2.png)
26b. Drop
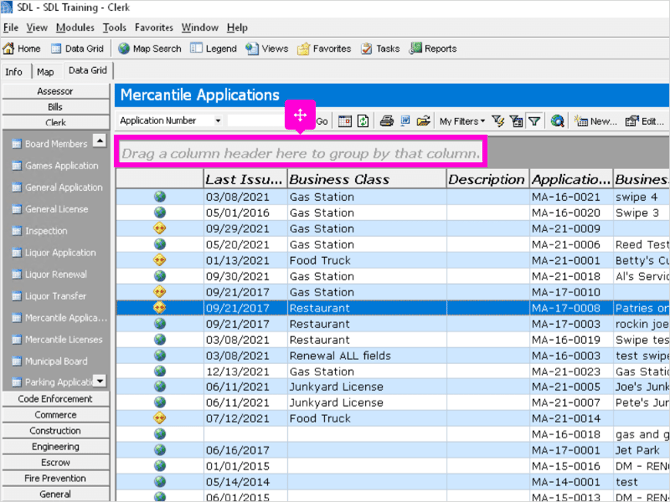
27. This will sort your data grid by Issue Date.
-png-2.png?width=670&height=503&name=27_800x600_z-undefined_mz-0-5_mi-1_ti-0_ar-1_cr-0_si-0_fr-0_tb-1_t-_ftc-_ftb-_mc-_mfc-_complete%20(1)-png-2.png)
28. Once you have decided on the best view of the applications for renewal, highlight the records that you want to renew. Use your Control or Shift key to highlight more than one record.
-png-2.png?width=670&height=503&name=28_800x600_z-undefined_mz-0-5_mi-1_ti-0_ar-1_cr-0_si-0_fr-0_tb-1_t-_ftc-_ftb-_mc-_mfc-_complete%20(1)-png-2.png)
29. Remember when renewing do not select too may records at one time. The system may get bogged down.
In the pop up window check the option to renew license.
-png-2.png?width=670&height=503&name=29_800x600_z-undefined_mz-0-5_mi-1_ti-0_ar-1_cr-0_si-0_fr-0_tb-1_t-_ftc-_ftb-_mc-_mfc-_complete%20(1)-png-2.png)
30. Use the Calendar input to set a new due date.
-png-2.png?width=670&height=503&name=30_800x600_z-undefined_mz-0-5_mi-1_ti-0_ar-1_cr-0_si-0_fr-0_tb-1_t-_ftc-_ftb-_mc-_mfc-_complete%20(1)-png-2.png)
31. Click Run to update the applications.
-png-2.png?width=670&height=503&name=31_800x600_z-undefined_mz-0-5_mi-1_ti-0_ar-1_cr-0_si-0_fr-0_tb-1_t-_ftc-_ftb-_mc-_mfc-_complete%20(1)-png-2.png)
32. You have now renewed all the selected records .
-png-1.png?width=670&height=503&name=32_800x600_z-undefined_mz-0-5_mi-1_ti-0_ar-1_cr-0_si-0_fr-0_tb-1_t-_ftc-_ftb-_mc-_mfc-_complete%20(1)-png-1.png)
33. Once the renewals are complete, navigate to the Mercantile License data grid to access the licenses.
-png-1.png?width=670&height=503&name=33_800x600_z-undefined_mz-0-5_mi-1_ti-0_ar-1_cr-0_si-0_fr-0_tb-1_t-_ftc-_ftb-_mc-_mfc-_complete%20(1)-png-1.png)
34. Filters are used again to view the records to be processed. Choose a filter from the drop down or create a new filter following the procedure previously demonstrated.
-png-1.png?width=670&height=503&name=34_800x600_z-undefined_mz-0-5_mi-1_ti-0_ar-1_cr-0_si-0_fr-0_tb-1_t-_ftc-_ftb-_mc-_mfc-_complete%20(1)-png-1.png)
35. You can create a filter using the due date you set for the renewals.
-png-1.png?width=670&height=503&name=35_800x600_z-undefined_mz-0-5_mi-1_ti-0_ar-1_cr-0_si-0_fr-0_tb-1_t-_ftc-_ftb-_mc-_mfc-_complete%20(1)-png-1.png)
36. Highlight the renewals you want to process further.
-png-1.png?width=670&height=503&name=36_800x600_z-undefined_mz-0-5_mi-1_ti-0_ar-1_cr-0_si-0_fr-0_tb-1_t-_ftc-_ftb-_mc-_mfc-_complete%20(1)-png-1.png)
37. Click Edit in the menu bar to continue the process.
-png-1.png?width=670&height=503&name=37_800x600_z-undefined_mz-0-5_mi-1_ti-0_ar-1_cr-0_si-0_fr-0_tb-1_t-_ftc-_ftb-_mc-_mfc-_complete%20(1)-png-1.png)
38. From the pop up screen, select the option that pertains to your selected records. We have chosen to print the Invoices.
-png-1.png?width=670&height=503&name=38_800x600_z-undefined_mz-0-5_mi-1_ti-0_ar-1_cr-0_si-0_fr-0_tb-1_t-_ftc-_ftb-_mc-_mfc-_complete%20(1)-png-1.png)
39. Next we select which invoice template we are utilizing.
-png-1.png?width=670&height=503&name=39_800x600_z-undefined_mz-0-5_mi-1_ti-0_ar-1_cr-0_si-0_fr-0_tb-1_t-_ftc-_ftb-_mc-_mfc-_complete%20(1)-png-1.png)
40. Click Run to create the invoices.
-png-1.png?width=670&height=503&name=40_800x600_z-undefined_mz-0-5_mi-1_ti-0_ar-1_cr-0_si-0_fr-0_tb-1_t-_ftc-_ftb-_mc-_mfc-_complete%20(1)-png-1.png)
41. Click Yes to confirm you are ready to print the invoices.
-png-1.png?width=670&height=503&name=41_800x600_z-undefined_mz-0-5_mi-1_ti-0_ar-1_cr-0_si-0_fr-0_tb-1_t-_ftc-_ftb-_mc-_mfc-_complete%20(1)-png-1.png)
42. Click Yes if you want to attach the invoice to the mercantile application.
Once this is complete the renewal process is complete and you are now waiting for payment.
-png-1.png?width=670&height=503&name=42_800x600_z-undefined_mz-0-5_mi-1_ti-0_ar-1_cr-0_si-0_fr-0_tb-1_t-_ftc-_ftb-_mc-_mfc-_complete%20(1)-png-1.png)