Overview
This article walks you through managing certificate types in SDL Desktop—where to go and what you can change. You can add new types, edit existing ones, or delete them. You can also configure details such as title/label, Purpose text, fees, tracking numbers, and optional settings (e.g., signatures, tenant display, and report options).
Getting Started
Before building your certificate:
-
Make sure you have administrative access to the Code Enforcement module.
-
Provide a copy of your existing certificate — This gives the team a reference to match the layout, title, and printed details as closely as possible in the system.
-
Have your fee schedule ready—fees are set by certificate type. Preparing the full fee schedule before setup prevents later changes.
-
Know the approved legal Purpose text — This text appears on the certificate. Wording requirements vary by municipality; confirm your locally approved language before setup.
Sample purpose text: This certificate is issued under the Municipal Code and Uniform Construction Code. It certifies that, at inspection, the premises described complied substantially with all applicable building and life safety ordinances. This certificate remains valid until tenancy or ownership changes.
Step-by-Step Instructions
-
Confirm you’re in the Code Enforcement view. Look for "Code Enforcement" centered at the top of the screen under your municipality name.
If you don’t see it, go to Modules, select Code Enforcement from the drop-down, and wait for the module to load.
-
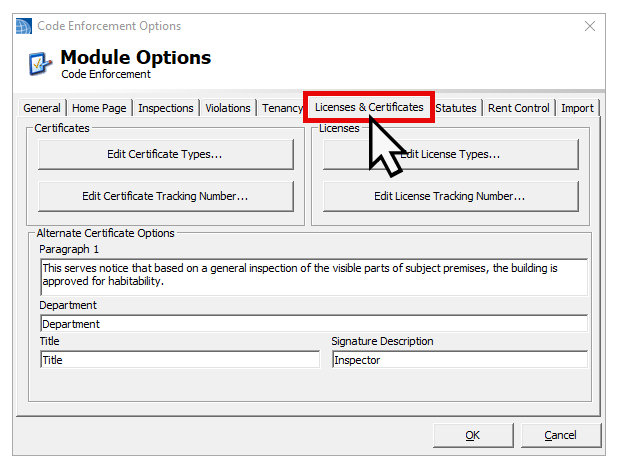
Click the Tools menu and click CodeEnforcement Options… from the dropdown menu.

-
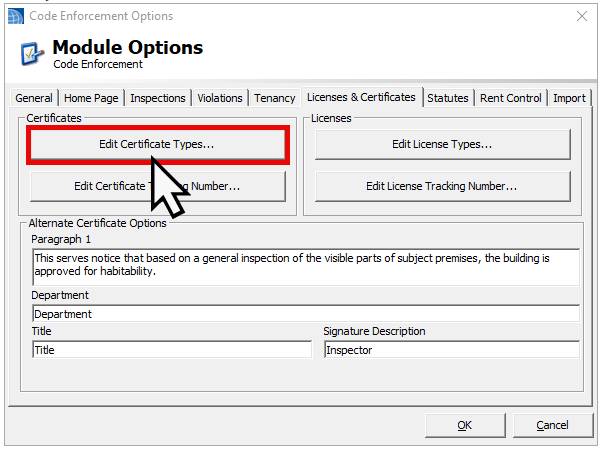
Click the License and Certificates tab.
-
Click Edit Certificate Types.
-
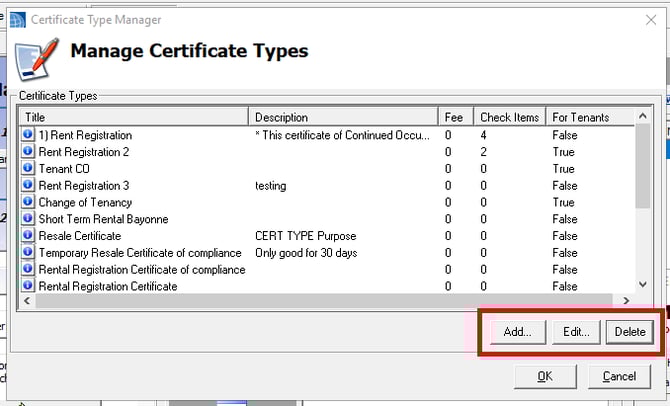
In the Manage Certificate Types window, you have 3 options:
-
Click the Add button to create a new certificate.
-
Select an existing type from the list and click Edit to modify it.
-
Or, select an existing type and click Delete to remove it.
🛑 Critical: Deletion is Permanent: Deleting a certificate type is strongly discouraged and should only be performed if you are 100% certain it is no longer needed. Deleting a type may affect existing certificates or historical data associated with that category.
-
-
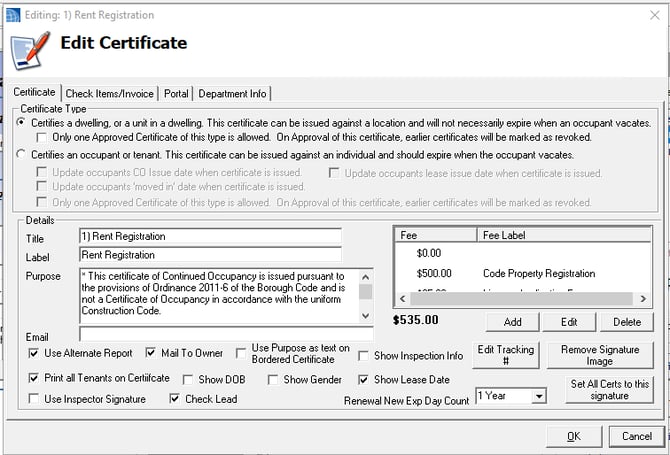
Adding or modifying a Certificate type will open the same Edit Certificate window:
-
Select a Certificate Type — Choose one of the radio buttons based on what the certificate applies to:

-
Certifies a dwelling, or a unit in a dwelling. Use when the certificate stays with the physical building, such as a standard CO or fire inspection outcome. Additionally, you can check if Only one Approved Certificate of this type is allowed.
-
Certifies an occupant or tenant. Use when the certificate is tied to the occupant, such as a Rental Registration. Use the checkboxes to note any additional circumstances that may apply.
-
💡Important: Where Certificate Types appears
The certificate type you create will appear based on your selection:-
Dwelling/Unit certificates will appear under the Unit > Certificate tab (and will not appear under Tenants).
-
Occupant/Tenant certificates will appear under the Unit > Tenants > Certificate tab (and will not appear under the general Unit tab).
-
-
-
Next, update the following in the Details section:

-
Title: Enter the internal shorthand name used to identify this certificate within the SDL Desktop dropdown menus and search filters.
-
Label: Enter the formal name of the certificate as it should appear on the printed document.
-
Purpose: Type or paste the approved legal text to print on the certificate body. This usually includes the specific ordinance or code section that justifies issuance of the certificate.
-
Email: Enter an email address here (like a department head or inspector) if you want a copy of the certificate automatically sent to a specific persons inbox every time this type of certificate is created.
-
-
Select the following checkboxes as needed:

-
Use Alternate Report: Check this box to print the certificate using a more professional, bordered layout by default.
-
Mail to Owner: Check this box to route automated emails regarding this certificate application directly to the property owner instead of the applicant.
-
Use Purpose as text on Bordered Certificate: Check this box to ensure your custom "Purpose" text prints even when using the alternate, bordered report format.
-
Show Inspection Info: Check this box to print specific inspection details directly on the finalized certificate.
-
Print all Tenants on Certificate: Check this box to list the names of all associated tenants on the printed document (most useful for tenant-based certificates).
-
Show DOB: Check this box to include the tenant's Date of Birth on the printout.
-
Show Gender: Check this box to include the tenant's Gender on the printout.
-
Show Lease Date: Check this box to include the start date of the lease on the printout.
-
Use Inspector Signature: Check this box to automatically apply the signature of the specific inspector who completed the inspection. Leave it unchecked if you want to use a default Director/Department Head signature.
-
Check Lead: Check this box if this certificate requires lead-safe tracking or lead inspection verification.
-
-
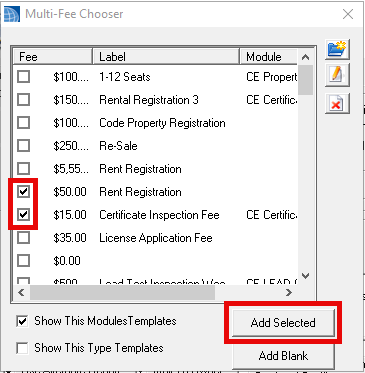
Manage Fees: Add, Edit or Delete Fees as needed. The total amount is shown on the bottom left of the Fees area.

To add a new Fee:-
Click Add to open the Multi-Fee Chooser window.
-
Check each fee you’d like to add.
Note: If you charge for re-inspections, you must add these manually later during the actual inspection process, as re-inspections are conditional and cannot be hard-coded into the base certificate fee. -
Click Add Selected to confirm your changes.
-
-
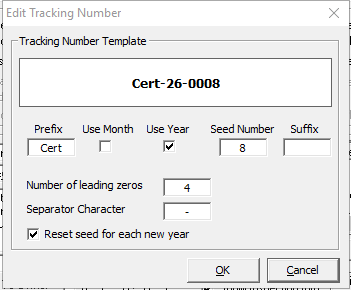
Tracking Numbers: If a numbering system is required, check Edit Tracking #, update the sequence formatting as needed, and click OK.
-
Remove Signature Image: Click this button to delete the default signature image currently uploaded to this specific certificate type. You’ll need to click Yes to confirm.

-
Renewal New Exp Day Count: Select a value (1 month, 3 months, 1 Year, etc.) if you’d like to select a default expiration date from the date the Certificate is approved.

-
Set All Certs to this signature: Click this button to quickly apply the signature image uploaded here to every other certificate type in your system, saving you from doing it manually one by one.

-
Click OK— Review all your changes and click OK to save the new Certificate Type, again to close out of the Certificate Type Manager, and lastly exit the Code Enforcement Options.

⚡ Save these Quick Steps
-
Open Options — Go to Tools > CodeEnforcement Options… > License and Certificates > Edit Certificate Types.
-
Add or Edit — Click Add to create a new type, or select an existing one and click Edit.
-
Select a Certificate Type Choose whether the certificate applies to the location or the tenant.
-
Set Title & Label — Enter the certificate name as it should appear internally and on the printed certificate.
-
Add Purpose — Enter the locally approved summary text that prints on the certificate.
-
Configure Options — Set preferences as needed.
-
Save — Click OK (3x).
✅ The certificate type is now saved and available for staff to select when adding a certificate to a property or unit.