Connect Form Settings
Form Settings Overview
Form settings allow internal users to automate many manual processes currently involved in application and permit processing. Form settings help to streamline the entire form processing experience, reducing administrative overhead and increasing efficiency.
Key items associated with form Settings:
- Define Approvers: Specify who the approvers are for each form.
- Enable Renewals: Allow the system to handle renewals of particular forms.
- Create Reports: Generate reports such as letters, certificates, or licenses related to specific forms.
- Set Permitting Processes: Configure processes like permitting, inspections and violations that are controlled by licensing levels.
1. Form Settings: General Tab
Configuring the General Tab effectively will streamline the workflow for both internal users and the public, reducing administrative burden and improving efficiency.
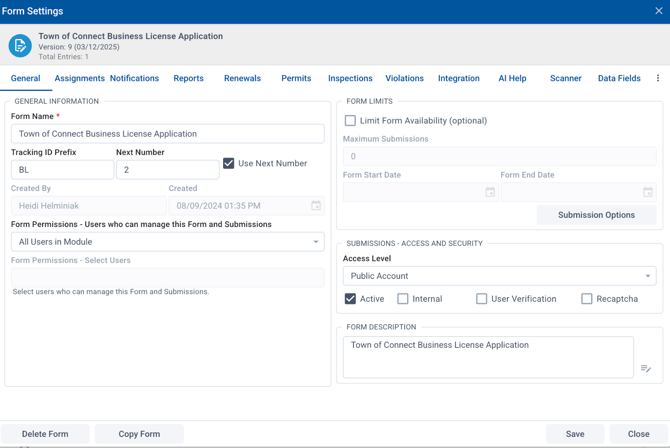
General Information
Form Name
- Form Name: The descriptive title of the form (e.g., "Business License Application", “Park Rental”, “Building Permit”). This name is viewable to both internal and external users depending on the access level and appears on the Portal requests page as well as in data grids and submission records.
- Example: "Town of Connect Business License Application."
- Example: "Town of Connect Business License Application."
Tracking ID Prefix and Number Sequences
- Form ID: Unique identifier for each submission (e.g., F-25-00004). Establishes a tracking identifier for form submissions. This includes setting a prefix and managing number sequences to ensure all submissions are uniquely identifiable.
Next Number
- Next Number: The next number, along with the tracking ID prefix, make up the unique identifier. By selecting Use Next Number it allows the system to utilize the next available number available in the system. Some clients may opt to have the next number continue from a prior system. If Next Number is not selected it would require hand keying in the number on submission processing.
Created By:
- Created By: Display name of the user who created the form (e.g., John Smith) with a date and time stamp of form creation.
Form Permissions
- Form Permissions: Specify specific users who can manage the form and submissions.
- Options: All Users in Module (Department) or Select Users.
- All Users: All users in a department (module) have access - default for new forms.
- Select Users: Enables form permissions for select users. A list of users in the system will be available for selection in the drop down. This would limit access to only those particular users.
- Options: All Users in Module (Department) or Select Users.
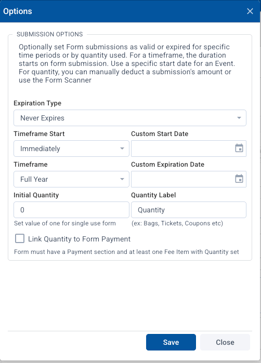
Form Limits
The Form Limits section allows you to define rules for form submissions. For example, you can specify an expiration type, start time, and initial quantity for limited submissions, such as event tickets.
- Form Limits: Limit the number of form submissions by setting the maximum number of allowed submissions. This is useful for special events or limited-time offers. Set "Maximum Submissions" to 0 for unlimited submissions or specify a limit.
Submission Options:
- Expiration Type: Choose whether the form expires or not. For example, "Never Expires”, “Expires By Timeframe”, or “Expires by Quantity".
- Timeframe Start: Choose when the form submission starts, such as immediately or on a custom start date.
- Timeframe: Set the duration of the form’s availability, such as for an Hour, Day, Week, Month, 6 Months, Full Year, End of Year, Select Expiration Date.
- Initial Quantity: Specify the quantity available for submission (e.g., 0 for unlimited, or a specific number like 100).
- Quantity Label: Define what the quantity represents (e.g., Tickets, Coupons).
- Link Quantity to Form Payment: If enabled, this links the quantity to a form payment. Form must have a Payment section and at least one Fee Item with Quantity set.
Submissions - Access & Security
Access Level: Allows you to set who has access to forms and whether they require an account or will be public or internal to your organization. SDL Account is the default access level for new forms.
- Anonymous: Set to Anonymous which allows anyone to access and make a submission without an SDL portal account.
- Public Account: Set to Public Account for submissions that require an SDL Portal account. This setting is recommended when you want notifications and updates to be streamlined through the system automatically.
- SDL Account: Set to SDL Account when you want to limit access to forms and applications to internal employees. This access is often used for internal forms within departments such as IT Requests, Name Changes and other internal processes you want to utilize forms for.
Note: If you choose to add a form with SDL Account access to the Portal Request page, only internal Connect users (staff employee users with an active SDL employee account) will see the item on the requests page. It will not be visible to citizens.
In addition to the Access levels for forms, there are four options you can also set with each access setting.
- Active: Default selection for newly created forms. This sets the form to active, which means it’s available for the access level selected.
- Example: If SDL Account is selected for the access, the “Active” checkbox is selected and you’ve chosen to add it to the requests page, the form will appear only for internal employees using the SDL Connect system.
- If “Active” is not selected, the form won’t be active to use for submissions regardless of the access level it is set to. Using the previous example, the form would no longer appear on the requests page for the internal employee using the SDL Connect system.
- Internal: This setting is being updated; we do not recommend using it for now.
- User Verification: Requires users account to be verified in order to successfully complete a submission / access form. If your portal account is not verified applicant cannot complete a submission. They will be prompted with links to verify their Portal account to complete the submission.
- Recaptcha: Regardless of access level for the form, this requires a user to complete a reCAPATCHA in order for the submit button to appear.
Form Description
- Form Description: Allows you to enter a description of the form, which will also appear as a snippet on the portal if the option to add it to the Portal requests page has been selected. This will also appear on the QR code placard option.
2. Form Settings: Assignments
The Assignments and Form Approvals sections help manage the workflow for form and permit submissions, approval processes, and user assignments. These are essential for organizing and assigning forms within the workflow of a town, city, or county process. It allows the configuration of which department and user are responsible for reviewing and processing submissions.
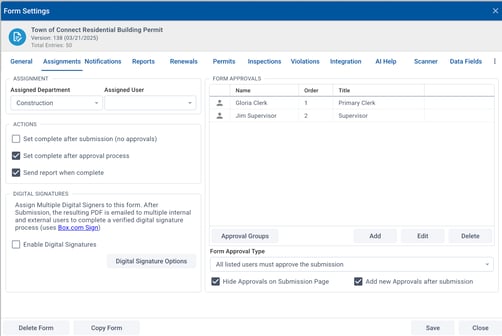
Assignment
- Assigned Department: This field is used to set the default department for the form. For example, you could assign the form to the Zoning Department, Planning Department, or Permit Office.
- Assigned User: This option allows you to optionally assign the form to a specific user within the department. Once a submission is received, the form is automatically assigned to the user as long as they are within the department.
Note: If the selected user(s) does not have permissions for the selected department, they will not receive an email.
Example: A Zoning Clerk could be the default user assigned to handle all zoning-related forms. The user will receive an email notification whenever a new submission is made, ensuring they are alerted immediately to take action.
Actions
In the Actions section, you can define the workflow behavior for form submissions.
- Set Complete After Submission (no approvals): This action marks the form as complete immediately after submission, without requiring approvals. It is used when approvals are not necessary, and the form should be considered final once it’s submitted.
Example: This may be used for applications or forms like Block Parties. Once payment is made at time of submission, approval is immediate. This would typically be used in conjunction with the “Send report when complete” option so the certificate can be generated once payment is received and submission is complete. The permit “report” would then be available to the applicant in their portal account in the permit request area.
- Set Complete After Approval Process: This action ensures the form is only marked as complete after all necessary approvals have been obtained. It ties into the approval process, ensuring forms go through the required review and sign-off stages before being finalized. This option uses the approvers specifically listed in the Form Approvals list.
- This option can also be used in conjunction with the “Send report when complete” option to auto generate the completion of the report (letter, certificate, permit, etc.,).
- This option can also be used in conjunction with the “Send report when complete” option to auto generate the completion of the report (letter, certificate, permit, etc.,).
- Send Report When Complete: Once the form is marked as complete or is “processed,” a report is automatically generated and sent out to the applicant. This eliminates the need to email applicants separately; they can check on status and print their reports directly from their portal account.
Note: The report that is created during this process uses the “primary report” associated with the form. The primary report is created by using the “Report” button at the top of the Form Designer when you are designing / editing a particular form. This differs from other reports that can be configured in form settings.

These actions help control the completion and notification process, making sure forms are finalized correctly and applicants are informed at the right stages.
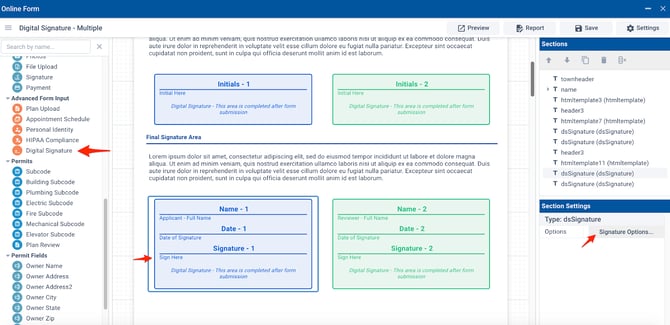
Digital Signatures*
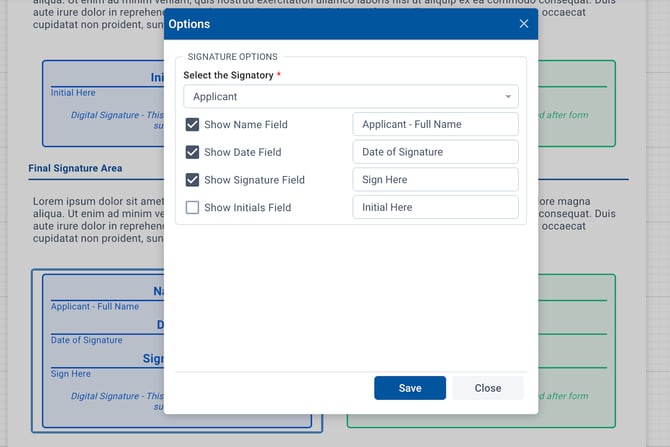
Capture multiple signatures using Digital Signature functionality with secure Box Sign integration. Forms, applications or permits requiring multiple signatures can be accommodated using the Digital Signature functionality. A Digital Signature section is available under Advanced Form Input in the Form Designer. This is used in conjunction with selecting Enable Digital Signatures on the form settings Assignments tab and defining the digital signature options.
*Digital signatures is a licensed feature.
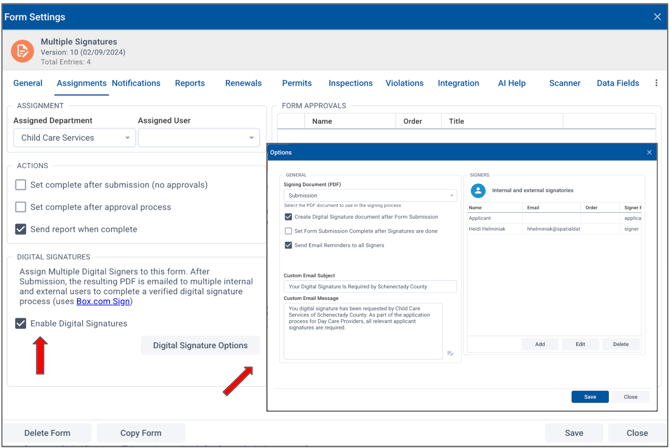
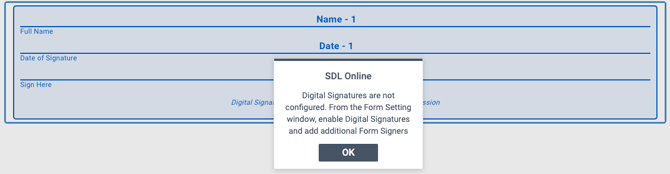
A Multiple Signatures section must also be present on a form and configured in the Form Settings section as noted above.
Otherwise, a message will appear alerting Digital signatures are not properly configured.
-1.png?width=670&height=326&name=9b9baebd-dcfa-4f53-83ae-2a883e930169%20(1)-1.png)
When digital forms replace paper applications that require physical signatures, digital signatures can be used to maintain compliance with current processes.
Use Cases:
- A teen applies for a summer job program and their parent's signature is required in addition to their own.
-
A state requirement for two mandatory signatures if there are two parents in a household when applying for a daycare assistance program.
Form Approvals
Form Approvals allows you to set up approval levels for your forms, ensuring they go through the proper workflow before being finalized. This is particularly useful when multiple individuals or departments need to approve an application in a specific order, such as in the case of business licenses, certain types of permits, or internal or other regulatory forms.
- Add Approvers: This allows approvers to be added to forms. When adding an approver, you are prompted to enter a user. Clicking in the field will display the list of users available in the system. These approvers would then be default approvers for every submission for this particular form.
- Approval Order: Each approver can have an approval order associated with them. Lower numbers must be approved before higher numbers. If you don’t want an order for any of the approvers, use zero.
- Edit / Delete: Edit allows you to edit an existing approver and delete allows you to remove an approver from the list.
- Approval Groups: This section allows you to define groups of users who will need to approve the form. You can specify the order in which approvals must occur within an approval group, ensuring that the application passes through the necessary stages before being finalized. Lower numbers must be approved before higher numbers. Use zero for no order. You can also omit the order and all approvers will still need to approve the form.
- Based on the individual submission of a form, you may want to decide the group of people who need to approve it. You can set-up these groups and then add them during the processing of the submission. This allows you to adjust the approvers as needed.
Example: This could apply to a building permit submission that may require a specific group of approvers in planning, zoning or environmental departments. These approvers may not always be applicable for all building permit submissions but would be available to add to the approval process during the processing of the application.
- Based on the individual submission of a form, you may want to decide the group of people who need to approve it. You can set-up these groups and then add them during the processing of the submission. This allows you to adjust the approvers as needed.
Form Approval Type

This field allows you to choose if all listed users must approve the submission before it moves forward. This ensures that no form is processed without the necessary approvals. Alternatively, you can choose any of the listed approvers can approve the submission. The latter is often used for departments where multiple individuals process submissions and allows any one of the individuals to move the application forward.
- Additional options allow you to:
- Hide approvals on the submissions page: If you do not want to display the name of the reviewers on the applicant's view of the submission, select this option.
- Add new approvers after a submission: If there are times where adding additional approvers will be necessary, check this box so additional approvers can easily be added during the review / processing phase.
3. Form Settings: Notifications
In the Notifications tab, you can customize the after-submission text, email notifications, and completion emails to applicants, providing them with clear, timely information about their form submissions. These can help to improve and streamline communication.
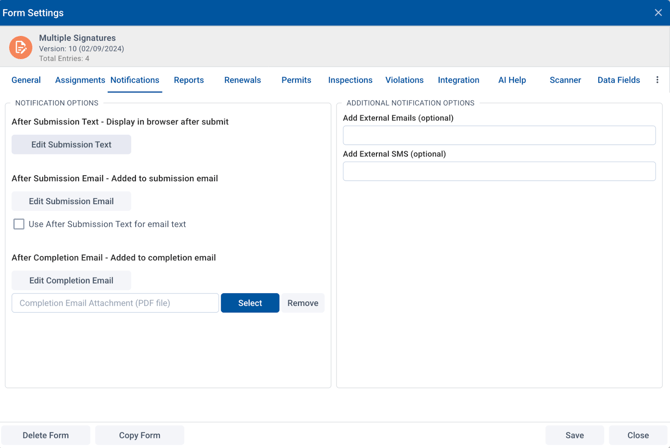
After Submission Text - Display Text After Submit
- Display Text After Submit: You can specify the text that will appear in the browser after a user submits a form. This text can be customized to give users a confirmation message, instructions or what to expect for next steps.
- Click the Edit Submission Text button to modify the message that users see immediately after they submit the form.
After Submission Email - Added to Submission Email
- Customize the Submission Email: When a form is submitted, an email is sent to notify the appropriate users. You can customize the content of the email, including any specific instructions, confirmation, or follow-up details.
- Click the Edit Submission Email button to modify the content.
- You can optionally choose to use the same text as the After Submission Text (displayed in the browser) by selecting the checkbox "Use After Submission Text for email text" to automatically include the same message in the email.
After Completion Email - Added to Completion Email
- When the form or application process is marked as complete, a completion email is sent to the relevant users. You can customize the content of this email to include any final information or instructions.
- Click the Edit Completion Email button to modify the email that gets sent once the form is complete.
- You can also attach a PDF file to the completion email. This might be useful if you want to send a detailed confirmation or a summary of the submission. To add a PDF attachment, click Select to choose the relevant file.
- Click the Edit Completion Email button to modify the email that gets sent once the form is complete.
Additional Notification Options
Adding External Emails and SMS
- Add External Emails (optional): If users outside of your department need to be notified of a form submission, enter the email addresses of the individuals who need to be notified.
- Add External SMS (optional): Add an external SMS number to send a notification to individuals who need to be aware of particular form submissions.
4. Reports
The Reports tab allows you to add additional documents such as other approval or denial letters, certificates, or other documents that need to be generated as part of the approval or denial workflow process. The Reports tab does not replace the primary report that is associated with the form approval process described in section 2. Form Settings - Assignments.
For non-permit submissions, these reports can be used to supplement the main report that is automatically generated for form submissions utilizing Actions settings on the Assignments tab that send reports when the approval is complete.*
*Note: The primary report does not apply to the permitting process and is not used as it is with other Form submissions.
Example: For a Mobile Food Establishment application, the main permit is generated once the application is completed and approved. However, in a scenario where the application is being denied, a letter outlining the reasons for denial could be associated as an additional report and generated as part of review process.
-
Adding New Reports: To add a new report, such as a denial letter, certificate or a custom letter follow these steps:
-
Click the Add button in the Reports section. This opens a form where you can specify the details for the new report.
-
Enter a name for the report. This name will appear in the list of available reports.
- To create and edit the report, choose Show Report Editor.
- You can work from a blank page or you can pick from existing templates by clicking Page Settings, and then choosing from the Available Templates dropdown.
- To move a field from the Form Data Fields on the left onto the document, double click the field name such as First / Last Name, Issued Date, etc.
- You can add also text, images and formatting to the document.
- To check the formatting and appearance, click on Preview at the top right.
- When done, click Save to return to the Report window.
- Click Save to add the report to the system.
-
Once reports are added, you can Edit existing reports by clicking the Edit button. You can also Delete a report that is no longer needed, click the Delete button to remove it from the list. Each report shows the creation and update dates and who last updated it, so you can keep track of changes.
-
5. Renewals
The Renewals tab can automate the renewal process for applications and permits, reducing manual work such as sending out reminder emails. This is particularly useful for forms related to Clerk or Health Department applications, such as Pet Licenses and Business Licenses, which typically require annual renewals.
Renewal Options
-
Enabling Renewals: When creating a form that requires renewal (e.g., annual permits or licenses), you must check "Enable Renewals" to activate the renewal functionality for the form. This ensures all form submissions associated with that form will automatically be set for renewal.
Important Note: If you enable renewals after receiving submissions, some forms may not automatically generate renewal emails, so it is best to enable this option when first creating the form.
Setting Renewal Frequency
You can choose the frequency of renewals by specifying the number of days before the form's expiration date, or you can choose a specific manual renewal date.
- Renewal Type: Number of Days or Manual Date
- Renewal in Days: This option allows you to set how many days before the expiration date the renewal email should be sent. The default is set to 7 days, which means the system will send renewal notifications 7 days before the permit or license expires.
- Manual Renewal Date: If a manual date is preferred, use this option along with selecting a specific date for all renewals to go out using the Manual Renewal Date calendar field.
- Renewal in Days: This option allows you to set how many days before the expiration date the renewal email should be sent. The default is set to 7 days, which means the system will send renewal notifications 7 days before the permit or license expires.
-
Submission Status: In this section, you can specify the conditions under which renewals will be triggered. If you leave this field blank, renewals will be sent for all status values.
- Reset Renewal Dates: If necessary, you can reset the renewal dates for all form submissions. This can be useful if there are changes to the renewal schedule or if a batch of renewals needs to be updated.
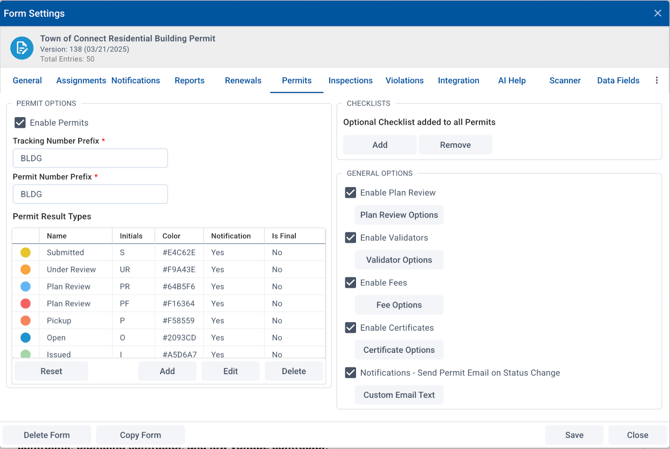
6. Permits
The Permits tab requires a Permitting, Licensing & Inspections license. This is where the configuration is done for tracking numbers, permit result types, plan reviews, validations, fees, and certificates.
-
Tracking & Permit Number Prefixes: You can customize the format for tracking and permit numbers by setting a prefix. These prefixes are used to organize and categorize your permit types.
-
Permit Result Types: You can define various permit result types, which help track the status of permits. Each result type has a color, initials, and a notification setting. You can also specify whether the result is final.
-
Add New Permit Result Types: Click the Add button to create a new permit result type. You will need to specify:
-
Name (e.g., "Submitted", "Under Review")
-
Initials (e.g., "S", "UR")
-
Color (Select a color for visual identification)
-
Notification (Enable or disable email notifications for this result type)
-
Is Final (Specify whether this result is a final status)
-
-
-
Edit or Delete Permit Result Types: Use the Edit button to modify any existing result types. Use the Delete button to remove any result types you no longer need.
-
Checklists: Optional Checklist Added to All Permits:
- This option allows a checklist to be associated with all permit submissions for the specific form. When a checklist is added to a form in Form Settings, it means every permit submitted will have the Checklist associated with it by default.
- If the checklist validator (see General Options: Enable Validators below this section) is set to true for the permit in Form Settings, the completion of the checklist would trigger the validator and block the issuance of the permit until the checklist is completed. If a checklist has 7 items, all seven items would either need to be marked as Yes/No or NA in order for the checklist to go from red to green.
- Additional checklists can be added during the processing phase. Likewise, a default checklist could also be removed during the processing phase. If a default checklist or other checklists are removed during permit processing, the permit validator will turn grey as checklists aren’t present.
- Note: If the checklist is added after permit submissions have already occurred, the checklist will only apply to future permit submissions, not to prior ones.
- Note: Checklists are created and managed in Admin Settings → Settings → Checklists.
The General Options section includes several several options for permits that can be enabled.
-
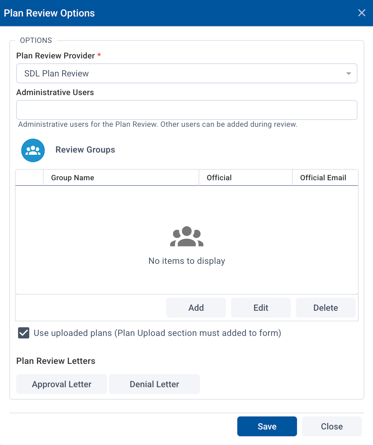
Enable Plan Review: If the permit template will require a plan review process, check this option. Then click the Plan Review Options button to configure options. These options allow you to configure the process for reviewing and approving plans associated with your form and result permit submission. This feature is especially useful for forms related to construction permits or other applications requiring a detailed plan review process. You can define administrative users, set up review groups, and specify review letters for approval or denial.
-
-
Plan Review Provider: The Plan Review Provider is where you specify which service provider will be used for the plan review process. Currently, SDL is the only provider available.
-
Administrative Users: Specify who the administrative users are for the plan review process. These are the users responsible for overseeing the review process and ensuring it moves forward. Type in the name of the user(s) you want to add. Other users can be added later during the review phase if needed.
-
Review Groups: Assign specific officials or teams to review plans. Each group can consist of one or more officials who will evaluate the submitted plans.
-
Click the Add button under Review Groups to create a new review group. Provide the Group Name, the Official's Name, and their Official Email. This helps identify which individuals or teams are responsible for reviewing the plan.
-
You can add multiple officials under each group as needed. After adding the required officials, click Save to store the changes.
-
You can also Edit or Delete a review group by selecting the appropriate button next to an existing group.
-
-
- Use Uploaded Plans: If the review process requires the submission of plans, you can allow users to upload plans during the form submission process. Selecting this option will use the plan submitted using the “Plan Upload” form section to initiate a plan review.
-
-
-
Plan Review Letters: Approval and Denial letters can be configured and then generated during the plan review process. These letters can include form submission information and notes from the plan review itself.
-
-
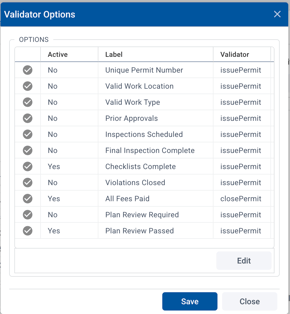
Enable Validators: The Validator Options in the Permits section are used to ensure certain criteria or conditions are met before a permit can be issued or closed. These validations act as checks to ensure that the permit application is complete and compliant with all requirements.
-
-
Validator Options: Each Validator Option has a label (such as "Unique Permit Number" or "All Fees Paid") that corresponds to specific criteria that must be validated. As listed in the above image, the validators are either tied to the issuance or closure of the permit and can be set to active or inactive. They are tied to actions or status in the system.
-
This is a set list of validators that cannot be added to. To account for other validator scenarios, a checklist could be used.
-
Active: This column indicates whether the validation is enabled (Yes) or disabled (No).
- Label: The name of the validator such as "Checklist Complete" or "Plan Review Passed".
- Validator: This column shows what action triggers the validation, such as issuePermit (tied to permit issuance) or closePermit (tied to closing the permit). Each validator ensures that specific steps or conditions are met before the next action can be taken.
- Note: Validators can only be set to active or inactive.
-
- Example of Validator Options: Here’s a breakdown of some common Validator Options that can be enabled.
- Unique Permit Number: Ensures that each permit has a unique tracking number. If a permit number has not been generated, the issue permit status will trigger an error message.
- Valid Work Location: Confirms that a work location (property location) is present before the permit can be issued.
- Valid Work Type: Verifies that the work type (e.g., construction, renovation) is populated.
- Checklists Complete: Ensures that all necessary checklists are completed before proceeding with the permit. This can serve as a wildcard for multiple use cases. Since anything can be part of a checklist, this helps answer the question of “can I add additional validators?"
- All Fees Paid: Checks whether the applicant has paid all required fees before allowing the permit to change to an Issued status.
- Plan Review Passed: Confirms that the submitted plan has passed the review before the permit can be issued.
-
-
Enable Fees: Enabling and configuring fees allows the automation of fee calculations based on form data, ensuring that applicants are charged accurately and consistently. By setting a Base Fee, adding Additional Fees, and using complex fee calculations, you can tailor the fee structure to suit the specific fee schedule for a given permit. This feature helps streamline the process, saving time and reducing errors. Fees can be unique to a particular form or apply to multiple forms. To activate the fee functionality for a form:
-
-
In the Fee Options window, you can either choose the “Add” button to add a fee for this specific form or choose the "Fee Library" button to select from fees that may be used in multiple forms (see Help Desk article Connect Fee Library ). These fees rely on the exact DataID to be present for each form where the fee calculation will be used.
-

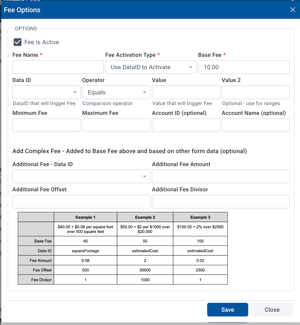
- To add a fee for this permit, choose the Add button.
- Add a Name for the fee.
- Set the Base Fee: This is the starting fee that will be applied to the form. Enter the amount for the base fee. Example: If your base fee is $10.00, enter $10.00 in the Base Fee field.
- Fee Activation Type: Choose the activation type for the fee:
- Use DataID to Activate: This option triggers the fee based on specific DataId values submitted with the form.
-
Enter a Data ID: Select the DataId to be used (e.g., squareFootage or estimatedCost) that will trigger the fee calculation.
-
Operator: Choose the operator (e.g., Equals, Not Equals, Contains, Range, Greater Than, Greater Than Or, Less Than, Less Than or Equal) to determine when the fee is activated. These options provide flexibility to account for various fee schedules.
-
Value: Enter the value that will trigger the fee calculation.
-
Example: For a permit where a fee is applied if the square footage exceeds 500, set the Data ID to squareFootage, the Operator to Greater Than, and the Value to 500.
-
-
-
Minimum and Maximum Fees
-
Minimum Fee: Set the minimum fee that will be applied, regardless of the calculations. For example, if the calculated fee is lower than the minimum fee, the system will apply the minimum amount.
-
Maximum Fee: Set the maximum fee that can be charged. If the calculated fee exceeds this amount, the system will apply the maximum fee.
-
-
Additional Fees Based on Form Data (Optional): You can add additional fees based on other data fields from the form. This is useful for more complex fee structures.
-
Additional Fee - Data ID: Select another data field (e.g., squareFootage, estimatedCost) to calculate the additional fee based on.
-
Additional Fee Amount: Enter the additional fee amount that will be added based on the data field.
-
Additional Fee Offset: Specify any offset values, such as if the fee increases based on specific thresholds (e.g., a square footage over a certain limit).
-
Additional Fee Divisor: Use this to divide the fee calculation by a specific divisor.
-
- Use DataID to Activate: This option triggers the fee based on specific DataId values submitted with the form.
-
Complex Fee Examples You can create more complex fee structures by combining the base fee with additional fees and conditions. Here are some examples of how fees might be calculated:
- Example 1:
- Base Fee: $40.00
- Additional Fee: $0.08 per square foot over 500 square feet
- Fee Calculation: If the square footage is 600, the fee would be $40 + (100 * $0.08) = $48.00.
- Example 2:
- Base Fee: $50.00
- Additional Fee: $2.00 per $1000 over $20,000
- Fee Calculation: If the estimated cost is $25,000, the fee would be $50 + (5 * $2) = $60.00.
- Example 3:
- Base Fee: $100.00
- Additional Fee: 2% of the estimated cost over $2500
- Example 1:
-
- Fees/Levies Applied to the Total Calculated Fees: In this section, you can define additional fees or levies applied to the total calculated fees. These can be fixed fees or percentage-based fees. As above, you can choose to Add to add a fee or levy just for this permit or you can choose one from the Fee Library. To create a new one, choose Add to open the Additional Fee Options Window.
- Fee Name: Define the fee (e.g., Permit Issuance Fee, State Surcharge Fee).
- Type: Choose between a flat fee (a fixed amount) or percent (a percentage of the total calculated fee).
- Amount: Set the amount for the fee.
- Examples:
- Permit Issuance Fee: Flat fee of $5
- State Surcharge Fee: Percentage of 2%
- Finalizing the Fee Setup: Once you have configured the fee settings, click Save to apply the changes. You can always come back to Edit the fee settings if you need to adjust them later.
- To close the configuration, click Close.
- Fees/Levies Applied to the Total Calculated Fees: In this section, you can define additional fees or levies applied to the total calculated fees. These can be fixed fees or percentage-based fees. As above, you can choose to Add to add a fee or levy just for this permit or you can choose one from the Fee Library. To create a new one, choose Add to open the Additional Fee Options Window.
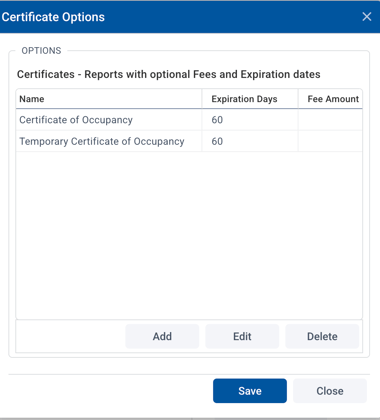
- Enable Certificates: Certificate templates can be added when permits are configured. These certificates can include reports like Certificate of Occupancy or Temporary Certificate of Occupancy, with optional expiration dates and fees.
-
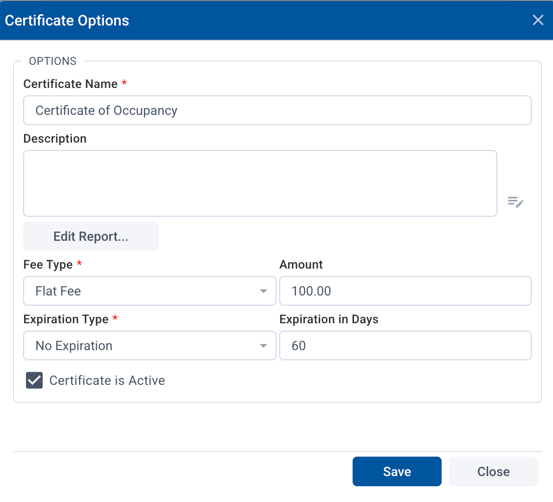
- Once certificates are enabled, you can choose Add to create a new one, then configure using the following options.
-
-
- Name & Description: Name and description of Certificate.
- Fee Type: No fee, Flat Fee or a Percentage
- Fee Amount: Enter the fee charged for the certificate (e.g., $50).
- Expiration Type: No expiration or expires in days
- Expiration Days: Specify the number of days after which the certificate will expire (e.g., 60 days).
-
-
- Edit: If you need to modify an existing certificate, click the Edit button next to the certificate name. Make any necessary changes to the Expiration Days or Fee Amount, and then click Save.
- Once they have been created, under Certificate Options, you will see a list of Certificate Types (e.g., Certificate of Occupancy, Temporary Certificate of Occupancy), along with their Expiration Days and Fee Amount.
- Edit: If you need to modify an existing certificate, click the Edit button next to the certificate name. Make any necessary changes to the Expiration Days or Fee Amount, and then click Save.
- Enable Notifications - Send Permit Email on Status Change: If you want the system to send an email every time a permit status changes, enable this notification option.
- Custom Email Text: You can also customize the email text that is sent with the permit status change notifications. This allows you to tailor the message to the recipients.
- Custom Email Text: You can also customize the email text that is sent with the permit status change notifications. This allows you to tailor the message to the recipients.
7. Inspections
Inspections play a crucial role in the License, Permits & Inspections workflow. If your organization is licensed for inspections, you can enable this functionality and configure it to work with your form's workflow.
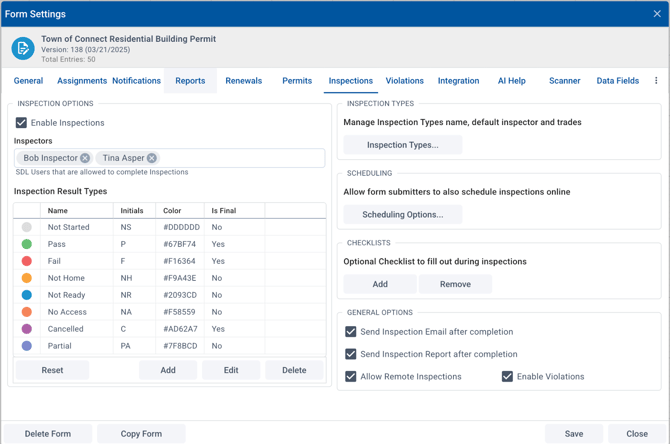
Check the Enable Inspections box to activate the inspection functionality for the form.
-
Important: If you are not licensed for inspections, the option will be grayed out and unavailable.
Adding Inspectors: Once inspections are enabled, you can assign inspectors to handle the inspections for the form.
-
Click on the Add button. You can see a list of available inspectors. From the list, select the inspectors (e.g., Bob Inspector, Tina Asper) who will be allowed to complete inspections for this form.
-
The selected inspectors will be able to conduct inspections and complete reports through the web or Mobile App for inspectors.
Modifying Inspection Result Types: Inspection results are categorized by specific result types that determine the outcome of an inspection. You can customize these result types to fit your needs.
-
Inspection Result Types: These are the different categories an inspection can fall under, such as:
-
Not Started (NS) – Inspection hasn't begun yet.
-
Pass (P) – Inspection passed.
-
Fail (F) – Inspection failed.
-
Not Home (NH) – The property owner wasn’t available for inspection.
-
No Access (NA) – The inspector couldn’t access the property.
-
Cancelled (C) – The inspection was canceled.
-
Partial (PA) – The inspection was partially completed.
-
-
You can Edit or Delete existing result types or Add new ones as necessary.
-
Click the Add button to create a new result type.
-
Provide the Name, Initials, and select a Color.
-
Indicate whether the result is final (i.e., no further action required after this result).
-
Scheduling Inspections: You can allow applicants to schedule inspections online. Under the Scheduling section, enable Allow form submitters to also schedule inspections online.
Checklists: Checklists can be created and used during inspections to ensure all necessary items are inspected and documented.
-
Checklists are managed in Admin Settings → Settings → Checklists.
-
You can create custom checklists that inspectors will need to fill out during the inspection process.
-
Optional Checklists can be added to the inspection form, which will be visible to inspectors during the inspection process.
-
Additional Options
-
Send Inspection Email After Completion: Enable this option to automatically send an email to relevant stakeholders once an inspection is complete.
-
Send Inspection Report After Completion: Check this box if you want the system to automatically send an inspection report after it’s completed.
-
Allow Remote Inspections: You can enable this option if you want to allow inspectors to conduct inspections remotely.
-
Enable Violations: If violations are part of the inspection process, you can enable this option. It allows inspectors to document any violations found during the inspection.
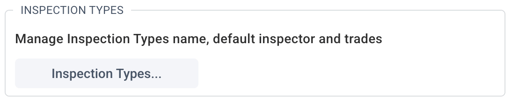
Inspection Types
Inspection types define the different categories of inspections associated with a form. Various inspection types can be created, default inspectors assigned and optional fees can be associated for each inspection type.
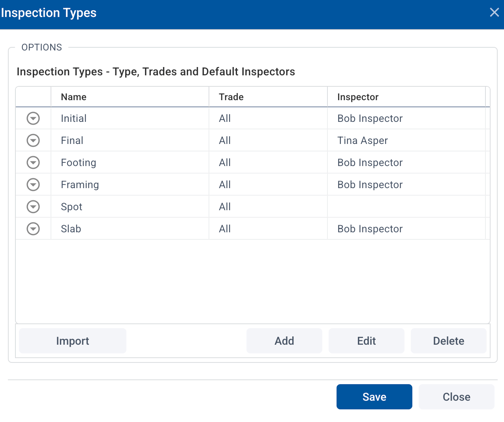
Adding New Inspection Types: You can define different inspection types based on the nature of the inspection (e.g., Initial, Final, Footing, etc.).
-
Click the Add button to create a new inspection type.
-
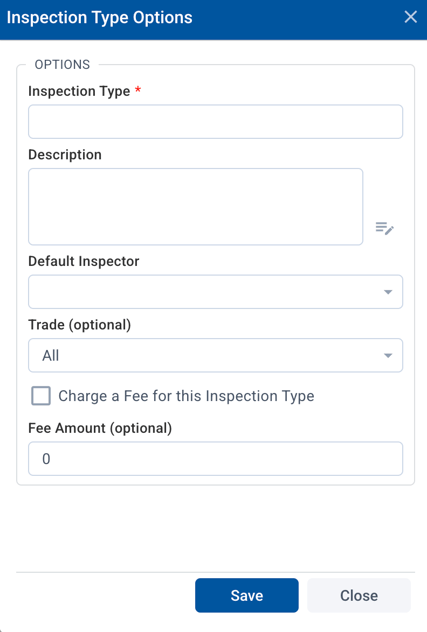
In the Inspection Type Options window:
-
Enter the Inspection Type Name (e.g., Final, Spot, Framing).
-
Add a Description: Optionally provide more details about the inspection type.
-
Assign a Default Inspector: Select the default inspector (e.g., Bob Inspector, Tina Asper) who will be assigned this inspection type by default.
-
Set the Trade (Optional): Choose a specific trade (e.g., Electrical, Plumbing), or select All if the inspection type applies to all trades.
-
Charge a Fee (Optional): Check this box if you want to charge a fee for this inspection type. You can then specify the Fee Amount.
-
-
Save to add the inspection type to the list.
Modify Existing Inspection Types: You can edit or delete existing inspection types as needed.
-
To modify an existing inspection type, click Edit next to the inspection name.
-
You can change the Description, Default Inspector, and Trade.
-
You can also add or remove the fee if necessary.
-
-
To delete an inspection type, click Delete next to the inspection name.
You can use the Import button to import existing inspection types from another source if needed.
Inspection Scheduling
The Inspection Scheduling Options allow you to manage how inspections are scheduled after form submissions. You can enable users to select inspection dates, define daily inspection limits, and ensure the inspection process integrates smoothly with your form submission and approval workflow.
Enabling Inspection Scheduling
To configure inspection scheduling after form submission:
-
Go to the Inspections tab in Form Settings.
-
In the Scheduling section, you will see the option to configure the Inspection Scheduling Options.
Configuring Scheduling Options
-
Automatically Create the Inspection: This option allows you to automatically create an inspection based on the Appointment Schedule timeslot selected by the user when they submit the form. The user selects an available time slot, and the inspection is created accordingly. You can later change the inspection date and time if needed.
-
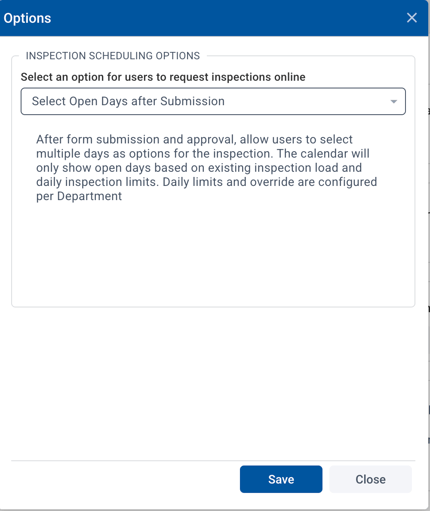
Select open days after submission: After form submission, you can allow users to select open days after submission and choose from three days for the inspection. The calendar will show available days based on:
-
Existing inspection load (how many inspections are scheduled).
-
Daily inspection limits (maximum number of inspections allowed per day).
-
-
No Online Inspection Requests: If you do not want to allow users to request inspections online, ensure that this option is disabled in the Inspection Scheduling Options.
8. Violations
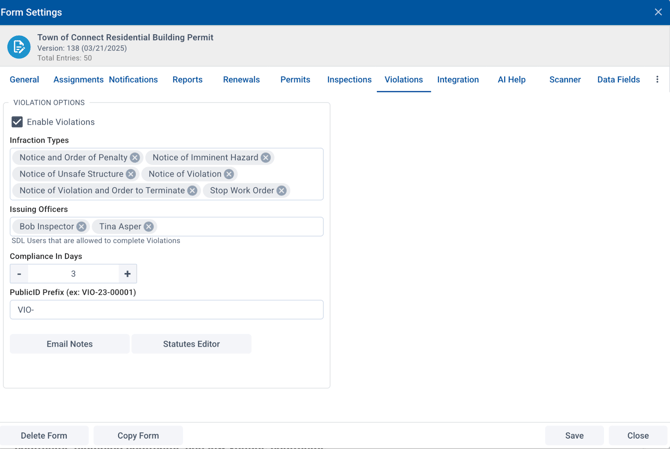
The Violations feature in CONNECT allows you to manage and track violations associated with permits. You can define different infraction types, assign officers to issue violations, and configure the compliance requirements and ID formatting. Here’s how you can configure the violation settings for your form.
- Enabling Violations: To start using violations for your form, you need to enable the violations feature:
- Go to the Violations tab in Form Settings.
- Check the box Enable Violations to activate the violation management functionality for the form.
- Defining Infraction Types: You can set up different types of infractions that can be issued as violations. These infraction types categorize the nature of the violation.
-
- Infraction Types available:
- Notice and Order of Penalty
- Notice of Imminent Hazard
- Notice of Unsafe Structure
- Notice of Violation
- Notice of Violation and Order to Terminate
- Stop Work Order
- Notice and Order of Penalty
- Infraction Types available:
-
- To add or manage these infraction types:
- Step 1: Click on the checkboxes to select the relevant violation types for this form.
- Step 2: You can also modify the names of existing infraction types if needed by clicking the Edit button next to each type.
- To add or manage these infraction types:
- Assigning Inspectors and Officers: You can assign officers (inspectors) responsible for issuing violations.
- Step 1: Under Issuing Officers, add the inspectors or officers who can issue violations. For example, you can assign Bob Inspector and Tina Asper as issuing officers.
- Step 2: Select from a list of available SDL Users who will be authorized to complete violations for this form.
- Setting Compliance Requirements: Compliance is an essential part of managing violations. This feature allows you to set the number of days within which the violation should be rectified.
- Step 1: Under Compliance In Days, set the number of days allowed for compliance after the violation is issued. For example, you can set 3 days as the default compliance time.
- Configuring Public ID Prefix: The Public ID is used to uniquely identify each violation. You can set a prefix for the violation ID.
- Step 1: In the PublicID Prefix field, enter a custom prefix for the violation ID. For example, you can set VIO- as the prefix for violation IDs like VIO-23-00001.
- Email Notes and Statutes Editor: You can customize the communication and legal aspects of the violations by using the following tools:
- Email Notes: You can add notes to the violation email templates for better communication when a violation is issued.
- Click on Email Notes to configure the message to be sent when a violation is issued or updated.
- Statutes Editor: Use this tool to define the legal basis or statutes for the violation, ensuring that all violations are in line with the law.
- Click on Statutes Editor to edit or add the legal language associated with the violation types.
- Click on Statutes Editor to edit or add the legal language associated with the violation types.
- Email Notes: You can add notes to the violation email templates for better communication when a violation is issued.
9. Integration
The Integration tab in CONNECT allows you to configure how your form interacts with external systems, integrates into websites, and provides easy access for users through sharing links or QR codes. Here’s how you can set up and manage form integration, embedding, and sharing options.
Things to remember:
- YOU MUST check “Add Form to SDL Portal Requests page” for the form to show up on the Portal where Citizens can see various online applications, permits, forms, etc.
- Check “Add to Datagrid to SDL Online” is more for NJ Clients.
- Forms can be used as Templates, either internally to a town or for Public (All Connect Towns) to use.
- This is also where a placard can be printed to include a QR code.
- Example: Towns that use forms for recycling credits may choose to print a placard with a QR code. When citizens come into the local office, they can scan the QR code.
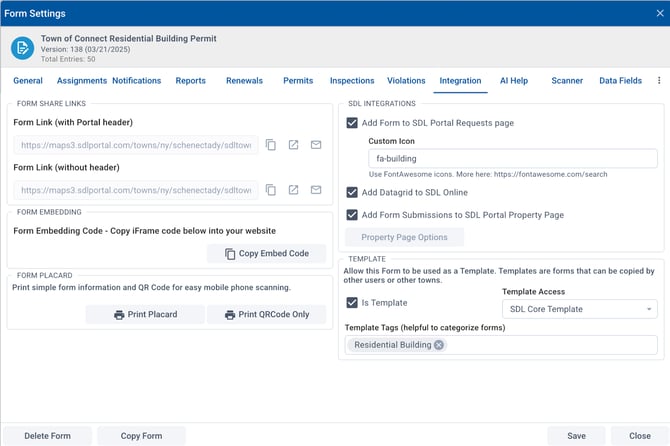
Form Share Links:
Form links are essential for providing direct access to your form. You can share your form using the link with or without the portal header.
-
Form Link (with Portal header): This is the link that includes the portal header for users accessing the form.
-
Step 1: Copy the URL from the Form Link (with Portal header) field to share the form with the portal header.
-
-
Form Link (without header): This link omits the portal header and directly opens the form for users.
-
Step 1: Copy the URL from the Form Link (without header) field to share the form without the portal header.
-
-
These links can be shared through emails, on websites, or within internal communications.
Form Embedding
If you want to embed the form directly into a website or external page:
- Step 1: Under the Form Embedding section, click Copy Embed Code. This will copy the iFrame code needed to embed the form on your website.
- Step 2: Paste the iFrame code into the HTML of the website where you want the form to appear.
This allows users to fill out the form directly on your site without having to navigate away.
Form Placard and QR Code
You can print a Placard or QR Code for easy access to the form using mobile devices:
- Print Placard: The placard includes the form link and QR code for easy physical distribution.
- Step 1: Click the Print Placard button to generate a printable placard.
- Step 1: Click the Print Placard button to generate a printable placard.
- Print QR Code Only: This option generates a QR code that users can scan with their phones to access the form directly.
- Step 1: Click Print QR Code Only to generate a printable QR code.
- Step 1: Click Print QR Code Only to generate a printable QR code.
These options are helpful for offline distribution or placing the form in public spaces where users can easily access it.
SDL Integrations
Integrating with the SDL Portal enhances the form's functionality and allows data to flow between the form and other SDL services.
- Add Form to SDL Portal Requests Page: This option makes your form available on the SDL portal’s Request page for users to access.
- Step 1: Enable this option to add the form to the SDL Portal Requests page.
- Step 1: Enable this option to add the form to the SDL Portal Requests page.
- Add Datagrid to SDL Online: You can integrate your form’s data into the SDL Datagrid for easier data management and display.
- Step 1: Enable this option to add your form’s data to SDL Online.
- Step 1: Enable this option to add your form’s data to SDL Online.
- Add Form Submissions to SDL Portal Property Page: This option integrates form submissions with the SDL Portal Property Page for better tracking and management.
Template Settings
If you want to create a reusable form template:
- Step 1: Under the Template section, check the box labeled Is Template to mark the form as a template that can be copied by other users or towns.
- Step 2: Select Template Access to define who can access the template (e.g., SDL Core Template).
- Step 3: Use Template Tags to categorize the form, such as Residential Building, to make it easier to find and identify.
This allows other users or departments to reuse and customize the form for their needs.
6. Finalizing Integration Settings
Once you have configured all the integration and sharing options, click Save to apply the settings.
- If you are done, click Close to exit the configuration page.
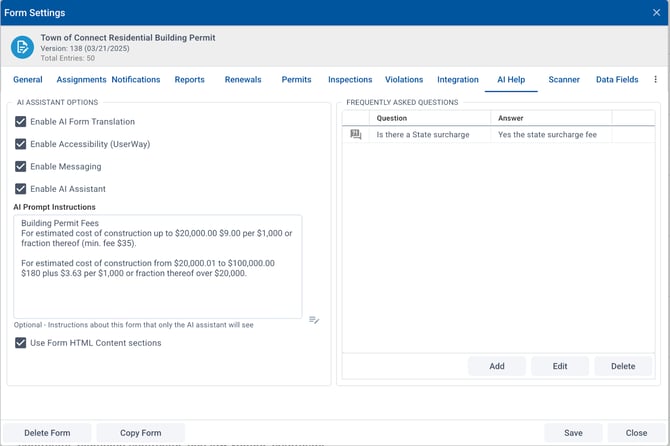
10. AI Help
The AI Help tab is where AI Assistant Options are configured. These are used to enhance the user experience by providing assistance through AI-driven translations, messaging, and answering questions using a list of frequently asked questions (FAQ) and HTML content.
-
Enable AI Form Translation: This allows the AI to translate the form into different languages for non-English speakers. This is enabled per form.
-
Enable Accessibility (UserWay): This option enables the UserWay accessibility widget on forms and provides features for users with disabilities, helping to meet web accessibility standards.
-
Enable Messaging: This option allows you to enable messaging functionality within the form. Using the AI assistant widget, an applicant can choose to interact with a “human” to have a two-way messaging conversation with a municipal employee. Searchable conversations are maintained in the Message Center under Public Conversations and associated with a public user’s account.
-
Enable AI Assistant: When enabled, the AI Assistant widget will appear on the form the applicant engages with. When clicked, it will help answer questions, provide instructions, and assist users with filling out the form based on the options used to aid in answering questions. See sections below.
Searchable conversations are maintained in the Message Center under Public Conversations and associated with a public user’s account. The AI Assistant uses Google Vertex AI and content is not used to train AI models.
-
AI Prompt Instructions: Enter relevant instructions that the AI assistant should use to assist users. For example, you might enter fee calculation instructions for building permits. This is an optional section where the content used would not be visible to applicants.
-
Using the HTML content sections can also be selected. This is especially helpful if there are instructions outlining requirements on the form itself that can be used to answer questions.
-
-
Frequently Asked Questions (FAQ): Add frequently asked questions that the AI assistant can refer to when answering users' queries.
-
Examples:
-
-
-
- Question: "Is there a State surcharge?"
- Answer: "Yes, the state surcharge fee is 2%.”
- Question: "Is there a State surcharge?"
-
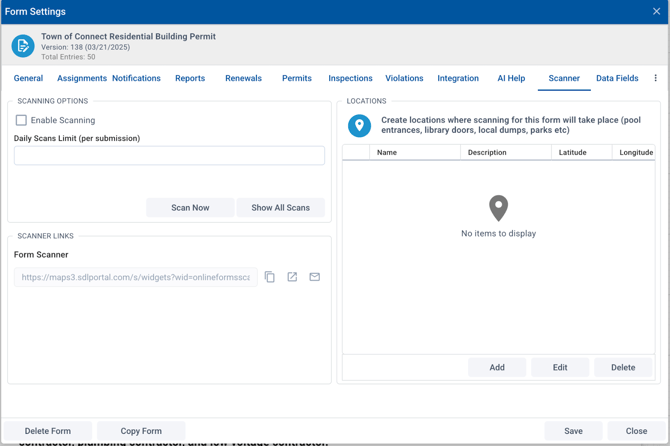
11. Scanner
The Scanner tab is useful for events or locations where users need to show proof of purchase, participation, or authorization. Select “Enable Scanning” to set up scanning limits, links and to specify locations where scanning will take place. This allows for tracking and managing scanned QR codes or barcodes related to specific form submissions.
-
Daily Scan Limits: Set a limit on the number of scans that can be processed each day. This is useful for events or locations where a specific number of scans are allowed per day.
-
Enter the maximum number of scans that can be completed per day for a given submission. For example, if each citizen can use their QR code up to 5 times a day, set the daily limit to 5.
-
Once enabled, internal users will be able to track how many scans have been completed for the form and check whether the daily limit has been reached.
-
-
Scan Now: Initiates a scan manually.
-
Show All Scans: View a list of all scans completed for this form.
-
Scanner Links: You can share a direct link to the Form Scanner page, which will allow the QR code for the form to be scanned. Copy the provided URL for the Form Scanner. Share this URL with the relevant users (e.g., event staff or internal users) so they can access the scanner page and track scans.
-
Scan Locations: To ensure that scans are taking place at the correct location (e.g., event entrances or specific areas), you can set up scan locations.
-
Add Location: To create a new scan location specifying a name, (e.g., Event Entrance), a Description of the location, and the Latitude and Longitude to specify the geographical location of the scan point.
Use Case: Raritan Township, NJ uses scanning functionality for recycling credits used at the Town Dump & Recycling Center, the location can be specified to track usage at the center’s entrance.
-
- Citizens purchase a specified quantity through the form.
- The QR code generated for the purchase is scanned each time they visit, which deducts from the quantity they have available.
- The internal system tracks how many scans have been completed and deducts the number accordingly.
- This setup helps monitor the usage and ensures that individuals can only use their purchases within the specified limits.
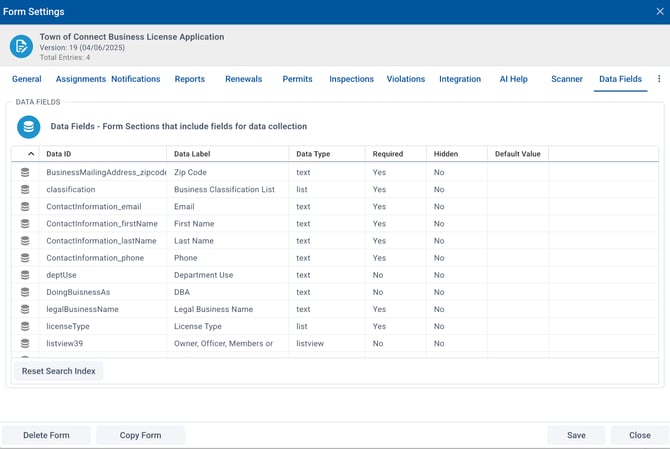
12. Data Fields
The Data Fields tab is a view of the fields available for data collection, which are used for reports, workflow intelligence, and other backend operations. While you can’t directly edit, delete, or copy data fields from this tab, the DataIds defined with the initial setup of a form ensure the fields are organized in a way for effective data management.
Proper DataID naming conventions are important to easily identify and use the fields for reporting and fee calculations.
-
Data Fields Table: The Data Fields section displays the following columns:
-
-
Data ID: This is the unique identifier for each field (e.g., licenseType, ). Using a clear naming convention for DataIds is key to ensuring they are easily identifiable and can be used in form logic and fees. Avoid generic names like text1, text2, etc.
-
Some core system fields require a specific DataId for fields to auto-populate on submissions. These will often be greyed out in the form designer to eliminate error in data population.
-
-
Data Label: The label shown on the form for the field (e.g., First Name, Email).
-
Data Type: Specifies the type of data being collected, such as:
-
text: For free-text fields.
-
bool: A boolean (Yes/No) field.
-
list: A dropdown menu with predefined options.
-
- Required: Indicates if this field is mandatory for submission (Yes/No).
- Hidden: Whether this field is visible to the user (Yes/No). Hidden fields can be used for internal tracking or data collection.
- Default Value: The default value that will be pre-filled in the field, if any (e.g., a default state or country). This is configured in the form designer for an application.
-
13. Versions
Tracks the version history of a form template, providing insights into when changes or updates were made.
Form Versions: The version history is presented in a list format that includes the following columns:
- Version Number: Displays the version of the form template (e.g., Version 138).
- Date / Time Saved: Shows when the form template was saved, including the exact date and time.
- Saved By: Indicates the user who made the changes and saved the version of the form template.
This view helps you identify when updates occurred and who was responsible for them.
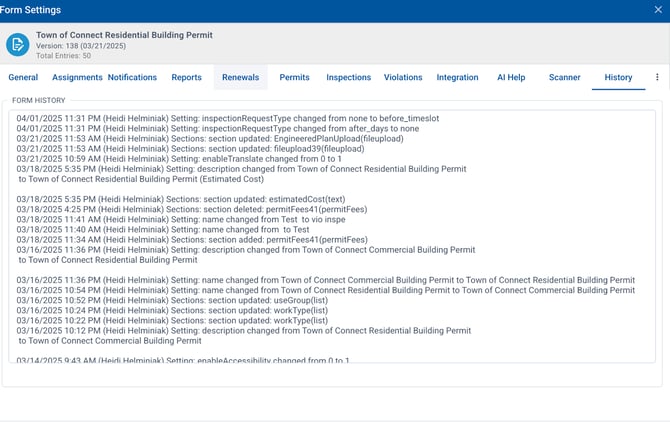
14. History
The History tab provides an audit trail of actions taken on a specific form. This is useful for tracking updates, changes, and configurations made by various users. You can easily see who made the changes and when they occurred, making it an essential tool for tracking form management and maintaining a history of activity. Each action is listed chronologically, making it easy to track the progression of changes.
-
Understanding the History Log: The History tab displays the following details for each action or activity.
-
Date / Time: The date and time when the update or change was made.
-
User: The user who made the change or update (e.g., John Smith).
-
Action Description: A description of what was changed, updated, or added.